
AWS infrastructure with Terraform
In the first part of this tutorial we are going install Terraform and AWS CLI to deploy some AWS services.
What is Terraform?
Terraform is a tool for building, changing, and versioning infrastructure safely and efficiently. Terraform can manage existing and popular service providers as well as custom in-house solutions.
Infrastructure as Code
Infrastructure is described using a high-level configuration syntax. This allows a blueprint of your datacenter to be versioned and treated as you would any other code. Additionally, infrastructure can be shared and re-used.
Installation of Terraform in Windows
First, ensure that you are using an *administrative shell* - you can also install as a non-admin, check out Non-Administrative Installation.
With PowerShell, you must ensure Get-ExecutionPolicy is not Restricted. We suggest using Bypass to bypass the policy to get things installed or AllSigned for quite a bit more security.
Run
Get-ExecutionPolicy
. If it returns Restricted, then run
Set-ExecutionPolicy AllSigned
or
Set-ExecutionPolicy Bypass -Scope Process
Now run the following command:
Set-ExecutionPolicy Bypass -Scope Process -Force; [System.Net.ServicePointManager]::SecurityProtocol = [System.Net.ServicePointManager]::SecurityProtocol -bor 3072; iex ((New-Object System.Net.WebClient).DownloadString('https://chocolatey.org/install.ps1'))
- Paste the copied text into your shell and press Enter.
- Wait a few seconds for the command to complete.
- If you don’t see any errors, you are ready to use Chocolatey! Type
chocoorchoco -?
Install the latest version of Terraform
choco install terraform
If you need an specific version of Terraform as an example 0.13.5
choco install terraform --version=0.13.5
Installation of Terraform in Linux
Ensure that your system is up to date, and you have the gnupg, software-properties-common, and curl packages installed. You will use these packages to verify HashiCorp’s GPG signature, and install HashiCorp’s Debian package repository.
$ sudo apt-get update && sudo apt-get install -y gnupg software-properties-common curl
Add the HashiCorp GPG key.
$ curl -fsSL https://apt.releases.hashicorp.com/gpg | sudo apt-key add -
Add the official HashiCorp Linux repository.
$ sudo apt-add-repository "deb [arch=amd64] https://apt.releases.hashicorp.com $(lsb_release -cs) main"
Update to add the repository, and install the Terraform CLI.
$ sudo apt-get update && sudo apt-get install terraform
TIP: Now that you have added the HashiCorp repository, you can install Vault, Consul, Nomad and Packer with the same command.
Install AWS CLI on Windows
-
Download and run the AWS CLI MSI installer for Windows (64-bit):
- For the latest version of the AWS CLI: chisl this link
Install AWS.Tools on Windows
You can install the modularized version of AWS Tools for PowerShell on computers that are running Windows with Windows PowerShell 5.1, or PowerShell Core 6.0 or later. For information about how to install PowerShell Core,
To install AWS.Tools on Windows using the Install-Module cmdlet
-
Start a PowerShell session.
Note
We recommend that you don’t run PowerShell as an administrator with elevated permissions except when required by the task at hand. This is because of the potential security risk and is inconsistent with the principle of least privilege.
-
To install the modularized AWS.Tools package, run the following command.
PS > Install-Module -Name AWS.Tools.Installer

Untrusted repository
You are installing the modules from an untrusted repository. If you trust this repository, change its InstallationPolicy value by running the Set-PSRepository cmdlet. Are you sure
 you want to install the modules from 'PSGallery'?
[Y] Yes  [A] Yes to All  [N] No  [L] No to All  [S] Suspend  [?] Help (default is "N"): y
If you are notified that the repository is “untrusted”, it asks you if you want to install anyway. Enter
yto allow PowerShell to install the module. To avoid the prompt and install the module without trusting the repository, you can run the command with the-Forceparameter.
Install VS Code editor
We will require use VS Code editor
Download VS Code from the following link :
and we need to add this plugin:
Create new user in AWS console
- In the console go to IAM users
- In the navigation pane, choose Users and then choose Add user.
- Type the user name for the new user called terraform
- Select the type of access this set of users will have. …
- Choose Next: Permissions.
- On the Set permissions page, specify how you want to assign permissions to this set of new users. Here the permission should be associated to the type of service or infrastructure you want to deploy. If you are learning you can choose AdministratorAccess but for production you should select the appropiate permission.
Setup AWS CLI
Run this command to quickly set and view your credentials, region, and output format. The following example shows sample values.
$ aws configure
AWS Access Key ID [None]: AKIAIOSFODNN7EXAMPLE
AWS Secret Access Key [None]: wJalrXUtnFEMI/K7MDENG/bPxRfiCYEXAMPLEKEY
Default region name [None]: us-west-2
Default output format [None]: json
Creating your first VPC
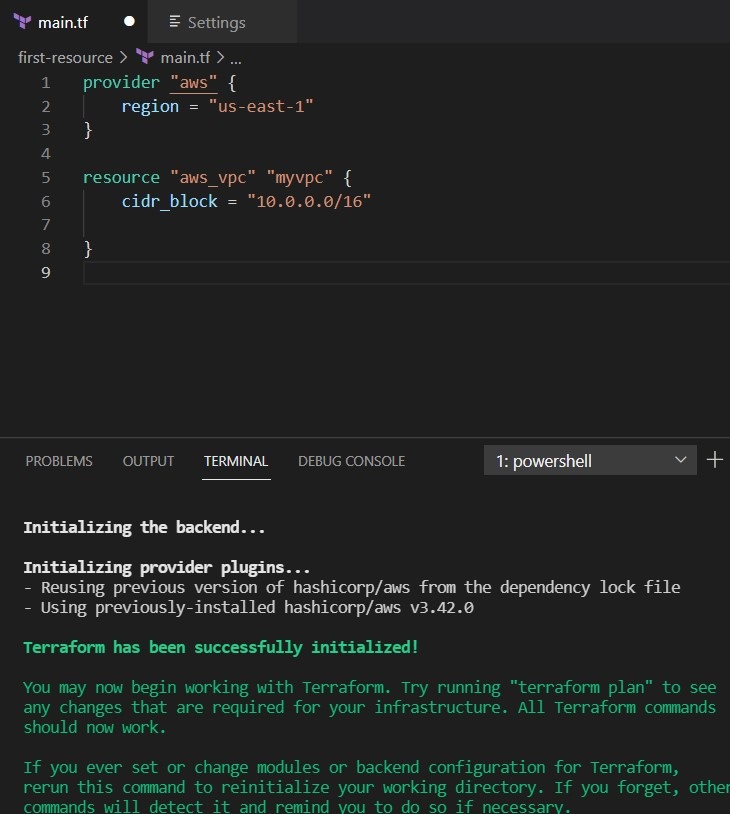
Let us first open vs code and create a folder called Terraform and inside of it create another folder called first-resource, later create new file called main.tf
provider "aws" {
    region = "us-east-1"
}

resource "aws_vpc" "myvpc" {
    cidr_block = "10.0.0.0/16"

}
then go to view and then click terminal and write
terraform init
Next is we want to check if our AWS credentials were introduced correctly we type in the terminal
terraform plan

the next command is apply, we type
terraform apply
and we write yes
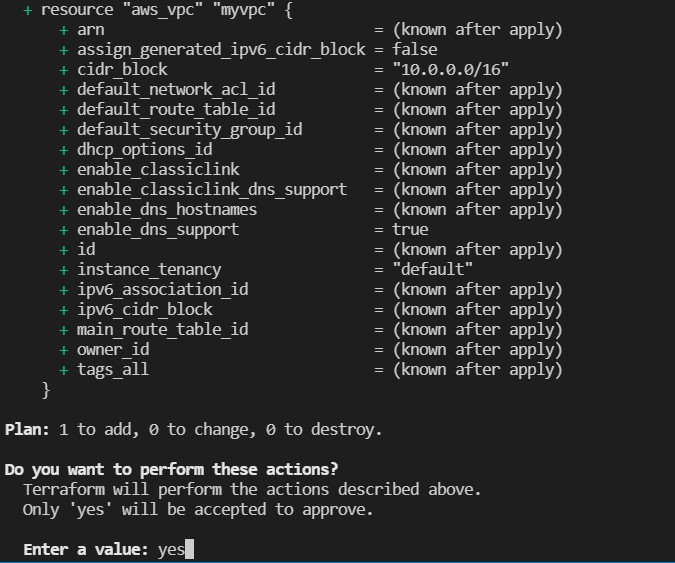
and then it is created the vpc

Let us check if was created in the AWS console and we go to the region were was created ang go to vpc
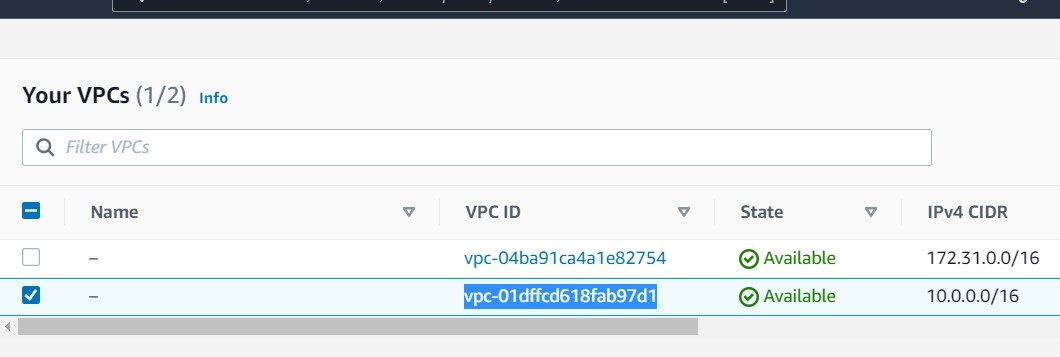
and it is exactly the same VPC ID that was shown in the terminal.
Now let us delete it with the command
terraform destroy
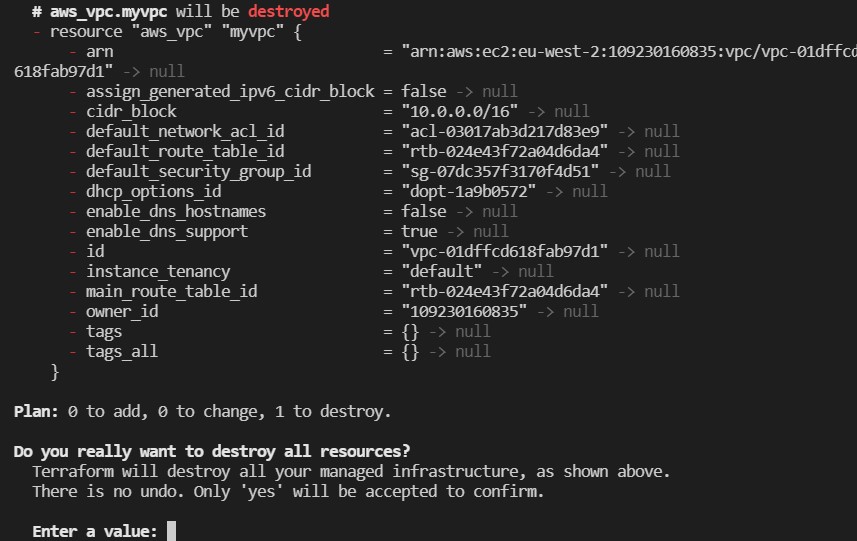
and then type yes
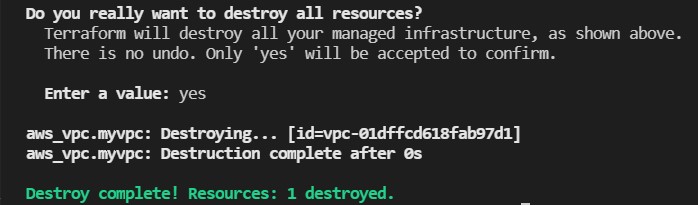
if you return back to the console, and refresh the windows, you can see that VPC it has been deleted

Basic Programming of Terraform
provider "aws" {
    region = "eu-south-1"
}


variable "vpcname" {
    type = string
    default = "myvpc"
}

variable "sshport" {

    type = number
    default = 22


}

variable "enabled" {
    default = true
  }

variable "mylist" {
    type = list(string)
    default = ["Value1", "Value2"]

}

variable "mymap" {
    type =  map
    default = {

        Key1 = "Value1"
        Key2 = "Value2"
    }


}


resource "aws_vpc" "myvpc" {
    cidr_block = "10.0.0.0/16"

    tags = {
      Name = var.vpcname
    }

}
we can work also with list
resource "aws_vpc" "myvpc" {
    cidr_block = "10.0.0.0/16"

    tags = {
      Name = var.mylist[0]
    }

}
we can work with map
resource "aws_vpc" "myvpc" {
    cidr_block = "10.0.0.0/16"

    tags = {
      Name = var.mymap["Key1"]
    }
}
Now if we want to control the input name
provider "aws" {
    region = "eu-south-1"
}

variable "vpcname" {
    type = string
    default = "myvpc"
}

variable "sshport" {

    type = number
    default = 22

}

variable "enabled" {
    default = true
  }

variable "mylist" {
    type = list(string)
    default = ["Value1", "Value2"]

}

variable "mymap" {
    type =  map
    default = {

        Key1 = "Value1"
        Key2 = "Value2"
    }


}

variable "inputname" {

    type =  string
    description = "Set the name of the VPC"

}

resource "aws_vpc" "myvpc" {
    cidr_block = "10.0.0.0/16"

    tags = {

        Name = var.inputname
    }

}
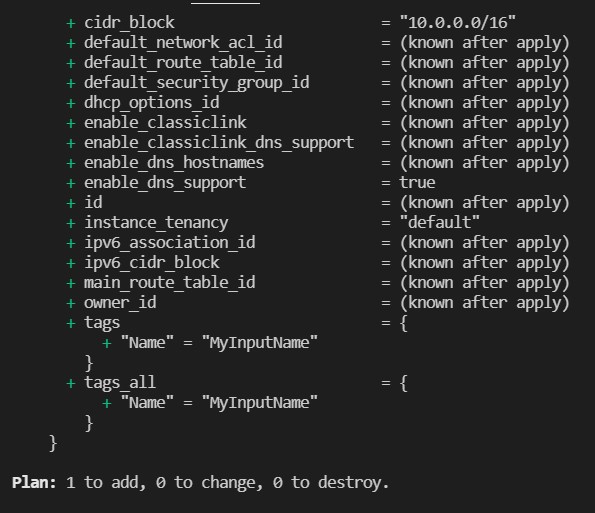
and we type on the terminal
terraform plan
and in the input type MyInputName and press enter
and it is displayed the following:
Now working with inputs
we include
output "vpcid" {

    value =  aws_vpc.myvpc.id

}
and we perform terraform apply
then type MyInputName and press enter and type yes and you got the following screen
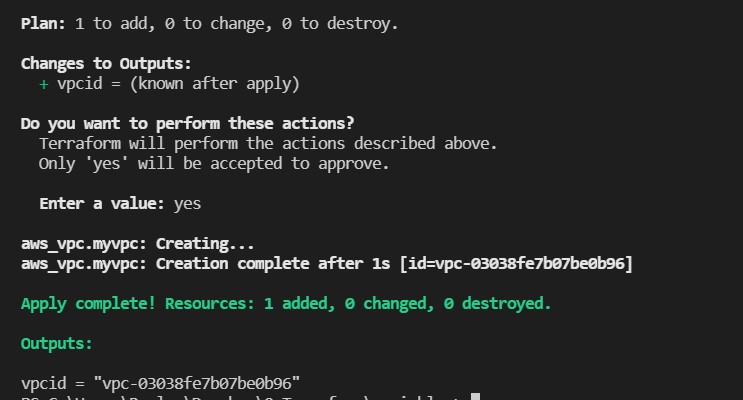
which shows the outputs the vpcid that you created.
Tuples and Objects
variable "mytuple" {
    type = tuple( string,number,string)
    default = ["cat",1,"dog"]

}

variable "myobjet" {
    type = object{name = string, port = list(number)})
    default = {
        name = "TJ"
        port = [22,25,80]
    }

}
EC2 instances with Terraform
A good documentation if found here https://registry.terraform.io/providers/hashicorp/aws/latest/docs/resources/instance
Let us create an instance, first at all let us enter to the AWS console and copy the name of the instance that you want to deploy
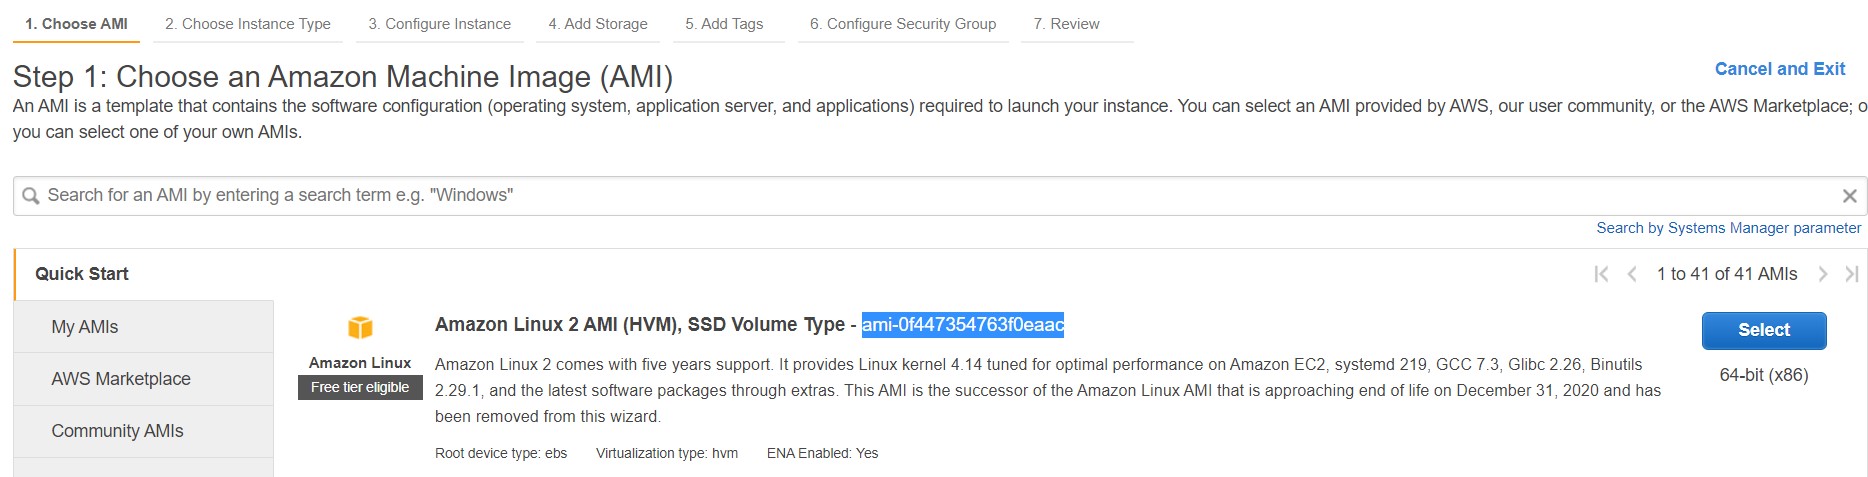
for my case I have copied ami-0f447354763f0eaac
Let us create a new folder named ec2 and inside we create a file called main.tf
provider "aws" {
    region =  "eu-south-1"
}
resource "aws_instance" "ec2" {
    ami = "ami-0f447354763f0eaac"
    instance_type = "t3.micro"
}
We go to the terminal and we go the ec2 folder and there we type terraform init and then terraform apply
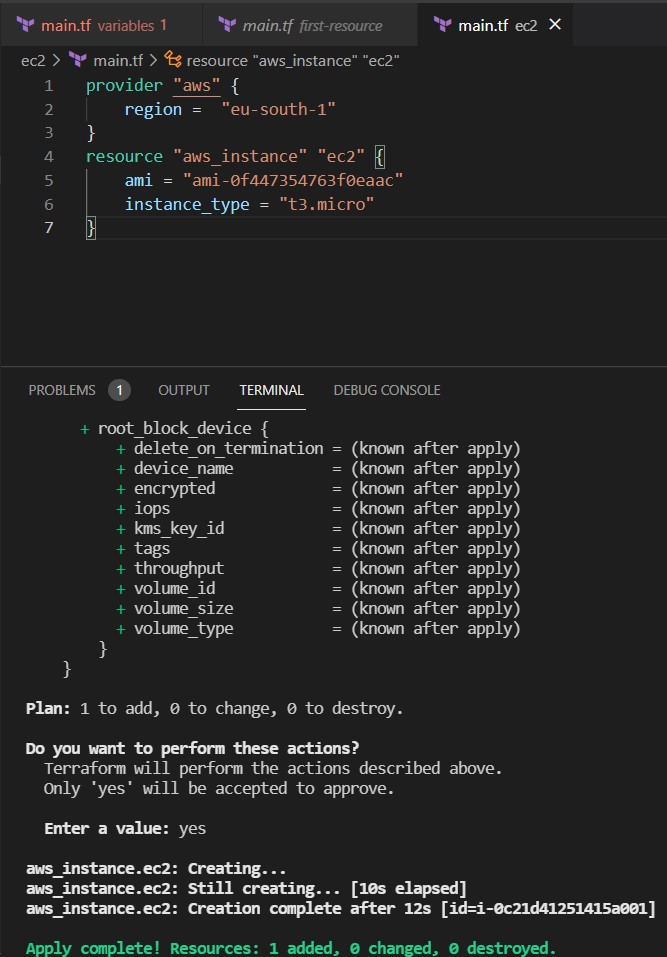
and if we check our console we can see our instance created

now we stop the instance with terraform destroy
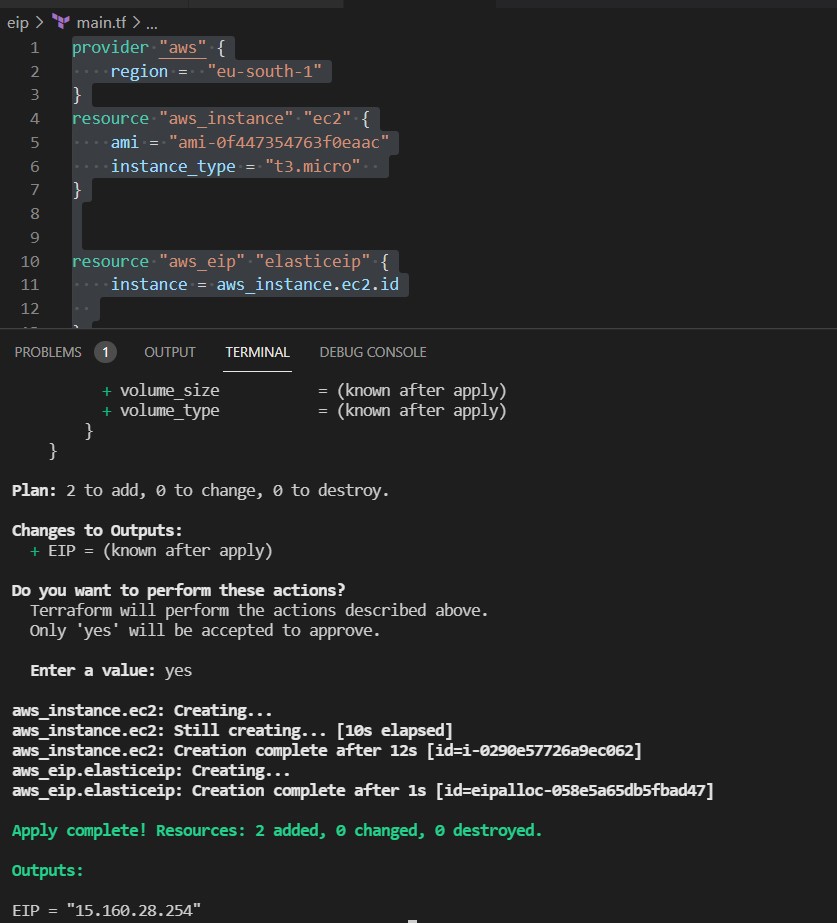
Now if we want to add aa elastic ip, we create a folder eip and there we create another file main.tf
provider "aws" {
    region =  "eu-south-1"
}
resource "aws_instance" "ec2" {
    ami = "ami-0f447354763f0eaac"
    instance_type = "t3.micro"
}


resource "aws_eip" "elasticeip" {
    instance = aws_instance.ec2.id

}

output "EIP" {
    value = aws_eip.elasticeip.public_ip
}
we type terraform init and then terraform apply in the folder eip
now we stop the instance and remove the elastic ip with terraform destroy

Congratulation we have practiced Terraform by using AWS.
Leave a comment