How to Generate Images in Python with Diffusion Models
Hello everyone, today we are going to explain how to load Diffusion models and how to generate images in Python. The goal is to guide you through the process of setting up the environment, loading various popular diffusion models, and creating visually stunning images.
In this comprehensive exploration, we will examine the following diffusion models, shedding light on their unique features and potential applications:
-
Stable diffusion xl base 1.0
-
DreamShaper 7
-
SDXL-Turbo
-
Dreamshaper xl v2 turbo
As diffusion models continue to revolutionize the AI landscape, they provide researchers and developers with powerful tools for image synthesis and text-to-image translation. These models open up new avenues for creativity, innovation, and problem-solving within artificial intelligence.
Introduction
Diffusion models generate images by simulating a reverse diffusion process, which consists of a series of carefully orchestrated steps that transform random noise into the desired output. The process can be broken down into the following stages:
- Data diffusion: The model starts with the original data (e.g., images) and gradually adds noise to them through a series of time steps. This process is called forward diffusion, and it continues until the original data is transformed into random noise. During this stage, the model learns the noise schedule and the corresponding probability distributions at each step.
- Training the denoising model: A denoising model is trained to predict the original data at each time step, given the noisy version generated in the previous step. This model learns to remove the noise and recover the original data from its noisy counterpart. This is typically done using a deep neural network, such as a convolutional neural network (CNN).
- Reverse diffusion for image generation: To generate new images, the model starts with random noise and iteratively refines it using the denoising model trained in the previous step. This process is called reverse diffusion. At each step, the denoising model predicts the less noisy version of the data, gradually transforming the random noise into a coherent image.
- Sampling: Once the reverse diffusion process is complete, the final generated image is obtained. This image is a sample from the learned probability distribution, and it should resemble the original data in terms of structure, style, and content.
The key advantage of diffusion models is their ability to generate high-quality images with fine-grained details and realistic textures. They have shown promising results in various applications, including image synthesis, text-to-image translation, and inpainting, competing with other popular generative approaches like GANs and VAEs.

Fashion-MNIST
For more details of diffusion model check out here my blog post about it. Get started with the creation of images.
Step 1: Create the environment
In ordering to generate images from a text you requires a GPU , you can use your local environment or use a cloud environment
Local Environment
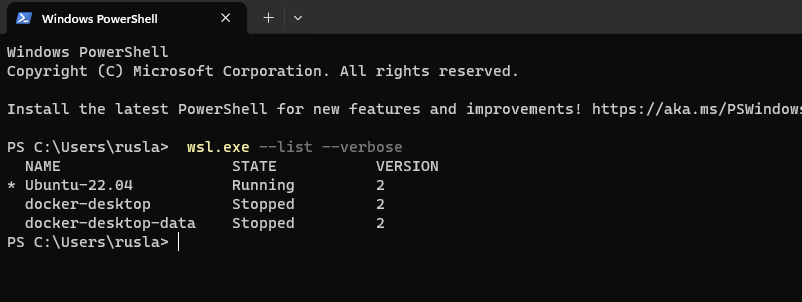
If you have Windows 11 and Ubuntu 22.04 wsl and you have a good Nvidia Graphics Card you can perform the following:
Open a Windows PowerShell

We ensure that the Windows Subsystem for Linux is running by opening PowerShell and running:
wsl.exe --list --verbose
Then we create our folder where we are going to build this project, in my case I will work in a external drive E:
You can your favorite drive, such as E: and then type
bash

then we can create our project let us call sd due to we remind it Stable Diffusion Models
mkdir sd
cd sd
First, we need to install Python on our computer, in this demo I will use Python 3.10.
sudo apt-get install python3.10 python3-pip
Create a symbolic link for python3 to point to python3.10. Run the following command:
sudo ln -sf $(which python3.10) /usr/bin/python
With Python already installed, you should have pip already installed. Be sure to use a pip that corresponds with Python 3 by using pip3 or checking your pip executable with
pip --version

and now we are ready to start write our python environment.
Cloud Environment
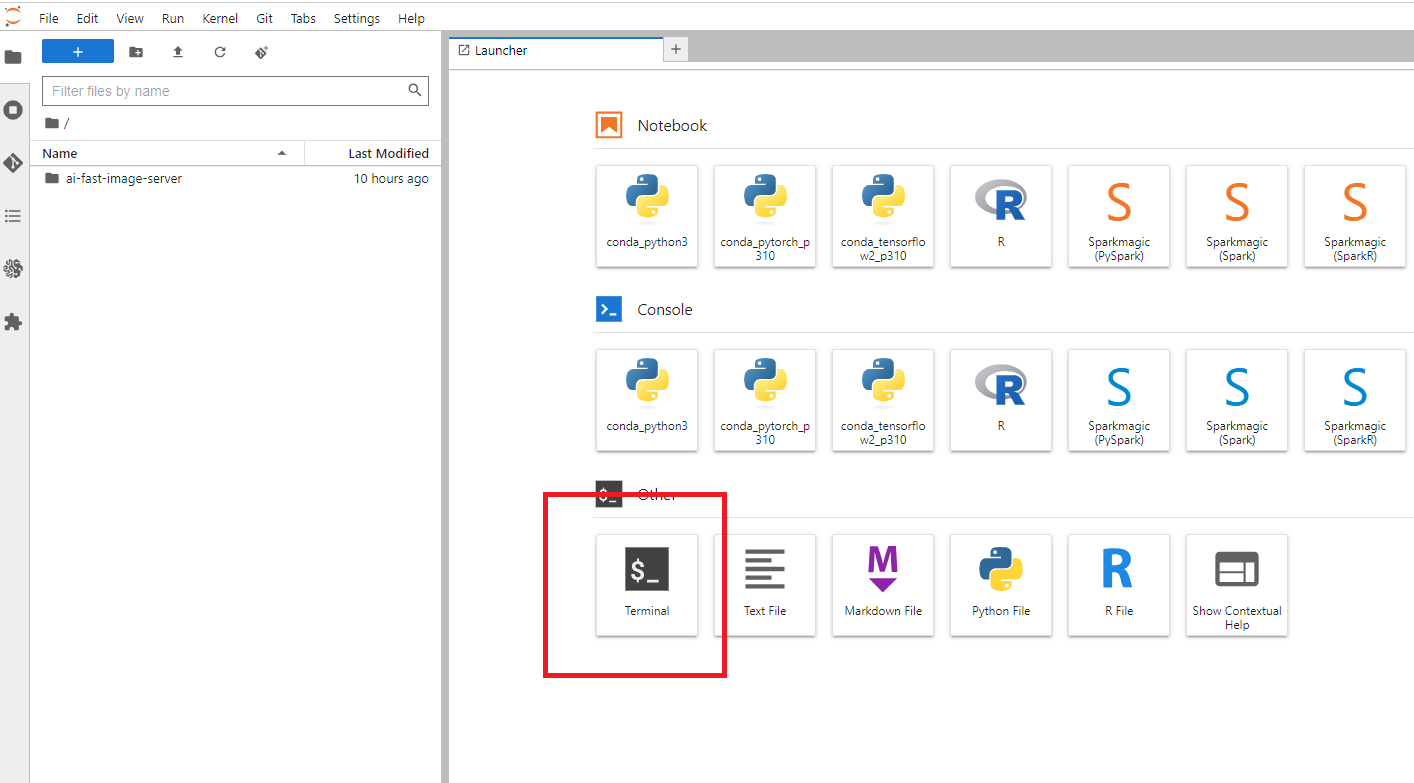
For the cloud environment we use SageMaker from AWS here we create a notebook instance with the ml.g4dn.xlarge with 50gb volume size.

and then after you click on ` open Jupyter Lab`

we go to the terminal
you type
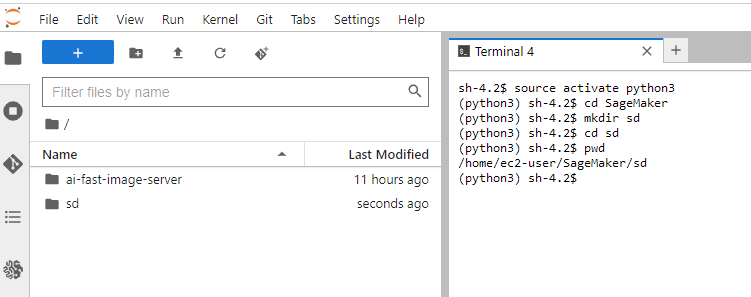
source activate python3
cd SageMaker
mkdir sd
and now we are ready to create our python environment.
Step 2: Create a Python virtual environment
A Python virtual environment allows one to use different versions of Python as well as isolate dependencies between projects. If you’ve never had several repos on your machine at once, you may never have felt this need but it’s a good, Pythonic choice nonetheless. Future you will thank us both!
Run the following command:
python -m venv venv
You’ll notice a new directory in your current working directory with the same name as your virtual environment.
Activate the virtual environment.
source ./venv/bin/activate
In your local env you have

In the cloud env you have

Now we are ready to install all the packages that we need .
Step 3: Notebook Installation
For the local and cloud environments we terminal type the following commands:
python -m pip install --upgrade pip
pip install ipykernel notebook ipywidgets
then
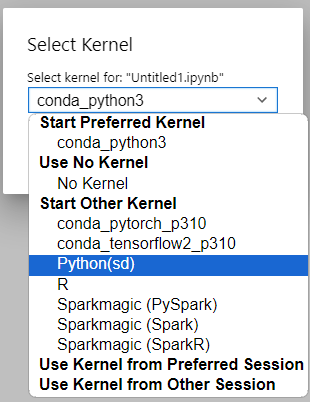
python -m ipykernel install --user --name sd --display-name "Python(sd)"
For the local environment:
You can install Jupyter lab
pip install jupyterlab
Now we can open our environment by typing
jupyter lab
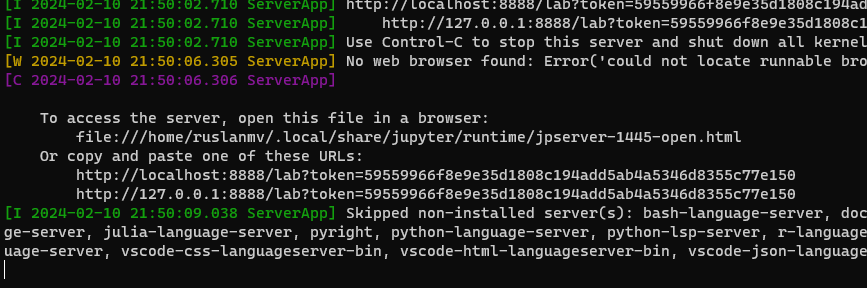
You should open your URL in my case
http://localhost:8888/lab?token=59559966f8e9e35d1808c194add5ab4a5346d8355c77e150
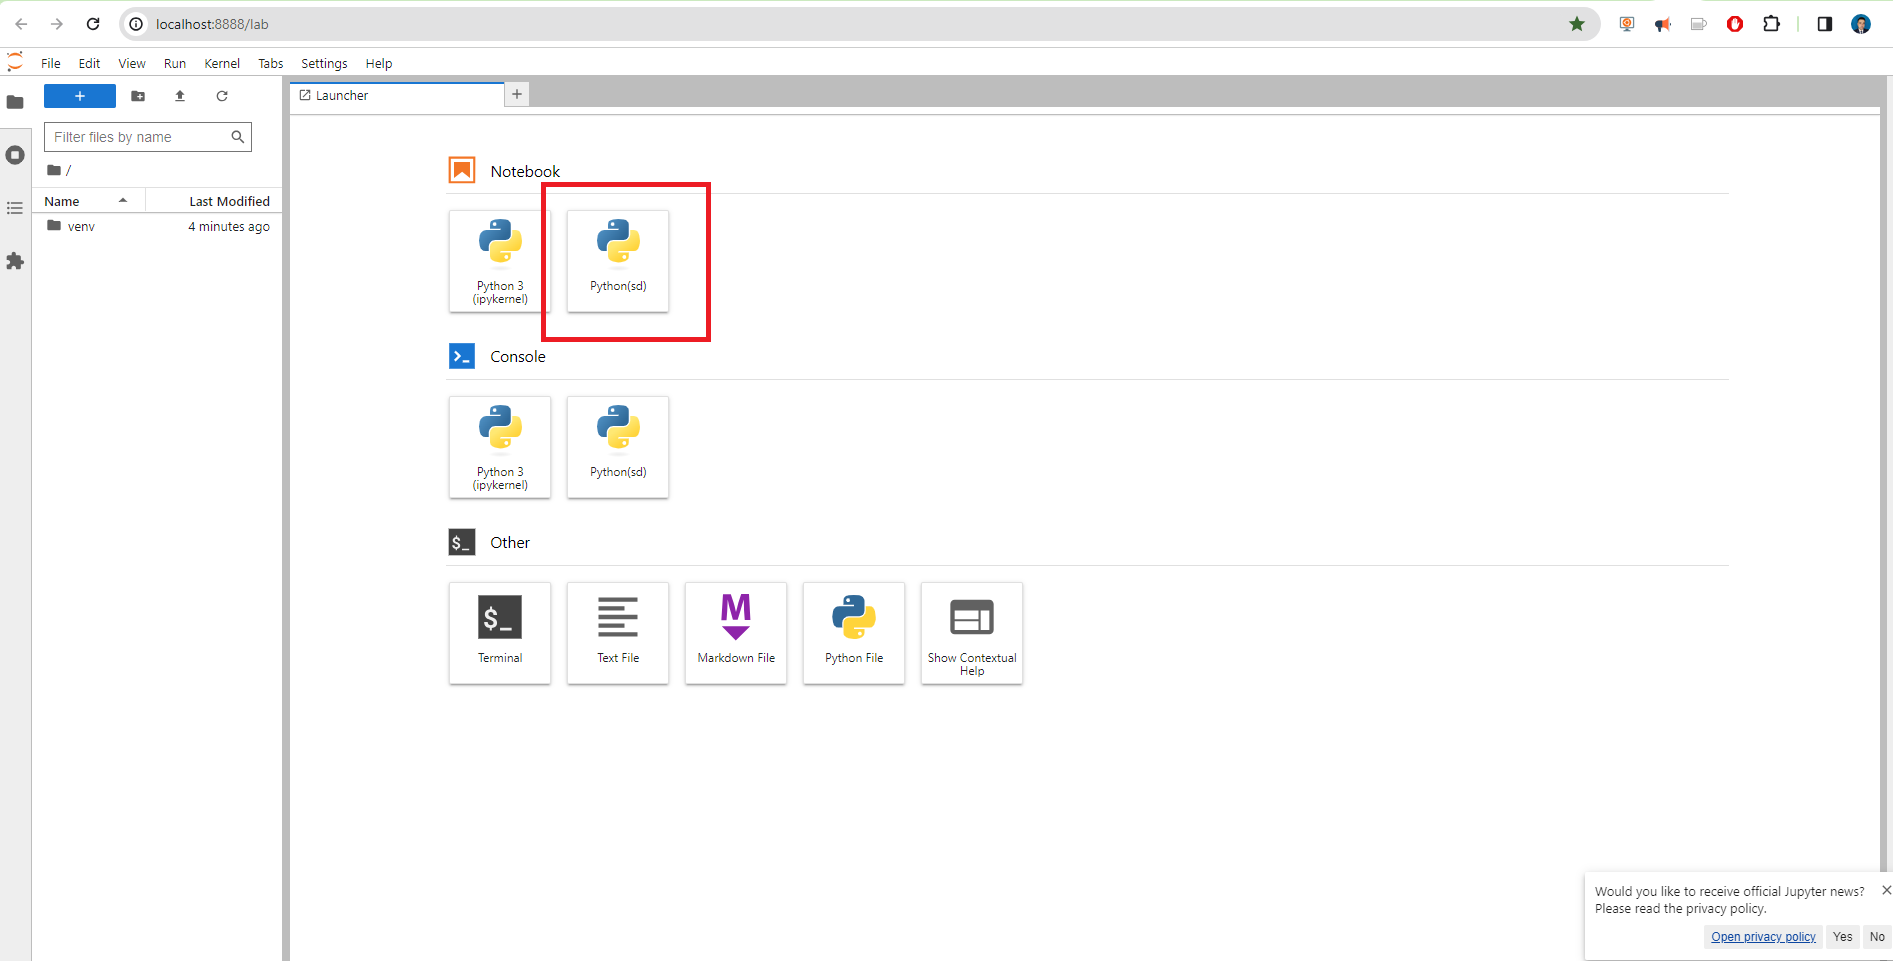
And you click Python(sd) and will be open our Jupyer notebook where we are going to work.
For the cloud environment:
We click File>New>Notebook
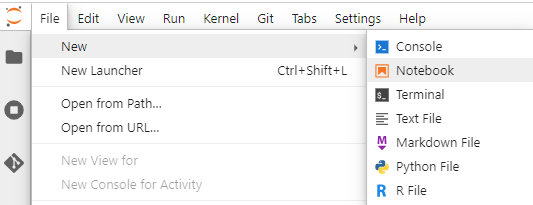
and we select just our environment created
and we are ready to work.
Step 4: Package Installation for Diffusion Models
First let us enter to the terminal and we install the libraries that we will use
source ./venv/bin/activate
pip install invisible_watermark transformers accelerate safetensors pandas xformers matplotlib
Step 5 . Diffusion Models for Image Generation
We will explore the fascinating world of diffusion models and their capability to generate images. We will dive into the workings of several popular diffusion models, gaining insights into their unique features and applications. By the end of this blog post, you will have a comprehensive understanding of diffusion models and be familiar with the following models:
-
Stable diffusion xl base 1.0
-
DreamShaper 7
-
SDXL-Turbo
-
Dreamshaper xl v2 turbo
Get started on this journey as we uncover the principles behind these diffusion models and witness their remarkable image generation capabilities.
Checking System Requirements
In order to run this notebook we requires a GPU
import os
import sys
# Use GPU
gpu_info = os.popen('nvidia-smi').read()
if 'failed' in gpu_info:
    print('Not connected to a GPU')
    is_gpu = False
else:
    print(gpu_info)
    is_gpu = True
print(is_gpu)

print("Python version:", sys.version)
print("Python executable path:", sys.executable)
Sun Feb 11 16:39:59 2024
+---------------------------------------------------------------------------------------+
| NVIDIA-SMI 535.104.12             Driver Version: 535.104.12   CUDA Version: 12.2     |
|-----------------------------------------+----------------------+----------------------+
| GPU  Name                 Persistence-M | Bus-Id        Disp.A | Volatile Uncorr. ECC |
| Fan  Temp   Perf          Pwr:Usage/Cap |         Memory-Usage | GPU-Util  Compute M. |
|                                         |                      |               MIG M. |
|=========================================+======================+======================|
|   0  Tesla T4                       On  | 00000000:00:1E.0 Off |                    0 |
| N/A   24C    P8               8W /  70W |      0MiB / 15360MiB |      0%      Default |
|                                         |                      |                  N/A |
+-----------------------------------------+----------------------+----------------------+

+---------------------------------------------------------------------------------------+
| Processes:                                                                            |
|  GPU   GI   CI        PID   Type   Process name                            GPU Memory |
|        ID   ID                                                             Usage      |
|=======================================================================================|
|  No running processes found                                                           |
+---------------------------------------------------------------------------------------+

True
Python version: 3.10.13 | packaged by conda-forge | (main, Oct 26 2023, 18:07:37) [GCC 12.3.0]
Python executable path: /home/ec2-user/SageMaker/sd/venv/bin/python
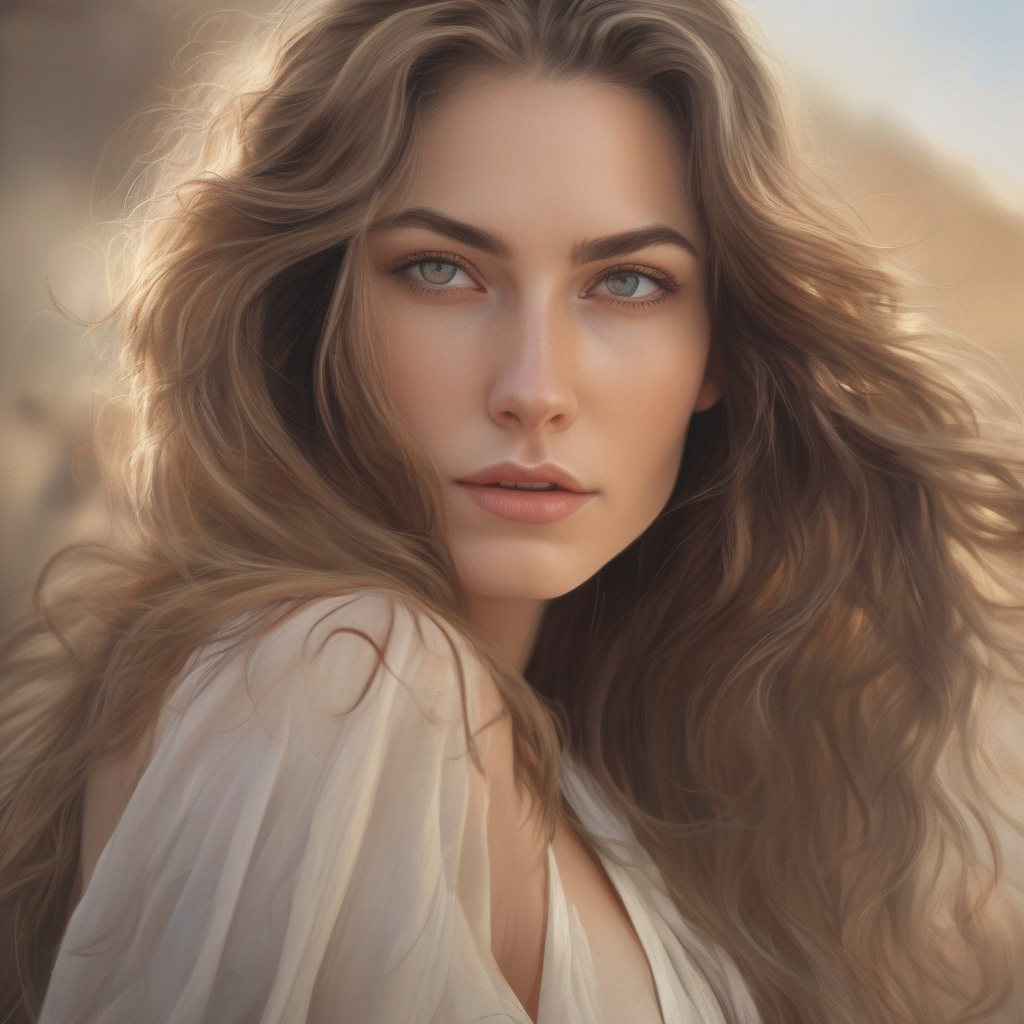
Stable diffusion XL base 1.0
The world of AI-powered image generation has taken a leap forward with the arrival of Stable Diffusion XL, or stable-diffusion-xl-base-1.0. This isn’t just another text-to-image model; it’s a groundbreaking ensemble of experts, meticulously orchestrated to translate your textual whims into stunning visuals. But beneath the artistic facade lies a complex, two-stage pipeline employing innovative techniques like latent diffusion.
We have already installed the packages but we can assure that our packages are already installed.
from IPython.display import clear_output
os.system("pip install diffusers --upgrade")
os.system("pip install invisible_watermark transformers accelerate safetensors")
# Clear the output
clear_output()
The stable-diffusion-xl-base-1.0 is an ensemble of experts pipeline for latent diffusion. It consists of a base model that generates (noisy) latents, which are then refined using a separate refinement model specialized for denoising.
# Get the current directory
import os
current_dir = os.getcwd()
model_path = os.path.join(current_dir)
# Set the cache path
cache_path = os.path.join(current_dir, "cache")
To just use the base model, you can run:
cache_path
'/home/ec2-user/SageMaker/sd/cache'
from diffusers import DiffusionPipeline
import torch

pipe = DiffusionPipeline.from_pretrained("stabilityai/stable-diffusion-xl-base-1.0",
                                         torch_dtype=torch.float16,
                                         use_safetensors=True, variant="fp16",
                                        cache_dir=cache_path)
pipe.to("cuda")
clear_output()
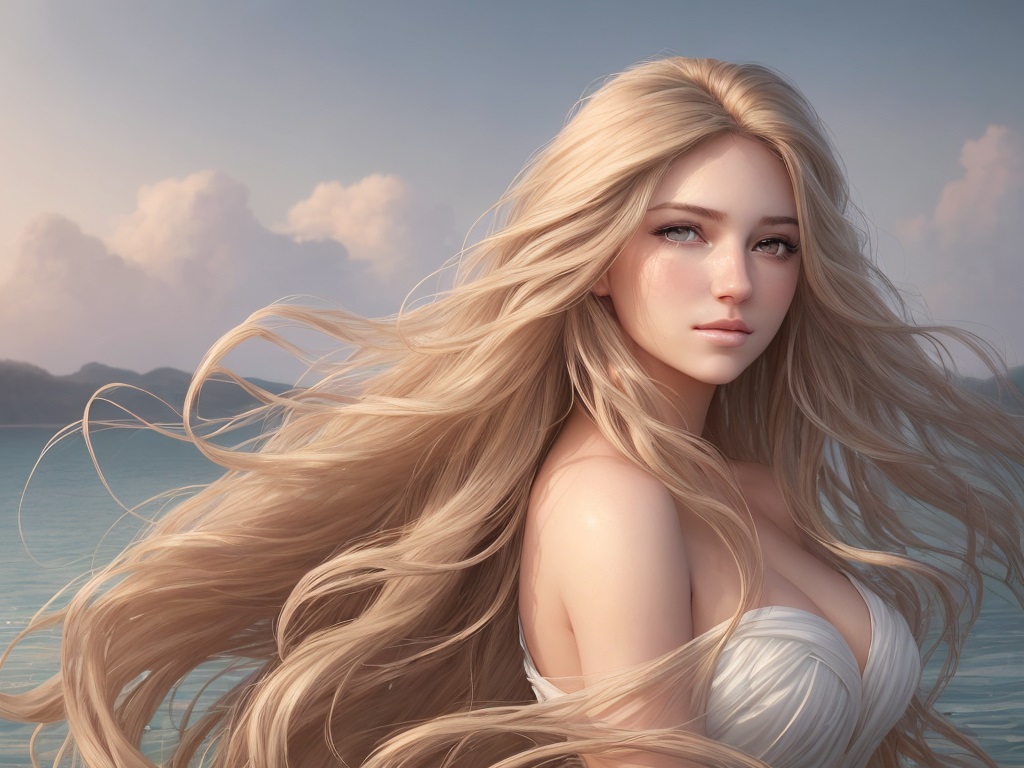
prompt= "An ultra-realistic portrait of a beautiful woman with flowing hair, radiant skin, and captivating eyes, set against a serene backdrop."
images = pipe(prompt=prompt).images[0]
from IPython.display import display
# Display the image in the Jupyter Notebook
display(images)
images.save("./image1.png")
To generate a higher quality image with 1024x768 resolution, you can modify the payload
from diffusers import DiffusionPipeline
import torch

pipe = DiffusionPipeline.from_pretrained("stabilityai/stable-diffusion-xl-base-1.0",
                                         torch_dtype=torch.float16,
                                         use_safetensors=True, variant="fp16",
                                        cache_dir=cache_path)
pipe.to("cuda")
clear_output()
# Set the seed for reproducibility
seed = 42
torch.manual_seed(seed)
np.random.seed(seed)
random.seed(seed)
# Load and customize payload
payload = json.loads(json.dumps({
    "model_id": 'stabilityai/stable-diffusion-xl-base-1.0',
    "prompt": "An ultra-realistic portrait of a beautiful woman with flowing hair, radiant skin, and captivating eyes, set against a serene backdrop.",
    #"negative_prompt": "painting, extra fingers, mutated hands, poorly drawn hands, poorly drawn face, deformed, ugly, blurry, bad anatomy, bad proportions, extra limbs, cloned face, skinny, glitchy, double torso, extra arms, extra hands, mangled fingers, missing lips, ugly face, distorted face, extra legs, anime",
    "width": 1024,  # Set desired image width
    "height": 768,   # Set desired image height
    "samples": 1,
    "num_inference_steps": 30,  # Increase steps for higher quality (might take longer)
    "safety_checker": "no",
    "enhance_prompt": "yes",
    "guidance_scale": 6.5,  # Optionally add # Control detail level (higher = sharper)
    "seed": 2,  # Keep None for random results
    "multi_lingual": "no",
    "panorama": "no",
    "self_attention": "no",
    "upscale": "no",
}))
# Generate image with adjusted settings
images = pipe(**payload).images[0]

# Display and save image
from IPython.display import display
display(images)
images.save("./image1.png")
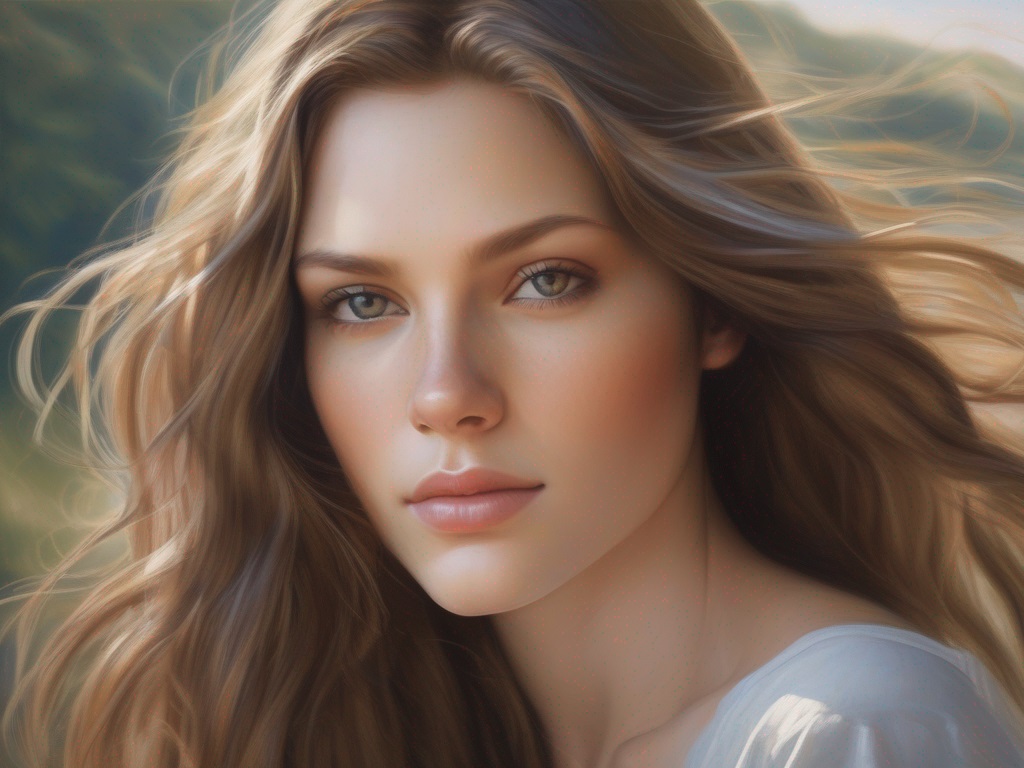
dreamshaper-7
lykon/dreamshaper-7 is a Stable Diffusion model that has been fine-tuned on runwayml/stable-diffusion-v1-5.
from diffusers import AutoPipelineForText2Image, DEISMultistepScheduler
import torch

pipe = AutoPipelineForText2Image.from_pretrained('lykon/dreamshaper-7', torch_dtype=torch.float16, variant="fp16")
pipe.scheduler = DEISMultistepScheduler.from_config(pipe.scheduler.config)
pipe = pipe.to("cuda")
clear_output()
prompt= "An ultra-realistic portrait of a beautiful woman with flowing hair, radiant skin, and captivating eyes, set against a serene backdrop."
generator = torch.manual_seed(363)
image = pipe(prompt, generator=generator, num_inference_steps=25).images[0]
image.save("./image3.png")
display(image)
To generate a higher quality image with 1024x768 resolution, you can modify the payload with more details
from diffusers import AutoPipelineForText2Image, DEISMultistepScheduler
import torch
from IPython.display import display, clear_output

cache_path = os.path.join(current_dir, "cache")
pipe = AutoPipelineForText2Image.from_pretrained("lykon/dreamshaper-7",
                                                 torch_dtype=torch.float16,
                                                 variant="fp16",
                                                 cache_dir=cache_path)
pipe.scheduler = DEISMultistepScheduler.from_config(pipe.scheduler.config)
pipe = pipe.to("cuda")

prompt = "An ultra-realistic portrait of a beautiful woman with flowing hair, radiant skin, and captivating eyes, set against a serene backdrop."

# Create a payload with desired settings
payload = {
    "negative_prompt": "two faces",
    "width": 1024,
    "height": 768,
    "samples": 1,
    "num_inference_steps": 50,  # Increase the number of inference steps for better quality
    "enhance_prompt": "yes",
    "seed": 1,
    "guidance_scale": 7.5,
}

generator = torch.manual_seed(payload['seed']) if payload['seed'] is not None else None
image = pipe(prompt,
             generator=generator,
             num_inference_steps=payload["num_inference_steps"],
             resize_method="aspect",
             width=payload["width"],
             height=payload["height"]).images[0]

clear_output()
# Display the image in the Jupyter Notebook
display(image)
image.save("./image-ultra.png")
If we are interested to generate an image with even more custom details, we can create add negative_prompt and add more parameters as follows:
import json
import torch
from diffusers import AutoPipelineForText2Image, DEISMultistepScheduler
payload = json.loads(json.dumps({
"model_id": 'lykon/dreamshaper-7',
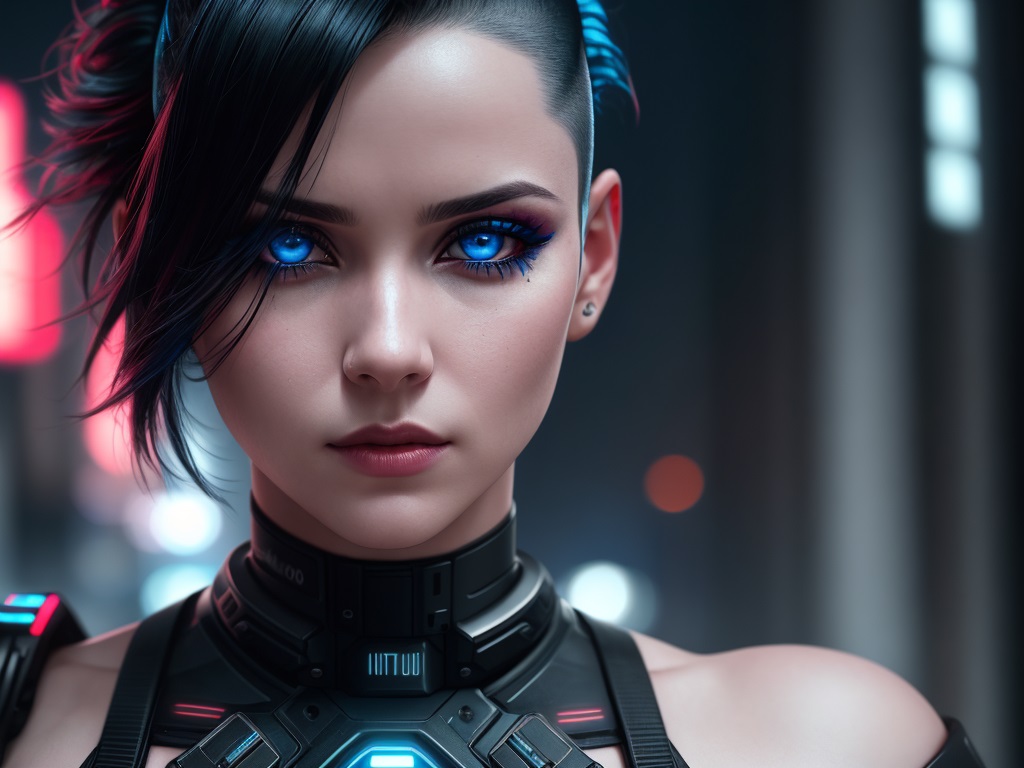
"prompt": "ultra realistic close up portrait ((beautiful pale cyberpunk female with heavy black eyeliner)), blue eyes, shaved side haircut, hyper detail, cinematic lighting, magic neon, dark red city, Canon EOS R3, nikon, f/1.4, ISO 200, 1/160s, 8K, RAW, unedited, symmetrical balance, in-frame, 8K",
"negative_prompt": "painting, extra fingers, mutated hands, poorly drawn hands, poorly drawn face, deformed, ugly, blurry, bad anatomy, bad proportions, extra limbs, cloned face, skinny, glitchy, double torso, extra arms, extra hands, mangled fingers, missing lips, ugly face, distorted face, extra legs, anime",
"width": 1024,
"height": 768,
"samples": "1",
"num_inference_steps": "30",
"safety_checker": "no",
"enhance_prompt": "yes",
"seed": None,
"guidance_scale": 7.5,
"multi_lingual": "no",
"panorama": "no",
"self_attention": "no",
"upscale": "no",
"seed":5
}))
pipe = AutoPipelineForText2Image.from_pretrained(payload['model_id'], torch_dtype=torch.float16, variant="fp16")
pipe.scheduler = DEISMultistepScheduler.from_config(pipe.scheduler.config)
pipe = pipe.to("cuda")
#clear_output()
prompt = payload['prompt']
negative_prompt = payload['negative_prompt']
num_inference_steps = int(payload['num_inference_steps'])
generator = torch.manual_seed(payload['seed']) if payload['seed'] is not None else None
image = pipe(prompt,
negative_prompt=negative_prompt,
generator=generator,
num_inference_steps=num_inference_steps,
resize_method="aspect",
width=payload["width"],
height=payload["height"]).images[0]
image.save("./imageN.png")
display(image)

Here’s a brief explanation of the parameters used in diffusion models:
-
"width": The width of the generated image in pixels. -
"height": The height of the generated image in pixels. -
"samples": The number of samples to generate. Each sample is an independent run of the model, generating a new image. Higher values will result in more output images. -
"num_inference_steps": The number of inference steps performed during the reverse diffusion process. Higher values may result in better image quality but will increase the inference time. -
"safety_checker": If set to “yes,” the model will perform additional safety checks to prevent the generation of inappropriate or harmful content. -
"enhance_prompt": If set to “yes,” the model will attempt to enhance the input prompt, potentially resulting in more accurate and higher quality image generations. -
"seed": The random seed used for reproducibility of the generated images. If set to a specific integer, the same input will always produce the same output. -
"guidance_scale": A scaling factor that controls the influence of the input prompt on the generated image. Higher values will make the output image more closely match the input prompt, while lower values will allow for more variation. -
"multi_lingual": If set to “yes,” the model will support multi-lingual prompts, allowing for input in languages other than English. -
"panorama": If set to “yes,” the model will generate panoramic images with a wider aspect ratio. -
"self_attention": If set to “yes,” the model will use self-attention mechanisms for improved image generation. -
"upscale": If set to “yes,” the model will upscale the generated image, potentially improving the resolution and overall image quality.
Note that these parameters might be specific to a custom implementation of a diffusion model and not necessarily applicable to all diffusion models in general. The actual parameters and their behavior may vary depending on the specific model and implementation you are using.
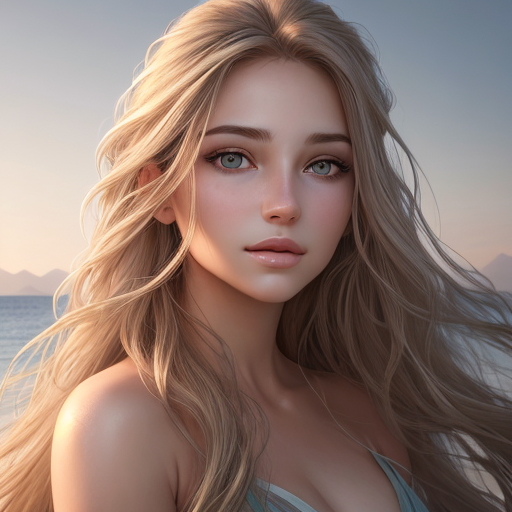
SDXL-Turbo
Imagine creating high-quality images from text descriptions in an instant, without waiting for long processing times. That’s the magic of SDXL-Turbo, a powerful text-to-image model fueled by a cutting-edge technique called Adversarial Diffusion Distillation (ADD).
SDXL-Turbo is like a “lite” version of its bigger brother, SDXL 1.0. It has learned and compressed all the image-making knowledge of the original model, but in a smaller, faster package.
Additional benefits:
- Reduced computational cost: Smaller model size means less processing power needed, making it more accessible for personal use or on devices with limited resources.
- Faster experimentation: Trying out different prompts and ideas becomes quicker and easier, opening up new creative possibilities. However, keep in mind:
- Trade-offs are inevitable: While fast and efficient, SDXL-Turbo might not always match the detailed quality of larger models in complex scenarios. Still under development: This is an evolving technology, and further improvements are expected in the future.
SDXL-Turbo does not make use of guidance_scale or negative_prompt, we disable it with guidance_scale=0.0. Preferably, the model generates images of size 512x512 but higher image sizes work as well. A single step is enough to generate high quality images.
from IPython.display import clear_output
os.system("pip install diffusers transformers accelerate --upgrade")
clear_output()
# Set the seed for reproducibility
seed = 42
torch.manual_seed(seed)
np.random.seed(seed)
random.seed(seed)
and later you can type
from diffusers import AutoPipelineForText2Image
import torch
pipe = AutoPipelineForText2Image.from_pretrained("stabilityai/sdxl-turbo",
                                                 torch_dtype=torch.float16,
                                                 variant="fp16",
                                                cache_dir=cache_path)
pipe.to("cuda")

clear_output()
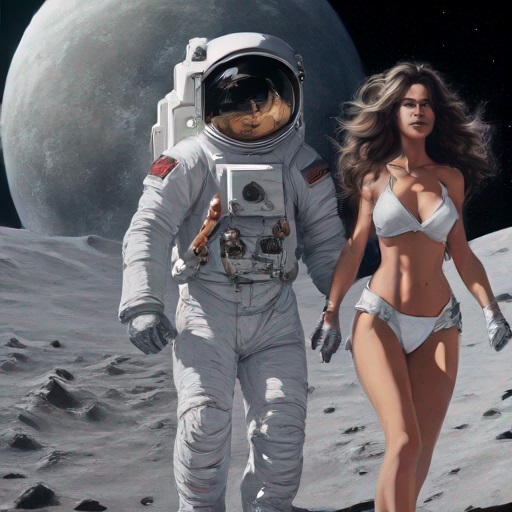
prompt= "astronaut with spacesuit walking in the moon with a beutiful woman in bikini with flowing hair, radiant skin, and captivating eyes."
image = pipe(prompt=prompt, num_inference_steps=2, guidance_scale=1.0, seed=10).images[0]
from IPython.display import display
# Display the image in the Jupyter Notebook
display(image)
image.save("./image3.png")
dreamshaper-xl-v2-turbo
lykon/dreamshaper-xl-v2-turbo is a Stable Diffusion model that has been fine-tuned on stabilityai/stable-diffusion-xl-base-1.0.
os.system("pip install diffusers transformers accelerate")
clear_output()
from diffusers import AutoPipelineForText2Image, DPMSolverMultistepScheduler
import torch

pipe = AutoPipelineForText2Image.from_pretrained('lykon/dreamshaper-xl-v2-turbo', torch_dtype=torch.float16, variant="fp16",cache_dir=cache_path)
pipe.scheduler = DPMSolverMultistepScheduler.from_config(pipe.scheduler.config)
pipe = pipe.to("cuda")
prompt= "astronaut with spacesuit walking in the moon with a beutiful woman in bikini with flowing hair, radiant skin, and captivating eyes."
generator = torch.manual_seed(10)
image = pipe(prompt, num_inference_steps=20, guidance_scale=2).images[0]
# Display the image in the Jupyter Notebook
display(image)
image.save("./image.png")
.png)
Generation of Multiple Images
Let us create a program that generates multiple pictures by adding some descriptions and the program augmented the description by using an small GPT model.
images_path = os.path.join(current_dir, "images")
df_path = os.path.join(current_dir, "images","collection.csv")
import os
import torch
import numpy as np
import pandas as pd
from diffusers import DiffusionPipeline
from transformers import pipeline
from PIL import Image
from tqdm import tqdm
import random
from IPython.display import clear_output
pipe = pipeline('text-generation', model='daspartho/prompt-extend')

def extend_prompt(prompt):
    return pipe(prompt+',', num_return_sequences=1)[0]["generated_text"]

def text_it(inputs):
    return extend_prompt(inputs)

def load_pipeline(use_cuda):
    device = "cuda" if use_cuda and torch.cuda.is_available() else "cpu"
    if device == "cuda":
        torch.cuda.max_memory_allocated(device=device)
        torch.cuda.empty_cache()
        pipe = DiffusionPipeline.from_pretrained("stabilityai/sdxl-turbo", torch_dtype=torch.float16, variant="fp16", use_safetensors=True,cache_dir=cache_path)
        pipe.enable_xformers_memory_efficient_attention()
        pipe = pipe.to(device)
        torch.cuda.empty_cache()
    else:
        pipe = DiffusionPipeline.from_pretrained("stabilityai/sdxl-turbo", use_safetensors=True,cache_dir=cache_path )
        pipe = pipe.to(device)
    return pipe

def genie(prompt="sexy woman", steps=2, seed=0, use_cuda=False):
    pipe = load_pipeline(use_cuda)
    generator = np.random.seed(0) if seed == 0 else torch.manual_seed(seed)
    extended_prompt = extend_prompt(prompt)
    int_image = pipe(prompt=extended_prompt, generator=generator, num_inference_steps=steps, guidance_scale=0.0).images[0]
    return int_image, extended_prompt

from tqdm import tqdm

def save_images(prompt="sexy woman", steps=2, use_cuda=False, num_images=1000, folder=images_path, input_seed=0):
    if not os.path.exists(folder):
        os.makedirs(folder)

    data = []
    columns = ['Image','Prompt', 'Extended_Prompt', 'Steps', 'Seed','Path']
    df = pd.DataFrame(columns=columns)
    df.to_csv(df_path, index=False)

    for i in tqdm(range(num_images), desc="Generating Images"):
        seed = random.randint(1, 999999999999999999) if input_seed == 0 else input_seed
        int_image, extended_prompt = genie(prompt=prompt, steps=steps, seed=seed, use_cuda=use_cuda)
        image_filename = f"image_{i+1}.png"
        file_path=f"{folder}/{image_filename}"
        int_image.save(file_path)
        new_data = [image_filename,prompt, extended_prompt, steps, seed,file_path]
        data.append(new_data)
        # Update the DataFrame and save it to the CSV file
        df = pd.DataFrame(data, columns=columns)
        df.to_csv(df_path, index=False)
        clear_output()
# Call the save_images function to generate and save 1000 images
prompt='''sexy woman,  flowing blonde hair, white dress with a red floral pattern, has red lipstick , serious expression.
'''
save_images(prompt=prompt, steps=2, use_cuda=True, num_images=10, folder=images_path)
df = pd.read_csv(df_path)
import pandas as pd
import matplotlib.pyplot as plt
from IPython.display import HTML
from PIL import Image
from io import BytesIO
import base64

# Read DataFrame
df_path = os.path.join(current_dir, "images","collection.csv")
df = pd.read_csv(df_path)

# Function to display image in Jupyter Notebook
def display_image(path):
    with open(path, 'rb') as f:
        img = Image.open(f)
        buffer = BytesIO()
        img.save(buffer, format='PNG')
        img_str = base64.b64encode(buffer.getvalue()).decode()
    return f'<img src="data:image/png;base64,{img_str}" />'

# Display images and texts in a 2x5 table
image_paths = df['Path'].tolist()
extended_prompts = df['Extended_Prompt'].tolist()
table = '<table>'
for i in range(5):
    table += '<tr>'
    for j in range(2):
        img_path = image_paths[i*2 + j]
        extended_prompt = extended_prompts[i*2 + j]
        table += f'<td>{display_image(img_path)}<br>{extended_prompt}</td>'
    table += '</tr>'
table += '</table>'

HTML(table)
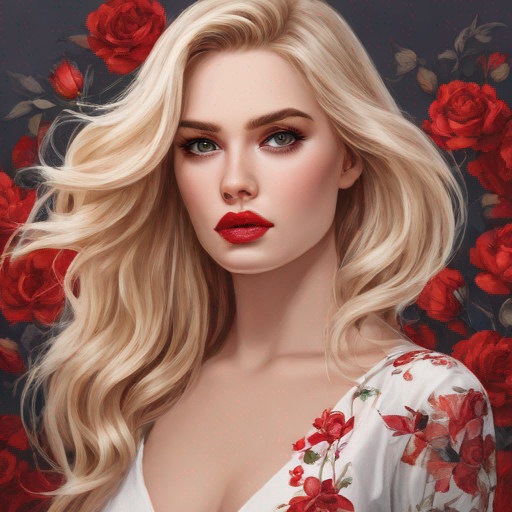 sexy woman, flowing blonde hair, white dress with a red floral pattern, has red lipstick, serious expression. , portrait, studio portrait, fantasy, detailed illustration, hd, 4k, digital art, overdetailed art, concept art, by |
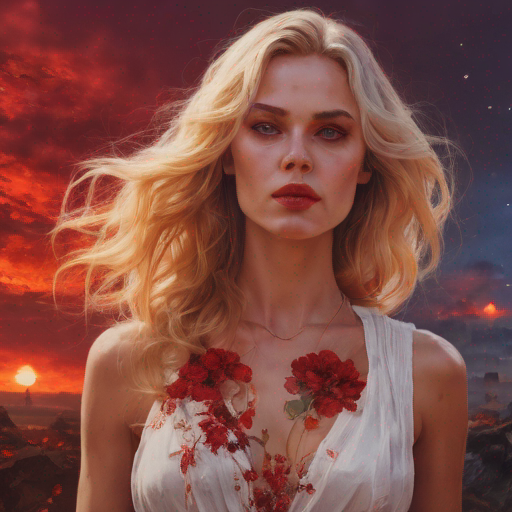 sexy woman, flowing blonde hair, white dress with a red floral pattern, has red lipstick, serious expression. , background is a red sunset on fire, background of outer space by Beksinski, wojtek fus, Hiroshi Yoshida and Magic the Gathering. |
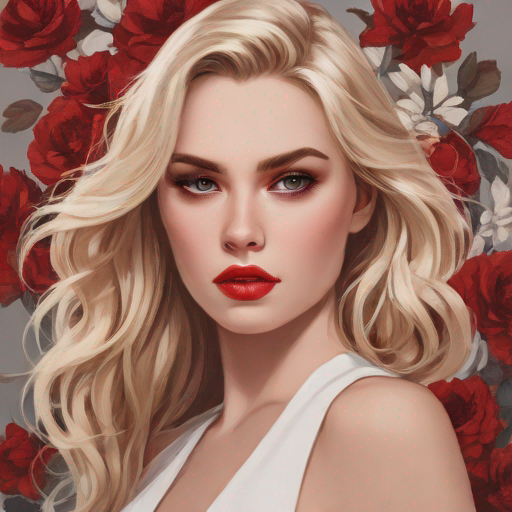 sexy woman, flowing blonde hair, white dress with a red floral pattern, has red lipstick, serious expression. |
 sexy woman, flowing blonde hair, white dress with a red floral pattern, has red lipstick, serious expression. , sci-fi fantasy painting by Peter Andrew Jones, Jean Delville, Yoshitaka Amano, horizontally symmetrical shoulders, detailed, beautiful portrait, |
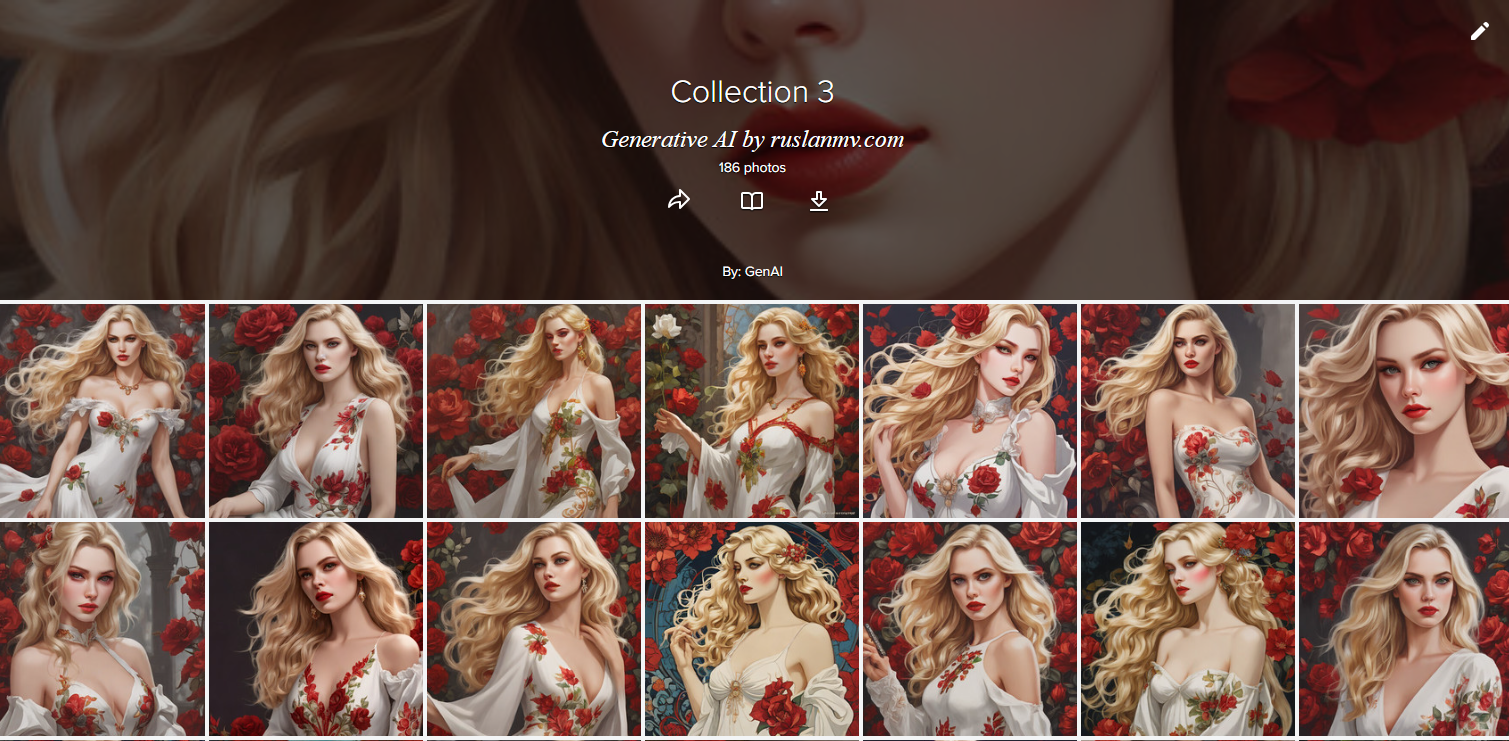
If you want to see more pictures generated visit this collection here
You can play with this program here in Hugging Face or if you liked this blog post you can download the notebook here.
Congratulations! You have practiced how to load diffusion models and generate images in Python.
Leave a comment