
Building RAG Applications with IBM watsonx.ai and Langflow
This tutorial provides a comprehensive and structured guide to integrating IBM watsonx.ai foundation models into the Langflow visual programming environment using custom components. You will learn how to install Langflow, configure IBM watsonx.ai, develop chatbot and agent flows, and implement vector-based Retrieval-Augmented Generation (RAG) systems.
Project Structure Overview
watsonx-langflow-integration/
├── .gitignore
├── LICENSE
├── README.md
├── requirements.txt
├── install.sh                  # Installation script for setting up the environment
└── components/
    ├── llm/
    │   └── watsonx.py          # IBM watsonx.ai LLM integration component
    └── embeddings/
        └── watsonx_embedding.py  # IBM watsonx.ai Embedding integration component
What is Langflow?
Langflow is an open-source visual programming platform for building and orchestrating LLM (Large Language Model) applications without needing extensive coding. It enables users to create flexible AI workflows by connecting modular components through an intuitive drag-and-drop interface.
Langflow supports custom components, such as LLMs, embeddings, vector stores, tools, and agents, making it an ideal choice for building Retrieval-Augmented Generation (RAG) pipelines.
Example: Generic Vector Store RAG Workflow
Below is a basic illustration of how Langflow integrates with vector stores to power RAG-based applications:
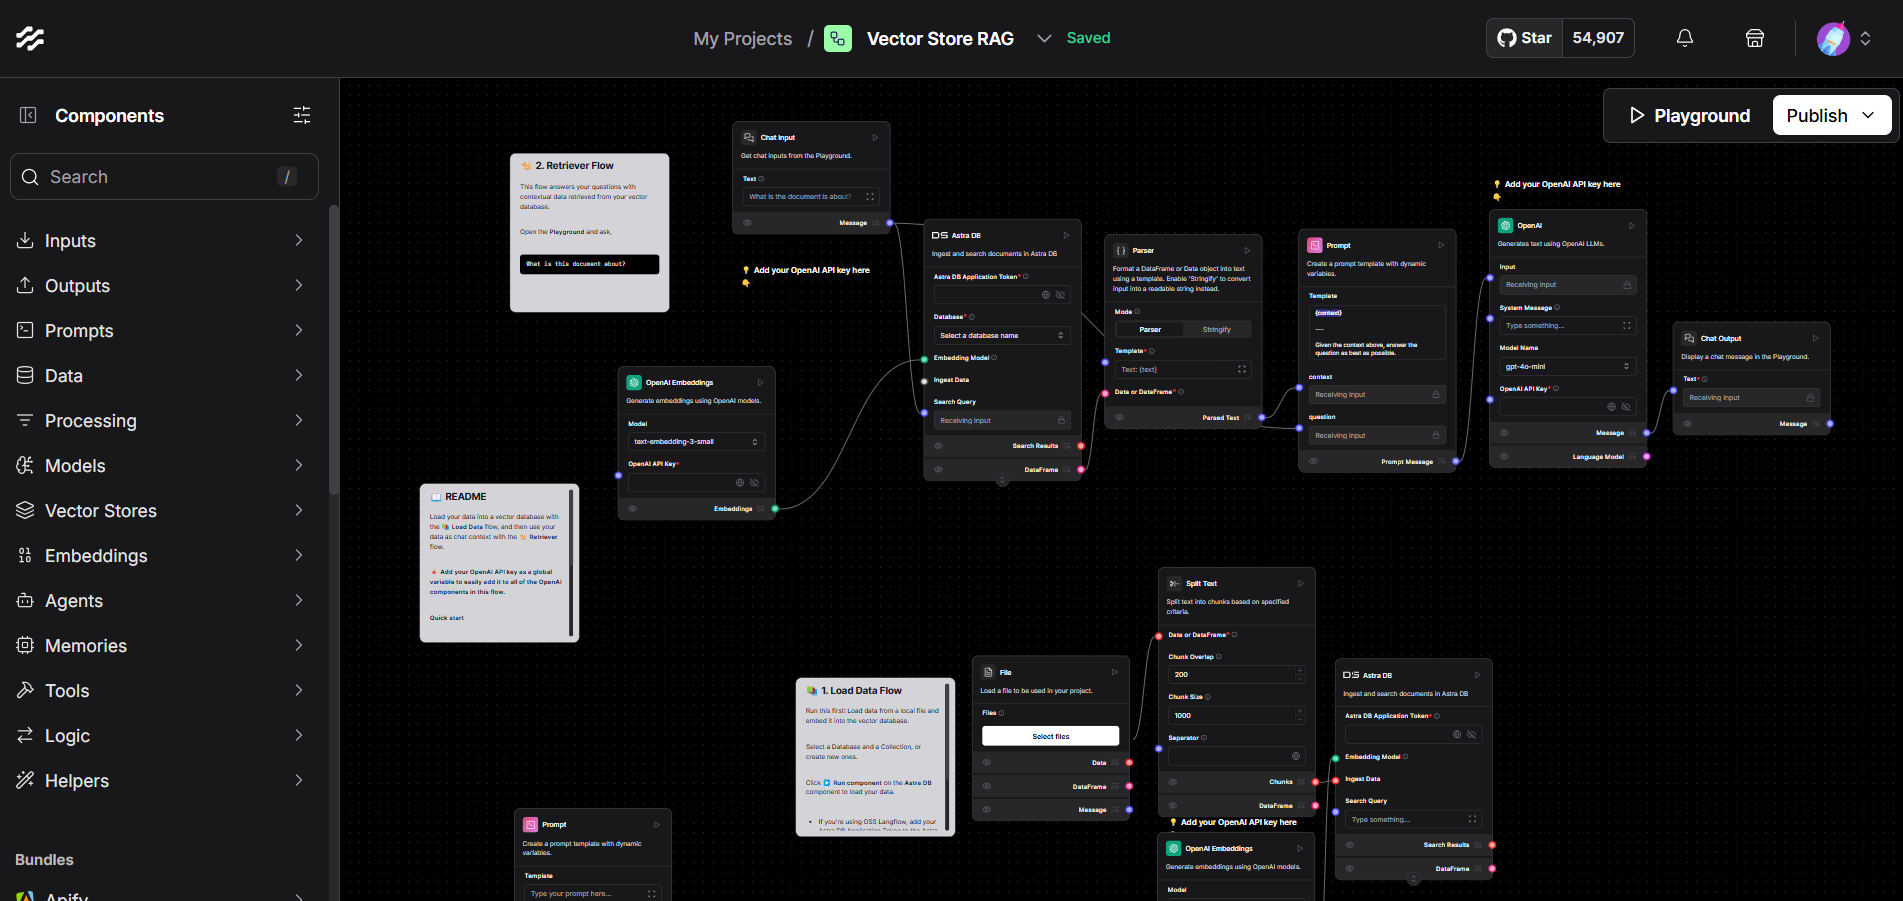
This modular structure allows you to easily extend, modify, or embed the components into a Langflow-based application for your specific needs.
Features of the Integration
- Custom components fully compatible with Langflow’s architecture.
- Secure API key management using
SecretStrInput. - Full parameterization of text generation settings (e.g., temperature, top_p, max_tokens, logprobs).
- Automatic dynamic retrieval of available IBM watsonx.ai models.
- Embedding generation support for use in RAG and vector search pipelines.
- Example integration of agent flows leveraging Langflow’s tool-calling framework.
Installation and Environment Setup
Prerequisites
To install Langflow and use this integration, you will need the following:
- Python 3.11 to 3.13
uv,pip, orpipxfor package management.- A virtual environment (recommended for environment isolation)
- An IBM watsonx.ai account with a valid API key and project ID
Cloning the Repository
First, clone the integration repository:
git clone https://github.com/ruslanmv/watsonx-langflow-integration
Then, navigate into the project directory:
cd watsonx-langflow-integration
Installing the Environment with install.sh
You can set up the environment automatically by running the provided installation script. Open your terminal in the project directory and execute:
bash install.sh
This script will:
- Update system packages and install necessary dependencies.
- Set up Python 3.11 (or a compatible version) along with pip.
- Create and activate a virtual environment (named
.venv). - Install Langflow and required dependencies.
- Verify that the environment is ready for running Langflow.
Adding IBM watsonx.ai Integration
Step 1: Prepare Components
Create directories for Langflow custom components:
mkdir -p ~/.langflow/components/llm ~/.langflow/components/embeddings
Copy the provided files into these locations:
cp components/llm/watsonx.py ~/.langflow/components/llm/
cp components/embeddings/watsonx_embeddings.py ~/.langflow/components/embeddings/
Step 2: Configure IBM watsonx.ai Access
To use IBM watsonx.ai, you will need:
- An IBM Cloud account
- A watsonx.ai project
- A project ID
- An API key
Visit IBM watsonx.ai to create a project and retrieve these values.
Supported endpoint regions include:
https://us-south.ml.cloud.ibm.comhttps://eu-de.ml.cloud.ibm.comhttps://eu-gb.ml.cloud.ibm.comhttps://au-syd.ml.cloud.ibm.comhttps://jp-tok.ml.cloud.ibm.comhttps://ca-tor.ml.cloud.ibm.com
Step 3: Test Available Models
Run the following script to list available embeddings models in your region:
python components/utils/list_embeddings.py
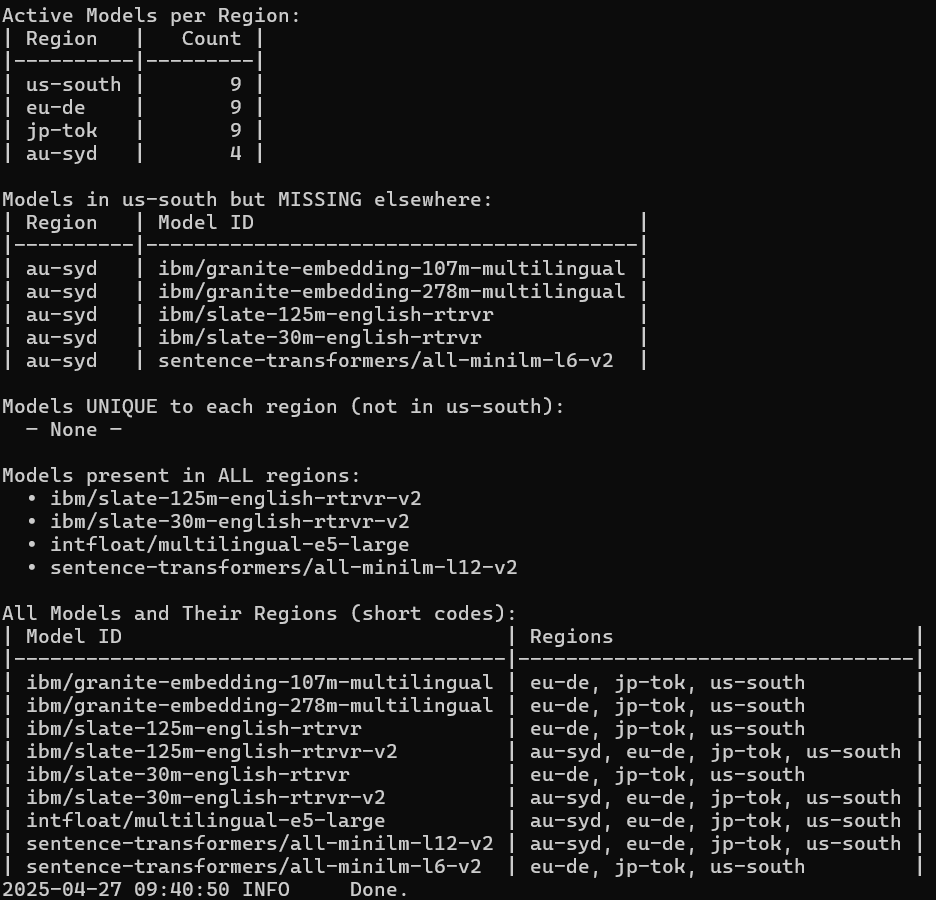
python components/utils/list_models.py
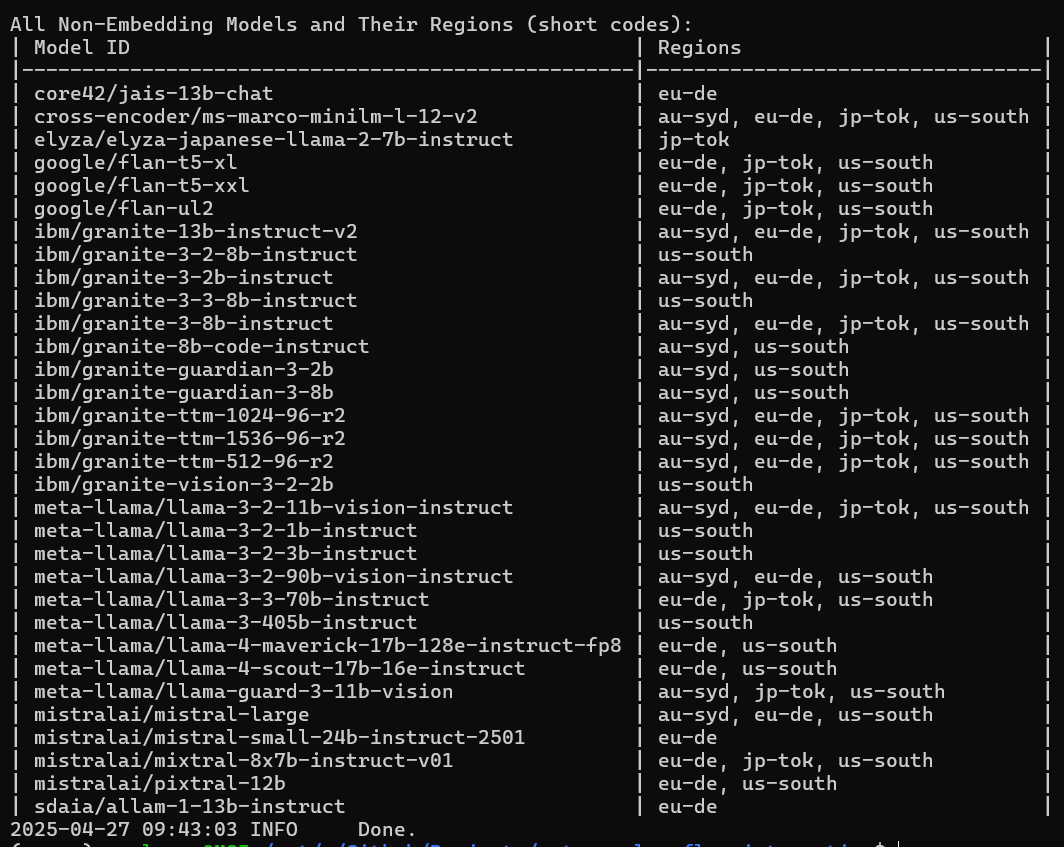
This script queries the watsonx.ai model endpoint for currently supported models and lists them in the terminal.
Creating Your First Langflow Flow with watsonx.ai
Langflow turns the usually code-heavy task of building an LLM pipeline into a visual experience. In this walk-through you will spin up Langflow locally, drop IBM watsonx.ai components onto the canvas, and weave them together into a Retrieval-Augmented-Generation (RAG) chatbot that understands a documentation website in real time.
Step 1 — Launching Langflow
Begin by activating the virtual environment that was created during installation:
source .venv/bin/activate
With the environment live, start Langflow:
langflow run
Point your browser at http://127.0.0.1:7860 and you will be greeted by the Langflow canvas. Create a fresh project by clicking New Flow and selecting Blank Flow; an empty grid now awaits your creativity.
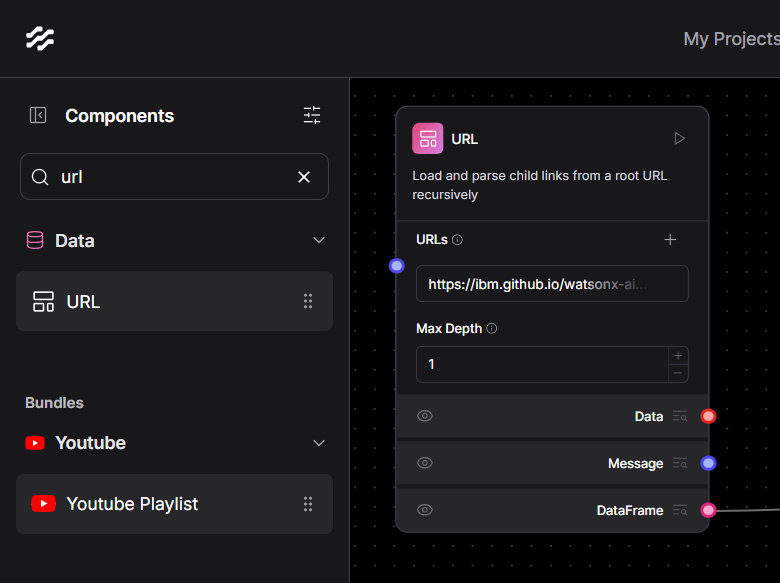
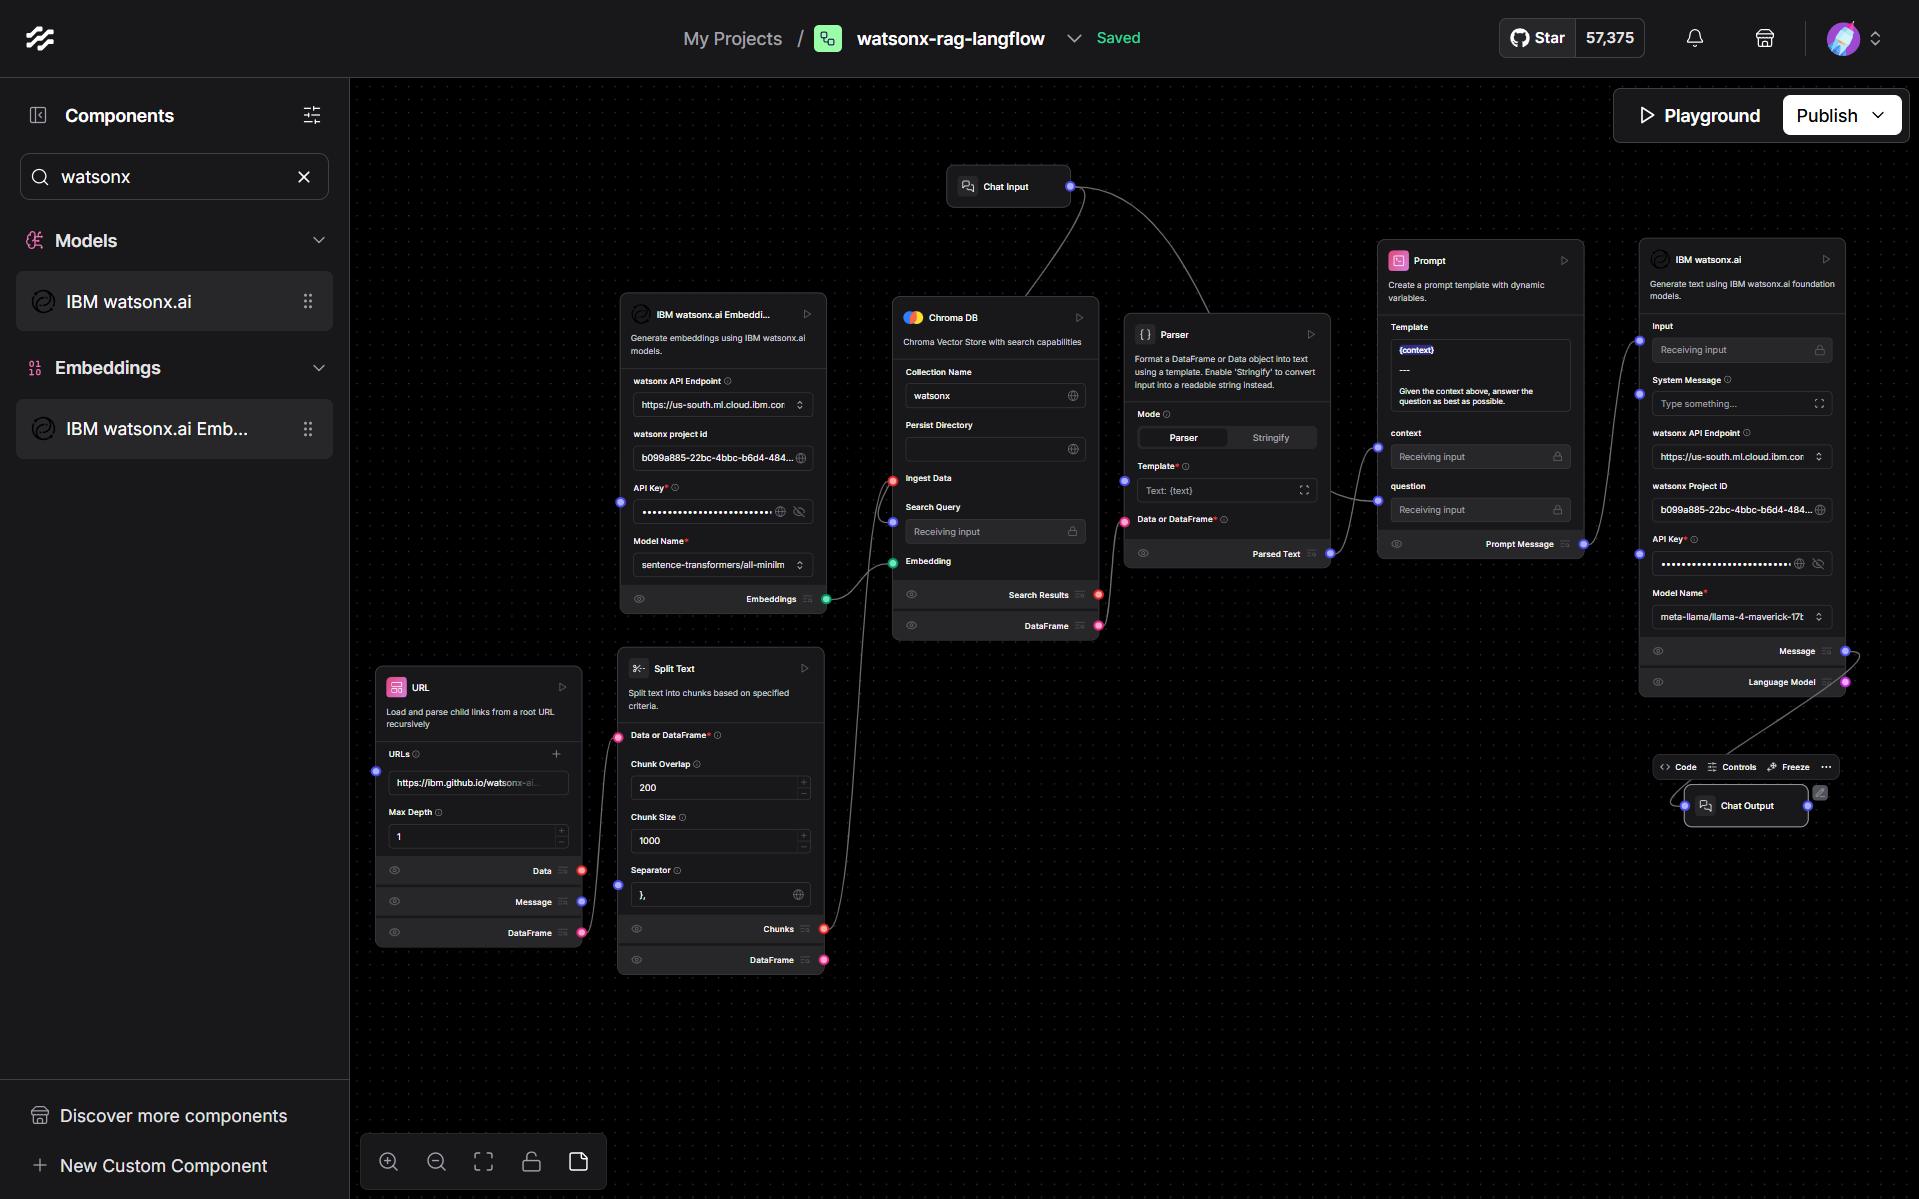
Step 2 — Feeding the Pipeline with Web Content
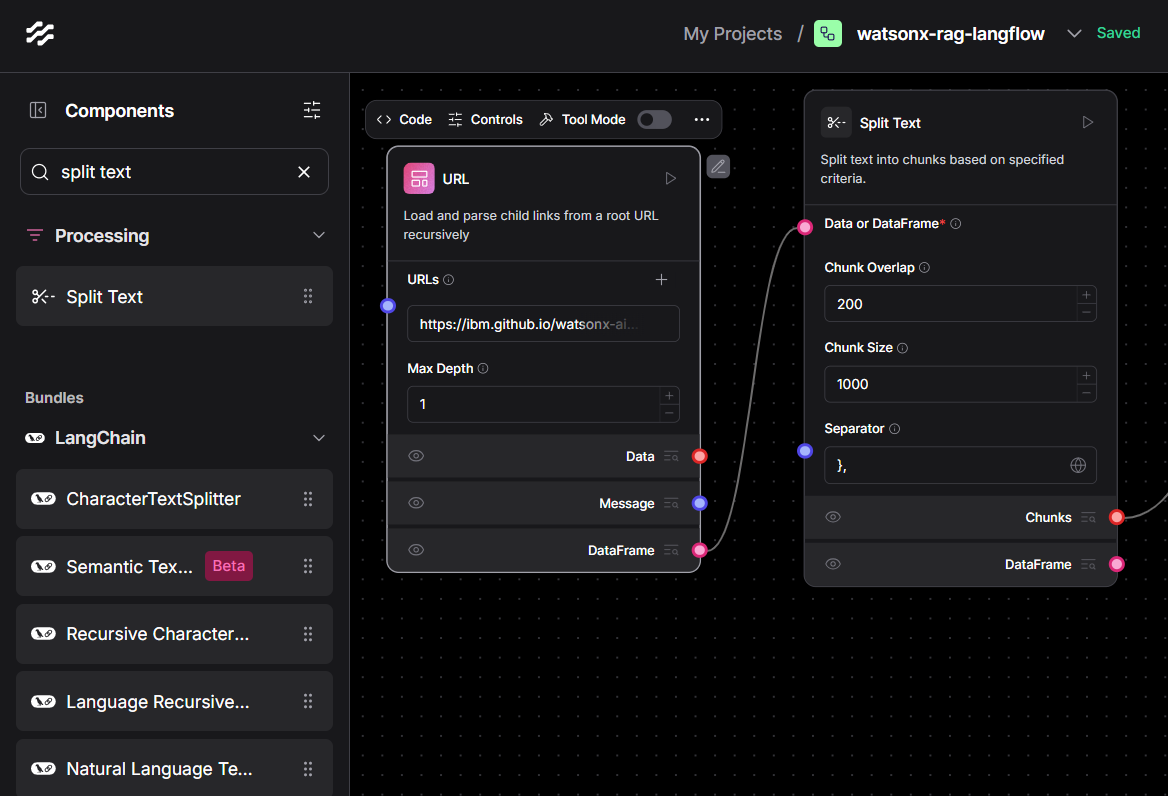
Drag a URL Loader block onto the canvas. In its settings paste the page you want to study—for example https://ibm.github.io/watsonx-ai-python-sdk/base.html. Set the Max Depth field to 1 so the crawler stays on that single page rather than wandering through every internal link.
Directly beneath it drop a Split Text block. Connect the blue Data pin of the URL Loader to the purple Data pin of Split Text. Inside the Split Text panel choose a chunk size of 1000 characters and an overlap of 200; this keeps each slice manageable while preserving enough context across boundaries for later embedding.
Step 3 — Distilling Text into Embeddings
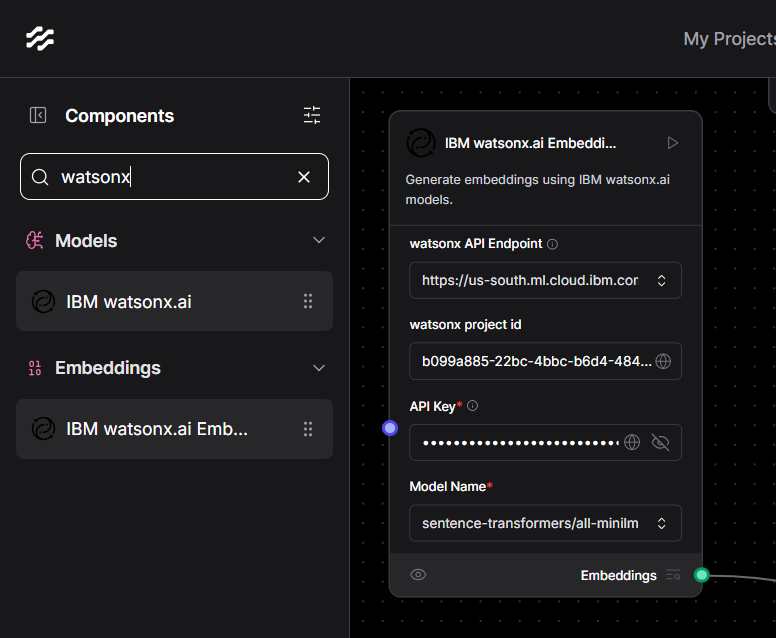
Place the custom Watsonx Embeddings component onto the grid. Fill in your endpoint (for instance https://us-south.ml.cloud.ibm.com), your project ID and your API key, then select sentence-transformers/all-minilm-l6-v2 as the model. Link the Chunks output of Split Text to the Text input of the Watsonx Embeddings block. Every chunk now emerges as a semantic vector ready for similarity search.
Step 4 — Indexing Vectors with ChromaDB
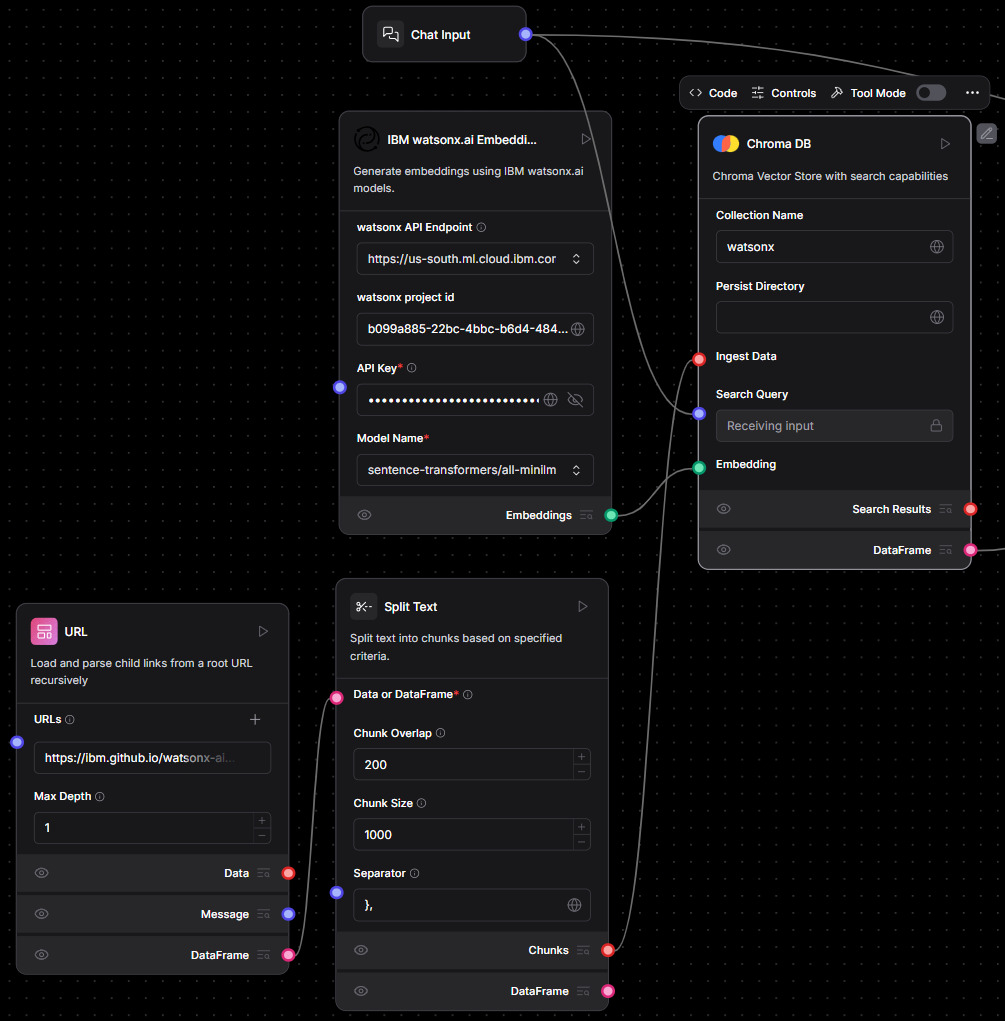
Add a ChromaDB block and name the collection watsonx_docs. If you want the database to survive restarts, specify a Persist Directory as well. Two connections are required: feed the text chunks from Split Text into the Ingest Data pin, and feed the vectors from the Embeddings block into the Embedding pin. Click the play icon and ChromaDB quietly indexes every vector it receives.
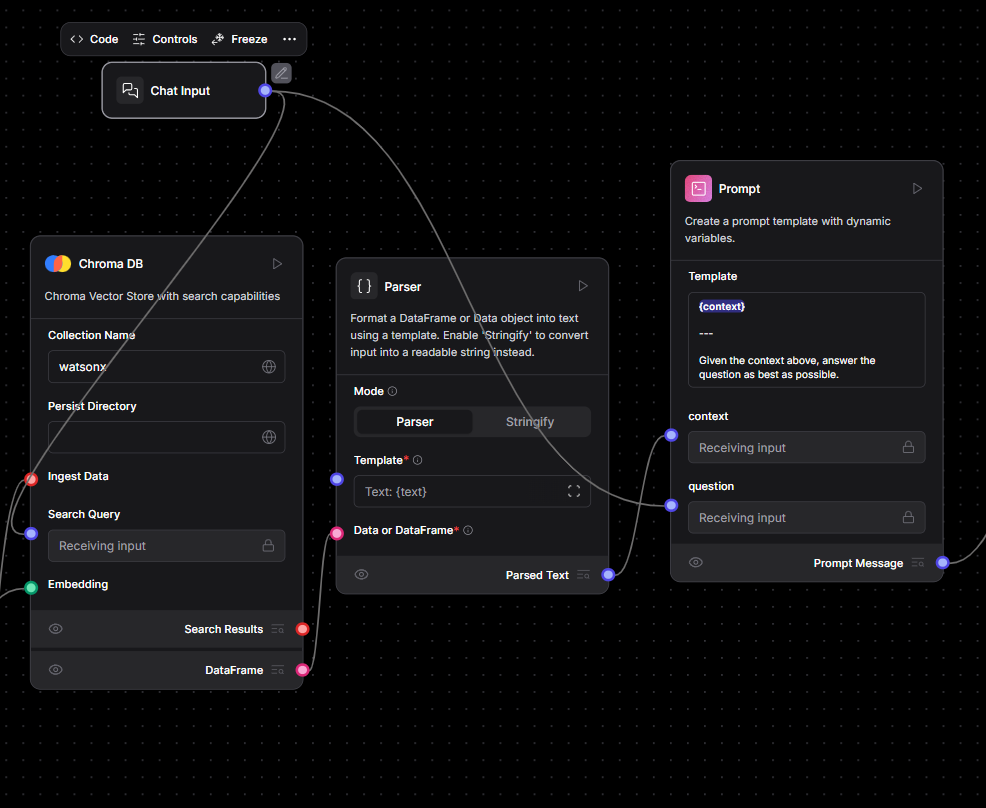
Step 5 — Parsing Search Results for the LLM
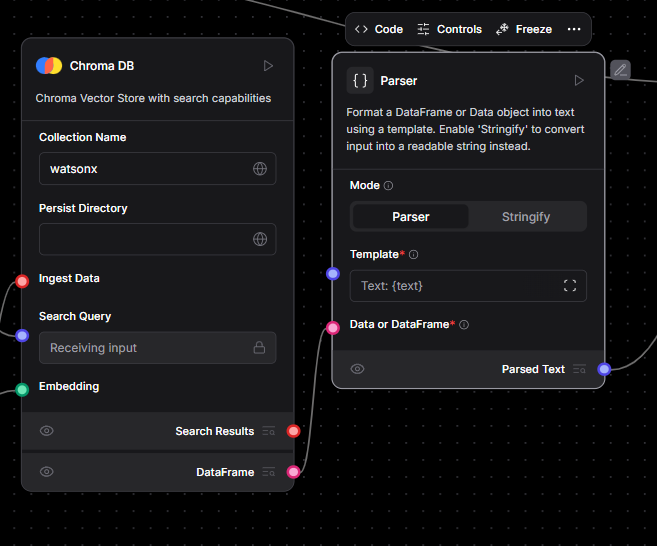
Introduce a Parser block, switch its mode to Stringify, and route the Search Results output of ChromaDB into the Parser’s input. Each retrieval will be flattened into plain text—ideal food for a prompt.
Step 6 — Accepting Questions and Crafting Prompts
Drop a Chat Input block onto the canvas. Wire its Search Query pin to the corresponding Search Query pin on ChromaDB, ensuring every user message triggers a nearest-neighbour lookup.
Next bring in a Prompt block and type a minimal template such as:
Use the following context to answer the question:
{context}

Question: {question}
Send the stringified context from the Parser to the Prompt’s Context pin and the raw user text from Chat Input to the Question pin. The Prompt component now assembles a fully-formed instruction containing both knowledge and query.
Step 7 — Generating Answers with watsonx.ai
Position an IBM watsonx.ai LLM block. Supply the same endpoint, project ID and API key you used for embeddings, then pick an instruction-tuned model—for example meta-llama/llama-4-scout-17b-16e-instruct. Connect the Prompt Message output of the Prompt component to the LLM’s input. Whenever the user speaks, the model will receive a rich prompt and return a text response.
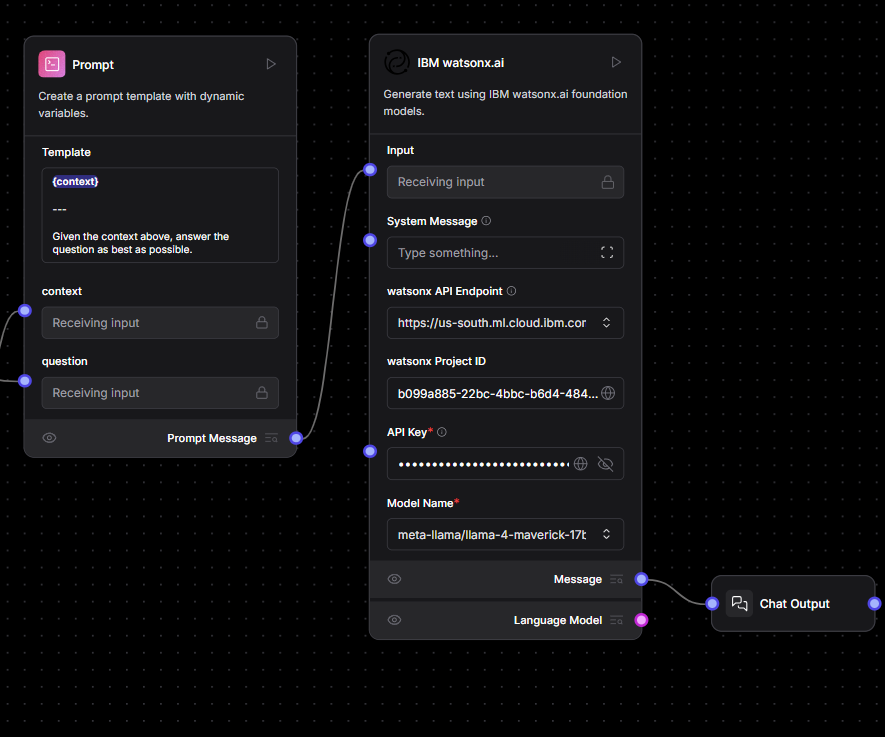
Step 8 — Showing the Response to the User
Finally, add a Chat Output block and join the LLM’s Message pin to Chat Output’s input. The conversational loop is now closed: question in, answer out.
Press Run at the top-right corner of Langflow, ask something like “How do I authenticate with the watsonx-ai Python SDK?” and watch the flow fetch the relevant snippet, build a context-aware prompt and deliver a precise explanation.
Building an Agent-Style Flow
Langflow can also orchestrate tool-enabled agents. Start a new flow and choose Simple Agent as the template. Replace the default LLM with the IBM watsonx.ai LLM you configured earlier, optionally drop in tools such as a URL reader or calculator, connect Chat Input to the agent and the agent to Chat Output, then run a prompt like “Create a tabletop RPG character.” The agent decides which tools to invoke and drafts a coherent reply via watsonx.ai.
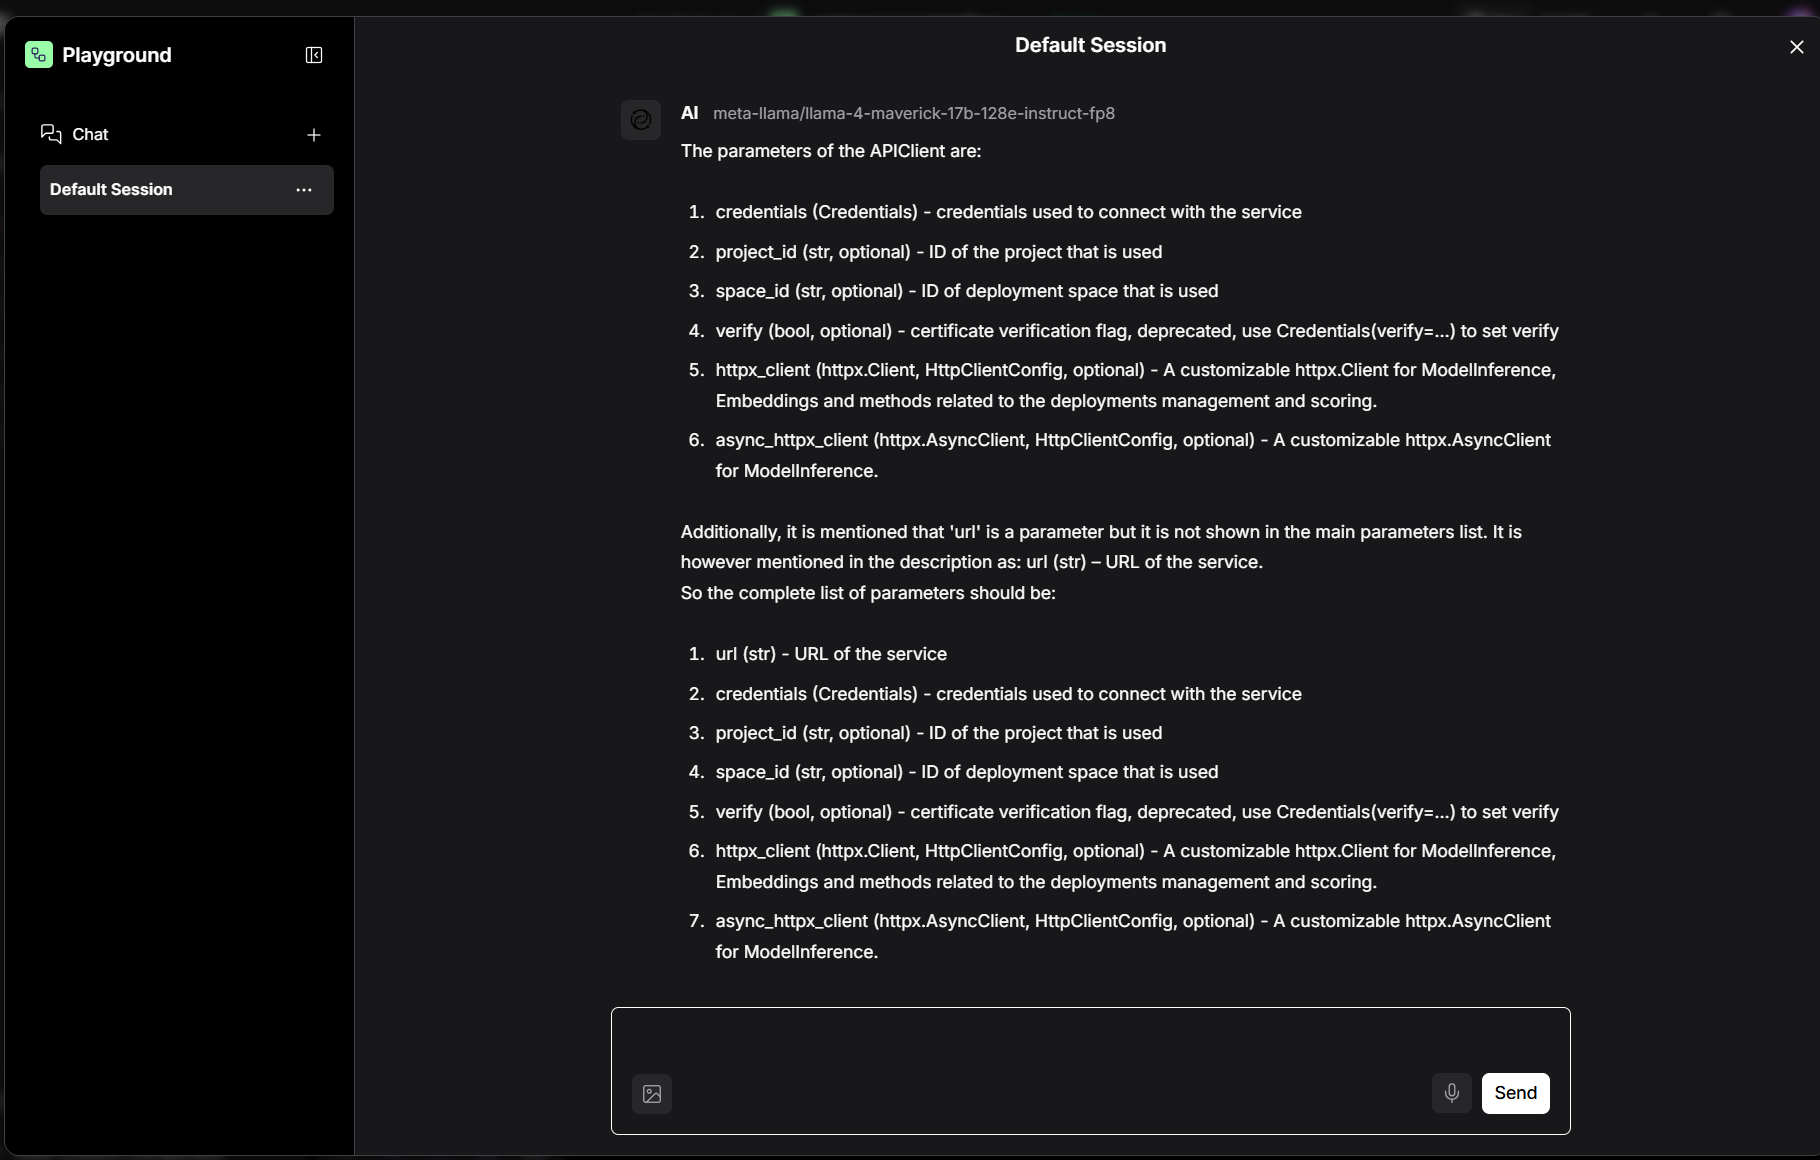
Putting the Finished Flow to Work
Once the full RAG workflow is running, open Playground (the rightmost tab on the Langflow toolbar). In the chat panel type:
what are the Parameters of the APIClient
Langflow forwards your question through the pipeline, retrieves the matching chunk from the SDK documentation, builds a prompt and calls your LLM. With the example model meta-llama/llama-4-maverick-17b-128e-instruct-fp8 you should see something close to:
Using Langflow via Python (Recommended API Approach)
To interact with your Langflow flow programmatically, use the built-in HTTP API rather than importing components directly. This avoids circular import issues and follows Langflow’s supported architecture.
Here’s a working example in Python using requests:
import requests

# Replace with your actual Flow UUID
url = "http://127.0.0.1:7860/api/v1/run/<your-flow-uuid>"

payload = {
    "input_value": "Tell me about the IBM watsonx.ai platform.",
    "output_type": "chat",
    "input_type": "chat"
}

headers = {
    "Content-Type": "application/json"
}

try:
    response = requests.post(url, json=payload, headers=headers)
    response.raise_for_status()
    print("Response from Langflow:")
    print(response.text)
except requests.exceptions.RequestException as e:
    print(f"Error making API request: {e}")
💡 You can find your Flow UUID in the Langflow UI under
Export > API.
This method allows you to run and test your Langflow workflows from any Python script or backend service without needing to access internal components directly.
Then you can use
import requests

# Replace with your actual Flow UUID
FLOW_ID = "2c02349f-303c-4fbd-b95d-d69646817840"
API_URL = f"http://127.0.0.1:7860/api/v1/run/{FLOW_ID}"

# Input payload for Langflow
payload = {
    "input_value": "hello world!",
    "input_type": "chat",
    "output_type": "chat"
}

headers = {
    "Content-Type": "application/json"
}

try:
    # Send the POST request to Langflow's API
    response = requests.post(API_URL, json=payload, headers=headers)
    response.raise_for_status()

    # Parse the JSON response
    data = response.json()

    # Attempt to extract the chatbot's response message
    message = (
        data.get("outputs", [{}])[0]
            .get("outputs", [{}])[0]
            .get("results", {})
            .get("message", {})
            .get("text", "")
    )

    if message:
        print("✅ AI Response:")
        print(message)
    else:
        print("⚠️ No valid message found in the response.")
        print("Raw Response:", response.text)

except requests.exceptions.RequestException as e:
    print(f"❌ Network or connection error: {e}")
except ValueError as e:
    print(f"❌ Error decoding JSON: {e}")

Troubleshooting
If you encounter caching hiccups, remove the .cache/langflow/ folder in your home directory and restart the application. For deeper issues, lean on the Langflow documentation or IBM watsonx.ai support.
Where to Go from Here
You have just created a fully working Retrieval-Augmented-Generation chatbot powered by IBM watsonx.ai. Experiment with larger context windows, swap in different embedding models, or export the entire flow as a Python script and drop it straight into production. Langflow’s visual canvas combined with watsonx.ai’s enterprise-grade models gives you a rapid yet robust path from idea to deployed application.
Congratulations! You have learned how to build a Visual RAG Pipeline with Langflow and IBM watsonx.ai
Leave a comment