Building a Production-Ready, Pluggable A2A Agent with IBM watsonx.ai, MatrixHub, and MCP Gateway
Hello everyone! Today we’ll guide you through architecting, building, and deploying a vendor-neutral Agent-to-Agent (A2A) service. We’ll take the foundational Universal A2A Agent concepts to a production-ready implementation by integrating with IBM watsonx.ai, publishing to the MatrixHub service catalog, and registering with the MCP Gateway for secure, standardized communication.
The core architectural principle is decoupling: the agent’s business logic is separated from the underlying Large Language Model (LLM) provider and the high-level orchestration framework. This design ensures that your agent is extensible, maintainable, and not locked into any single technology stack.
Introduction
What’s an “agent”? An agent is a small, goal‑oriented program (usually backed by an LLM) that can understand a request, decide next steps, use tools/services, and return a result. Unlike a single model call, an agent can plan, call APIs/DBs, iterate, and explain what it did.
Examples:
- Chat/Assistant — conversational helper that explains, summarizes, and answers.
- Tool‑using — calls APIs, databases, code interpreters, or SaaS to get real work done.
- Retrieval (RAG) — looks up facts in your docs/data, then answers with citations/grounding.
- Planner/Executor — breaks a big task into steps and executes them in order.
- Workflow/Graph — follows a predefined graph with branches, guards, and retries.
- Multi‑agent crew — a small team of specialists (Researcher → Writer → Reviewer) handing off work.
In practice you mix these (e.g., Planner/Executor that also does RAG and uses tools).
What is Universal A2A Agent
Universal A2A Agent is a production-ready, framework-agnostic implementation of the Agent-to-Agent (A2A) protocol. It bridges the gap between abstract standards and real-world deployments by providing a unified server that speaks both A2A and OpenAI-compatible APIs, while seamlessly integrating with modern frameworks such as LangGraph, LangChain, CrewAI, AutoGen, BeeAI, and more.
Designed for scalability and interoperability, it offers:
-
Multi-provider support (Watsonx.ai, OpenAI, Claude, Gemini, Ollama, Azure OpenAI, AWS Bedrock, etc.)
-
Multi-framework orchestration (LangGraph, CrewAI, LangChain, AutoGen)
-
Enterprise-ready operations (Docker, Helm, CI/CD, health checks, observability)
-
Secure adapters for private enterprise integrations
By combining standards compliance with developer-friendly APIs and cloud-native deployment tools, Universal A2A Agent becomes the reference hub for connecting AI systems, orchestrators, and enterprise tools—future-proofing your AI infrastructure for the fast-evolving multi-agent ecosystem.
What is A2A (Agent‑to‑Agent) services?
This project provides a HTTP service (FastAPI) you run once and point anything at:
POST /a2a— minimal A2A envelopePOST /rpc— JSON-RPC 2.0POST /openai/v1/chat/completions— OpenAI-compatible
Inside, the runtime “brain” is split into two pluggable layers:
-
Provider plugin → Which LLM vendor/model do we call? Examples:
watsonx,openai,ollama,anthropic,gemini,azure_openai,bedrock. Selected byLLM_PROVIDER. Located insrc/a2a_universal/provider_plugins/. -
Framework plugin → How do we call it for this use-case? Examples: simple LangGraph-style loop, CrewAI-like stepper, etc. Selected by
AGENT_FRAMEWORK. Located insrc/a2a_universal/framework_plugins/.
Think: Provider = “the model backend” (watsonx.ai). Framework = “the orchestration strategy” (how we structure the prompt/response loop).
A2A is a vendor‑neutral way to call an agent service over a small, stable API. Your app—or another agent—sends a structured message; the service is free to choose models, invoke tools, run workflows, and return a well‑formed reply. The big win is decoupling: one contract on the outside, freedom to change providers/frameworks on the inside.
The essential A2A pieces (the bits most intros miss)
-
Agent Card (discovery): a document that says who the agent is and how to talk to it. It declares:
protocolVersion,name,description,version- Transports & URLs: canonical
url+preferredTransport(JSONRPC baseline), optionaladditionalInterfaces(GRPC, HTTP+JSON) - Capabilities:
streaming,pushNotifications,stateTransitionHistory(+ optional extensions) - Security: OpenAPI‑style
securitySchemes(bearer, apiKey, oauth2, oidc, mTLS) and overallsecurity(OR‑of‑AND requirements) - I/O Modes:
defaultInputModes/defaultOutputModes(MIME types) - Skills: public capabilities with
id,name,description,tags,examples(+ optional per‑skill I/O/security)
-
Core endpoints (spec‑level):
POST /v1/message:send— synchronous message → responsePOST /v1/message:stream— streaming updatesGET /v1/tasks/{id}— task state/historyPOST /v1/tasks/{id}:cancel— optional cancellationGET /v1/card— the Agent Card
-
Content model: messages are made of parts
text,file, ordatawith explicit MIME types.
Project convenience shims (optional): Many runtimes expose friendly routes like
POST /a2a(raw),POST /rpc(JSON‑RPC 2.0 wrapper), and an OpenAI‑compatible path (e.g.,/openai/v1/chat/completions) for drop‑in ecosystem support. These are add‑ons; the canonical endpoints above are the standard.
MatrixHub in one minute (why, what, how)
What MatrixHub is: a catalog & installer for agents/tools. It ingests manifests that describe your agent (including A2A metadata), makes them searchable, and can install them into projects and environments.
![]()
What MatrixHub offers:
- Universal discovery: publish a manifest once; teams can find and reuse your agent anywhere.
- Protocol‑aware manifests: MatrixHub stores
manifests.a2aandprotocols=["a2a@<ver>"], so clients know your agent speaks A2A and how to call it. - One‑step install: installation can auto‑register your agent with an MCP Gateway (best‑effort), so routing/auth live at the edge and your service stays simple.
- Versioning & channels: track versions, promote safely, and roll back fast.
- Team governance: central metadata, tags, and ownership make compliance easier.
Why use it: it removes glue code. Instead of every app hard‑coding URLs and auth, you publish one manifest; MatrixHub standardizes how teams discover, install, and route to your agent.
How it simplifies agentic AI: agents become plug‑and‑play. Discovery, registration, and (optionally) Gateway routing are handled for you, so you focus on agent logic—not on wiring.
For more information visit MatrixHub project here.
A2A vs. other things (quick differences)
-
A2A vs. LLM API LLM API = “talk to a model.” A2A = “talk to a service that can plan, use tools, run workflows, and then answer.”
-
A2A vs. SDK/Framework Frameworks (LangGraph, CrewAI, LangChain, AutoGen, Bee, etc.) help you build agents. A2A is how you call an agent once it’s running.
-
A2A vs. MCP Gateway A2A is the protocol an agent speaks. MCP Gateway is the front door/proxy that standardizes access, auth, routing, retries, and federation for tools and agents. MatrixHub can auto‑register your A2A agent to that Gateway during install.
-
A2A vs. webhooks Webhooks are one‑way event pings. A2A is a structured request/response contract designed specifically for interactive agent work.
Mental model (one line)
Your app → A2A agent service → (chooses model, uses tools/flows) → reply. You keep one clean HTTP contract; the agent is free to evolve its internals without breaking clients. MatrixHub makes the agent discoverable/instalable; MCP Gateway gives you a secure front door.
Tiny Agent Card (minimal YAML)
protocolVersion: "0.3.0"
name: "Example Agent"
description: "Simple agent that answers questions and can use basic tools."
version: "1.0.0"
provider: { organization: "Acme AI", url: "https://acme.ai" }

# Canonical discovery + transport
url: "https://api.example.com/a2a/v1"
preferredTransport: "JSONRPC"          # baseline; add GRPC/HTTP+JSON via additionalInterfaces
defaultInputModes: ["text/plain", "application/json"]
defaultOutputModes: ["text/plain", "application/json"]

capabilities:
  streaming: true
  pushNotifications: false
  stateTransitionHistory: true

securitySchemes:
  bearer: { type: http, scheme: bearer, bearerFormat: "JWT" }
security:
  - bearer: []

skills:
  - id: "general"
    name: "General Q&A"
    description: "Answer questions with optional tool lookups."
    tags: ["chat","qa","tools"]
    examples: ["Summarize this text", "Explain yesterday’s results"]
Architectural Overview
You will run a single, containerized FastAPI service that acts as a universal A2A hub. The service exposes a small, stable protocol surface so any client, framework, or gateway can integrate without SDK lock‑in. MatrixHub provides catalog/discovery, and MCP Gateway provides secure, standardized ingress/routing.
Core Components (at a glance, no tables)
- Agent Service (FastAPI): The core HTTP application that implements A2A behaviors and adapters. Designed to sit behind TLS and ship with health probes and discovery.
- Protocol Surface: A compact set of interoperable endpoints (see Endpoints below) so different clients can connect without rewriting.
- Framework Adapters (Pluggable): Orchestration glue for LangGraph, CrewAI, LangChain, etc. Swap at runtime via
AGENT_FRAMEWORK. - Provider (Pluggable): The LLM/backend implementation. This guide uses IBM watsonx.ai; swap to OpenAI, Ollama, Anthropic, Gemini, Bedrock, etc., via
LLM_PROVIDERwithout code changes. - MatrixHub (Catalog): Discovery/search/install layer. Ingests your manifest, persists
manifests.a2a, and tagsprotocols=["a2a@<ver>"]so A2A capability is queryable. - MCP Gateway (Ingress): Secure entry point for clients. Supports
POST /a2aagent registration and optional virtual servers viaPOST /serversthat route to your A2A agent.
Endpoints (data plane)
POST /a2a— Raw A2A request/response (vendor‑neutral, lowest level).POST /rpc— JSON‑RPC 2.0 wrapper for the same A2A methods (e.g.,message/send).POST /openai/v1/chat/completions— OpenAI‑compatible shim for immediate ecosystem compatibility.GET /.well-known/agent-card.json— Agent Card for discovery and metadata.GET /healthzandGET /readyz— Liveness & readiness (the latter returns actionable reasons).
Auth tip: If the agent is protected, prefer Bearer or API key; declare this in your A2A manifest under
manifests.a2a.authso clients and gateways know how to call you.
How the pieces fit
Data plane (runtime calls)
Client / App / Framework ──HTTP──> Universal A2A Agent ──SDK/API──> Provider (watsonx.ai)
- Your app never links vendor SDKs; it speaks HTTP to the A2A service.
- The Provider is injected via
LLM_PROVIDER(e.g.,watsonx,openai,ollama). - The Framework adapter (LangGraph/CrewAI/LangChain) orchestrates on top of the same A2A core.
Control & discovery plane
Author manifest (agent.manifest.yaml)
        │
        ▼
MatrixHub — Ingest (persists manifests.a2a, tags protocols)
        │
        ▼
MatrixHub — Install (best‑effort register to MCP Gateway /a2a; optional /servers)
        │
        ▼
MCP Gateway — Clients call Gateway; Gateway routes to your Agent
- Ingest: Makes the agent discoverable and stores A2A metadata (
manifests.a2a+protocols). - Install: If
MCP_GATEWAY_URLis configured, the Hub will best‑effort POST to/a2aon the Gateway and, if your manifest includesmanifests.a2a.server, create a virtual server via/servers.
Mental model (one slide)
            ┌──────────────────────────────────────┐
            │            MatrixHub (Catalog)       │
            │  • Search, discovery, install       │
            │  • Stores manifests.a2a + protocols │
            └───────────────┬──────────────────────┘
                            │ (install triggers best‑effort registration)
                            ▼
┌───────────────────────────────────────────────────────────────────────┐
│                         MCP Gateway (Ingress)                         │
│  • /a2a registration, optional /servers                              │
│  • Auth, routing, policy                                             │
└───────────────┬───────────────────────────────────────────────────────┘
                │ (HTTPS)
                ▼
         ┌──────────────────────────┐
         │  Universal A2A Agent     │  ◄──  /.well-known/agent-card.json
         │  • /a2a  /rpc  /openai   │
         │  • /healthz  /readyz     │
         └──────────┬───────────────┘
                    │ (SDK/API)
                    ▼
            Provider (watsonx.ai)
Portability & upgrades (why this scales)
- Swap providers without code changes:
LLM_PROVIDER=watsonx|openai|ollama|…. - Swap orchestrators:
AGENT_FRAMEWORK=langgraph|crewai|langchain|…. - Stable protocol surface keeps clients unchanged as internals evolve.
- MatrixHub A2A‑ready ingestion stores protocol‑native blocks for future tooling.
- Gateway idempotency: treat
/a2aand/serversas idempotent during installs (409 ⇒ OK when requested).
Quick responsibilities checklist
- Agent: implement endpoints; emit clear readiness reasons; return structured A2A responses.
- Manifest: include
manifests.a2a(version, endpoint_url, agent_type, auth, tags; optionalserver). - MatrixHub: ingest manifests; install into a project; best‑effort register to Gateway if configured.
- Gateway: secure entry; route traffic; list agents/servers; apply auth & policy.
Keep this as your canonical mental model. It’s 100% compatible with MatrixHub ingestion/installation semantics and MCP Gateway’s
/a2a+/serversAPIs.
Prerequisites
Before proceeding, ensure your development environment meets the following requirements:
- Python 3.11 or newer.
- Core Development Tools:
gitandmake. - (Optional) Containerization: Docker and Docker Compose for building and running the service in an isolated environment.
- IBM watsonx.ai Credentials: You will need an active IBM Cloud account. If you don’t have one, you can register for free.
WATSONX_API_KEY: Your service API key.WATSONX_URL: The regional endpoint for your watsonx.ai service (e.g.,https://us-south.ml.cloud.ibm.com).WATSONX_PROJECT_ID: The unique identifier for your watsonx.ai project.
- (Optional) Deployment Infrastructure: A running instance of MatrixHub and MCP Gateway for the final deployment and registration steps.
Conceptual Detour: MatrixHub & MCP Gateway
- MatrixHub: Functions as a service catalog or “app store” for distributed agents and tools. It ingests standardized manifests that describe what an agent does and how to communicate with it. Its primary role is discovery and metadata management.
- MCP Gateway: Acts as a secure, unified API Gateway. It provides a single point of entry for clients, routing requests to the appropriate backend agents registered within it. It handles concerns like authentication, routing, and protocol mediation, decoupling clients from the physical location and implementation details of the agents.
1. Project Setup and Installation.
In this Demo we are going to assume that you have Linux system, like ubuntu, and we assume that you have Python 3.11 installed.
First, clone the official repository and set up a virtual environment to manage dependencies.
# Clone the project repository
git clone https://github.com/ruslanmv/universal-a2a-agent.git
cd universal-a2a-agent
Automatic method
Then we can use type the following commands to install it, where we create and activate a Python virtual environment and Install the core application and its dependencies
make install
We install the optional framework adapters used in this tutorial
make install-extras EXTRAS="langgraph crewai watsonx"
It will takes long to install all packages. So take your time… Meanwhile you can continue with the next section.
Or if you want to do manually you can do
Manually method
# Create and activate a Python virtual environment
python -m venv .venv
source .venv/bin/activate  # On Windows, use: .venv\Scripts\activate
# Install the core application and its dependencies
pip install -e .
# Install the optional framework adapters used in this tutorial
# The [extras] syntax installs optional dependency groups defined in pyproject.toml
pip install -e .[langgraph]
pip install -e .[langchain]
pip install -e .[crewai]
Tip: To install all available adapters at once, you can run
pip install -e .[all].
4. Local Execution and Verification
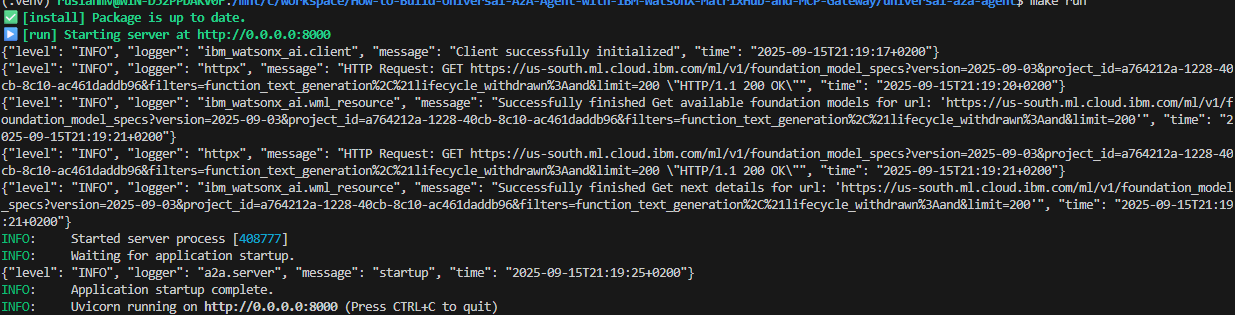
With the configuration in place, you can now run the server.
# The 'make run' command is a convenient shortcut for the uvicorn command
make run

# Alternatively, run uvicorn directly
uvicorn a2a_universal.server:app --host 0.0.0.0 --port 8000
Once the server is running, perform a series of smoke tests to verify that all components are operational.
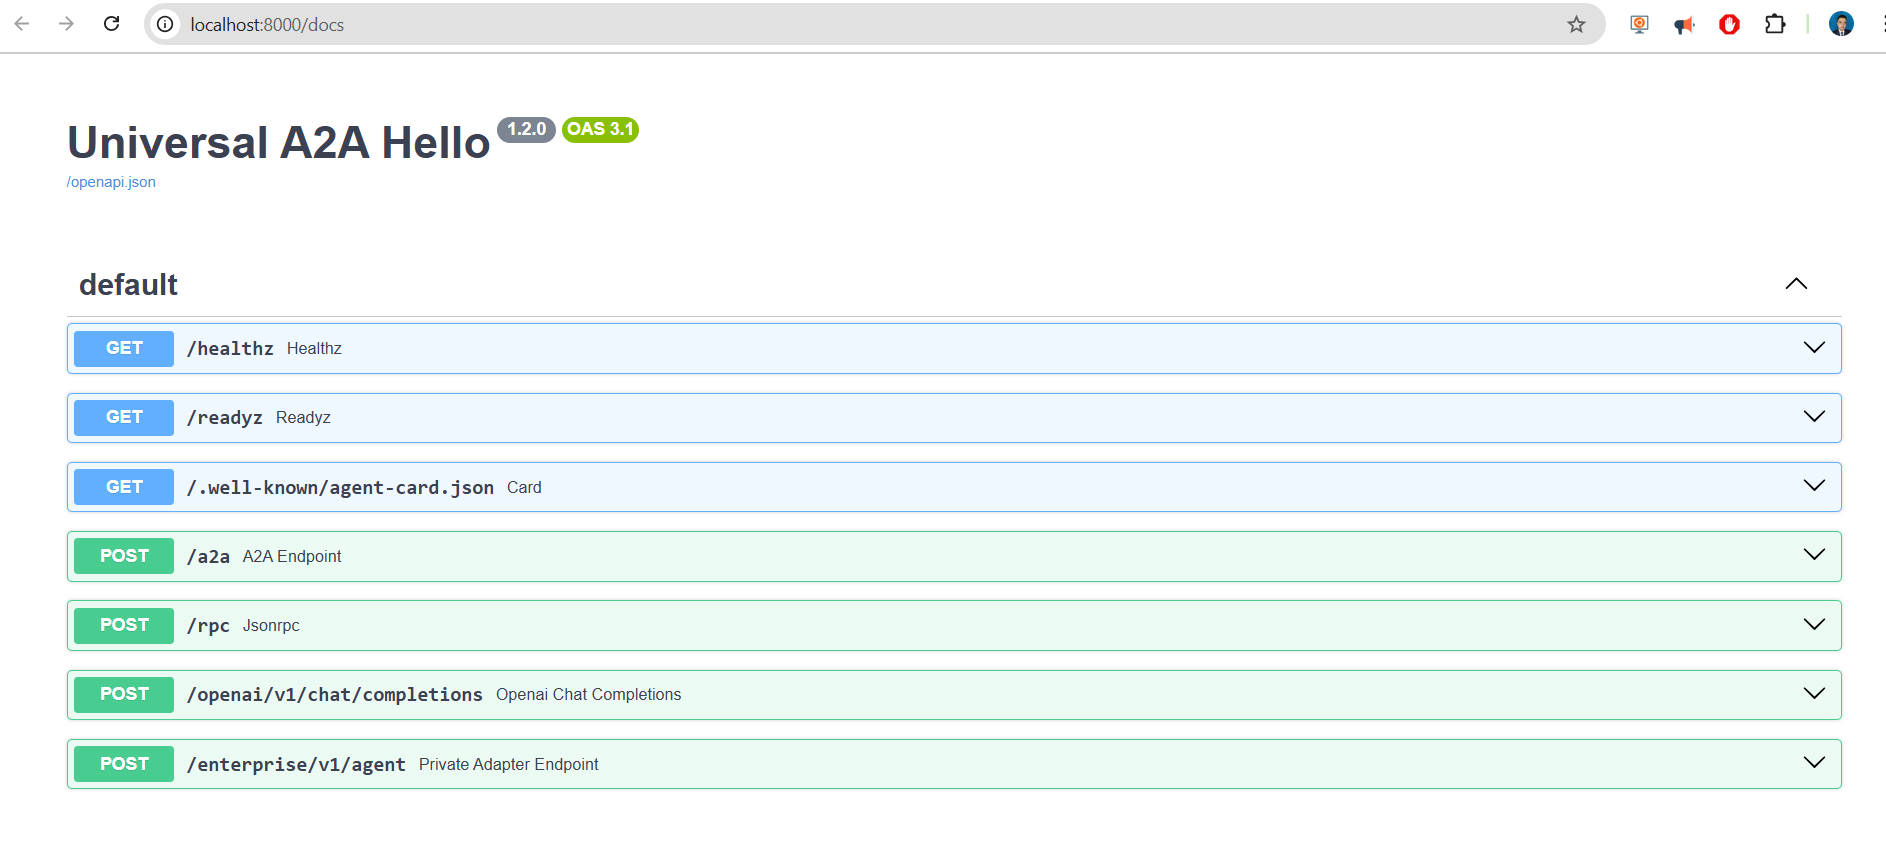
- Check the interactive API documentation (OpenAPI/Swagger) You can open http://localhost:8000/docs
- Check the basic health endpoint (liveness probe)
curl -s http://localhost:8000/healthz
{"status":"ok"}
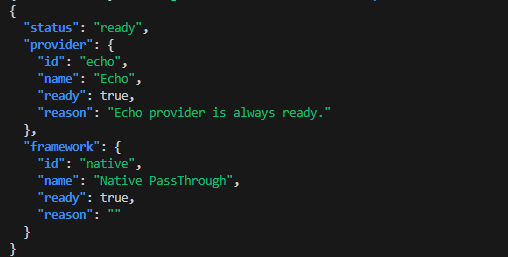
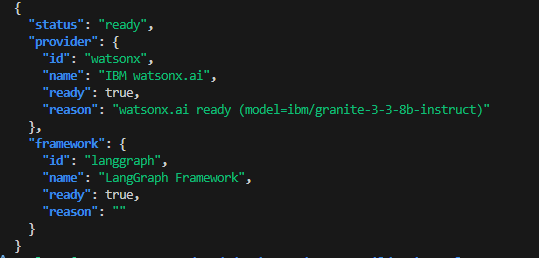
- Check the readiness endpoint (readiness probe), which verifies provider connectivity
curl -s http://localhost:8000/readyz | jq
- Check the agent card for discovery metadata
curl -s http://localhost:8000/.well-known/agent-card.json | jq

5. Validating Agent Functionality via Multiple Protocols
Confirm that the agent responds correctly across its different protocol endpoints.
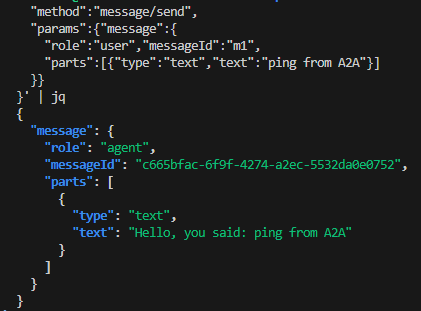
A) Raw A2A Protocol
curl -s http://localhost:8000/a2a -H 'Content-Type: application/json' -d '{
  "method":"message/send",
  "params":{"message":{
    "role":"user","messageId":"m1",
    "parts":[{"type":"text","text":"ping from A2A"}]
  }}
}' | jq
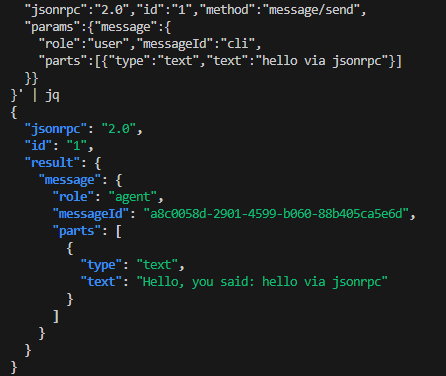
B) JSON-RPC 2.0 Protocol
curl -s http://localhost:8000/rpc -H 'Content-Type: application/json' -d '{
  "jsonrpc":"2.0","id":"1","method":"message/send",
  "params":{"message":{
    "role":"user","messageId":"cli",
    "parts":[{"type":"text","text":"hello via jsonrpc"}]
  }}
}' | jq
C) OpenAI-Compatible Protocol
curl -s http://localhost:8000/openai/v1/chat/completions \
  -H 'Content-Type: application/json' \
  -d '{
    "model":"universal-a2a-hello",
    "messages":[{"role":"user","content":"hello from openai route"}]
  }' | jq -r '.choices[0].message.content'

2. Acquiring IBM watsonx.ai Credentials
Nìow that you have setup all your enviroment. We are ready to build our first agent. To configure the watsonx.ai provider, you need to obtain your API key and project details from the IBM Cloud platform.
- Sign in to IBM Cloud.
- Navigate to your watsonx.ai instance. If you don’t have one, create a new project. You can access your projects directly via
https://dataplatform.cloud.ibm.com/projects/. - Within your project’s Manage tab, go to the Access Control section and create a new service API key. Securely copy this key.
- Collect the following three values:
WATSONX_API_KEY: The API key you just generated.WATSONX_URL: The regional endpoint shown in your service instance details (e.g.,https://us-south.ml.cloud.ibm.com).WATSONX_PROJECT_ID: The GUID of your project, found in the project’s Manage -> General settings.
For security and ease of configuration, it is highly recommended to store these credentials in a .env file at the root of the project.
3. Configuring the Runtime Environment
The agent’s behavior is controlled by environment variables. This allows you to switch the active provider or framework without any code changes. Set the following variables in your shell (or confirm they are in your .env file).
1) Minimal Setup for watsonx.ai
Example .env file:
# Provider and Framework Selection
LLM_PROVIDER=watsonx
AGENT_FRAMEWORK=langgraph

# IBM watsonx.ai Credentials
WATSONX_API_KEY=your_api_key_here
WATSONX_URL=https://us-south.ml.cloud.ibm.com
WATSONX_PROJECT_ID=your_project_guid_here
MODEL_ID=ibm/granite-3-3-8b-instruct # Optional: specify a different model

# Public URL for agent discovery
PUBLIC_URL=http://localhost:8000
Install & Run
# Select the watsonx.ai provider
export LLM_PROVIDER=watsonx
# Set your credentials
export WATSONX_API_KEY=YOUR_KEY
export WATSONX_URL=https://us-south.ml.cloud.ibm.com
export WATSONX_PROJECT_ID=YOUR_PROJECT_ID
# Select the LangGraph framework for orchestration
export AGENT_FRAMEWORK=langgraph  # Other options: crewai, langchain, native
You can try with
Use the Makefile, which guarantees the right interpreter and dependencies:
make run
# Linux/macOS
source .venv/bin/activate
uvicorn a2a_universal.server:app --host 0.0.0.0 --port 8000
# Windows PowerShell
.venv\Scripts\Activate.ps1
uvicorn a2a_universal.server:app --host 0.0.0.0 --port 8000
provider & framework ready:true
curl -s localhost:8000/readyz | jq
2) Hello, World — The Absolute Simplest Call
curl -s http://localhost:8000/a2a \
  -H 'Content-Type: application/json' \
  -d '{
        "method":"message/send",
        "params":{"message":{"role":"user","messageId":"m1","parts":[{"type":"text","text":"What are the main attractions in Genova Italy?"}]}}
      }' | jq

What Happened When We Called Universal A2A with Watsonx
We got back a detailed answer about tourist attractions in Genoa, Italy, wrapped in an A2A response.
So what really happened under the hood? Let’s break it down.
Step-by-Step Execution Flow
1. You sent a message in A2A format
The curl request used the A2A “message/send” envelope, which is the universal, vendor-neutral contract:
{
  "method": "message/send",
  "params": {
    "message": {
      "role": "user",
      "messageId": "m1",
      "parts": [
        {"type": "text", "text": "What are the main attractions in Genova Italy?"}
      ]
    }
  }
}
This says: “Here’s a user message, please send it to the agent and return a reply.”
2. Universal A2A endpoint normalizes the request
The /a2a FastAPI endpoint validated the JSON and recognized the method: message/send.
It then extracted the user text:
"What are the main attractions in Genova Italy?"
3. Framework plugin takes over (langgraph)
Because we configured:
AGENT_FRAMEWORK=langgraph
…the LangGraph framework plugin was loaded. Its job is to decide how messages are passed to the provider.
- In this case, the logic is simple: Take the last user message → Forward it to the provider.
If we had chosen a different framework (crewai, autogen, etc.), this step might have looked more like a multi-turn reasoning loop or a multi-agent workflow.
4. Provider plugin selected (watsonx)
Next, the framework called the provider plugin defined in our config:
LLM_PROVIDER=watsonx
This plugin knows how to talk to IBM watsonx.ai. It used our credentials:
WATSONX_API_KEYWATSONX_URLWATSONX_PROJECT_IDMODEL_ID=ibm/granite-3-3-8b-instruct
…and sent the user text to the Granite model.
5. Watsonx Granite model generates the reply
The Granite 8B Instruct model inside Watsonx produced a detailed answer about Genoa:
- Aquarium of Genoa 🐠
- Galata Maritime Museum ⚓
- Piazza De Ferrari 🏛️
- …and more.
This is the raw natural language output from the model.
6. Universal A2A wraps the response
Finally, the runtime wrapped the model output back into an A2AResponse schema:
{
  "message": {
    "role": "agent",
    "messageId": "7bfd4222-3b47-4e15-afd1-d3e95cdafebc",
    "parts": [
      {
        "type": "text",
        "text": "Genova, Italy, is a vibrant port city with a rich history..."
      }
    ]
  }
}
Notice:
role: "agent"— marks this as the agent’s reply.messageId— auto-generated UUID.parts— structured payload, in this case a singletextpart.
Why This Matters
- One stable API (
/a2a,/rpc,/openai/v1/chat/completions). -
Pluggable brains inside:
- Provider = Watsonx Granite (but could be OpenAI, Ollama, Claude, etc.).
- Framework = LangGraph (but could be CrewAI, AutoGen, etc.).
- Decoupling: You didn’t have to change your client code when switching from Echo → Watsonx → OpenAI.
In short:
Your curl request went through the A2A contract → LangGraph framework → Watsonx Granite model → wrapped back into A2A → returned as JSON.
That’s why you got a rich, natural-sounding answer about Genoa attractions from your local Universal A2A Agent.
This posts to /a2a. Internally:
- Framework reads the user text → calls the watsonx Provider
- watsonx Provider calls IBM watsonx.ai
- The server returns the model’s reply.
3) Direct Provider Test (no server)
Use this to debug credentials quickly.
examples/watsonx_direct.py
import os
from a2a_universal.providers import build_provider

def main():
    os.environ.setdefault("LLM_PROVIDER", "watsonx")
    p = build_provider()
    print("ready:", p.ready, "reason:", getattr(p, "reason", ""))
    print("model reply:", p.generate(prompt="Tell me about Genova Italy"))

if __name__ == "__main__":
    main()
Run:
python examples/watsonx_direct.py
If this prints a sane reply, your watsonx credentials are good.

If you did not exported the enviroment variables you can add this block to the previos code
# Load environment variables from the .env file in the same directory as this script
from pathlib import Path
from dotenv import load_dotenv
load_dotenv(dotenv_path=Path(__file__).parent / '.env')
1. os.environ.setdefault("LLM_PROVIDER", "watsonx")
You’re telling the system: “Use the watsonx provider plugin.”
This makes build_provider() load the watsonx connector instead of echo, openai, etc.
2. p = build_provider()
This constructs the provider plugin object, which knows how to talk to IBM watsonx.ai.
At this moment, the plugin checks credentials (WATSONX_API_KEY, WATSONX_URL, WATSONX_PROJECT_ID) and marks itself as ready.
3. print("ready:", p.ready, "reason:", getattr(p, "reason", ""))
You’re confirming that the provider is operational:
ready: True reason: watsonx.ai ready (model=ibm/granite-3-3-8b-instruct)
This means Watsonx Granite 8B is correctly initialized.
4. p.generate(prompt="Tell me about Genova Italy")
This is the actual LLM call. The provider plugin sends the prompt to IBM watsonx.ai → Granite 8B Instruct model → gets a response.
That’s why you see:
model reply: Genova, also known as Genoa, is a historic seaport city...
4) Call the Server from Python (tiny client)
Start the server first
make run
This starts the Universal A2A Agent on http://0.0.0.0:8000.
Then, in another terminal, run:
python examples/call_server.py

where examples/call_server.py it is defined
import httpx, os, sys

BASE = os.getenv("A2A_BASE", "http://localhost:8000")

def call_a2a(text: str) -> str:
    payload = {
        "method": "message/send",
        "params": {
            "message": {
                "role": "user",
                "messageId": "poc",
                "parts": [{"type": "text", "text": text}],
            }
        },
    }
    try:
        r = httpx.post(f"{BASE}/a2a", json=payload, timeout=30.0)
        r.raise_for_status()
    except httpx.ConnectError:
        return f"[Error] Could not connect to A2A server at {BASE}. Did you run `make run`?"
    except httpx.HTTPStatusError as e:
        return f"[Error] Server returned {e.response.status_code}: {e.response.text}"

    data = r.json()
    for p in (data.get("message") or {}).get("parts", []):
        if p.get("type") == "text":
            return p.get("text", "")
    return "[No text part in A2A response]"

if __name__ == "__main__":
    print(call_a2a("What is the best dish in Genova?"))
What actually happened
-
Your script built an A2A request
-
examples/call_server.pycreated a JSON payload like:{ "method": "message/send", "params": { "message": { "role": "user", "messageId": "poc", "parts": [ {"type": "text", "text": "What is the best dish in Genova?"} ] } } } -
Then it POSTed it to
http://localhost:8000/a2a.
-
-
The Universal A2A Agent server received it
- Your FastAPI app (
a2a_universal.server) was running (frommake runor Docker). - The server parsed the A2A envelope (
method=message/send). - It extracted the user text:
"What is the best dish in Genova?".
- Your FastAPI app (
-
The Framework layer took over
-
The server called the configured Framework (from
AGENT_FRAMEWORK). -
In your
.env, you had:LLM_PROVIDER=watsonx AGENT_FRAMEWORK=langgraph -
So → the LangGraph orchestration strategy was used to pass the user’s text to the provider.
-
-
The Provider plugin sent the query to IBM watsonx.ai
- The Provider was
watsonx. -
It used your Watsonx credentials:
WATSONX_API_KEYWATSONX_URLWATSONX_PROJECT_IDMODEL_ID=ibm/granite-3-3-8b-instruct
- It built an API call to Watsonx.ai, sending the prompt:
"What is the best dish in Genova?".
- The Provider was
-
Watsonx.ai generated the answer
-
The model (
granite-3-3-8b-instruct) replied with text about:- Pesto Genovese 🍝
- Trofie pasta
- Focaccia 🥖
-
This raw text came back to the Universal A2A server.
-
-
The server wrapped the reply
-
The Framework wrapped the LLM’s text in a proper A2A response:
{
  "message": {
    "role": "agent",
    "messageId": "xxxx-uuid",
    "parts": [
      {
        "type": "text",
        "text": "The best dish in Genoa is the Pesto Genovese..."
      }
    ]
  }
}
-
-
Your client printed the result
-
examples/call_server.pyparsed the JSON. -
It extracted the first
textpart. -
It printed the model’s answer to your terminal:
The best dish in Genoa is the Pesto Genovese...
-
In short
Running call_server.py = full Universal A2A roundtrip:
- Client → A2A request
- Server → Framework → Provider (Watsonx.ai)
- Model reply → Framework → Server → A2A response
- Client prints answer
So what you saw was a real LLM call going through your Universal A2A Agent, asking Watsonx.ai what the best dish in Genoa is.
Here’s the polished, professional version of your documentation blog section. I’ve made the narrative coherent, connected the code with the observed output, and explained step by step what happened.
5) Integration with Orchestration Frameworks (Watsonx as Orchestrator + Executor)
Why this matters
Modern AI stacks are usually two-layered:
-
Orchestration layer (planner) – decides what to do next. Frameworks like LangChain, CrewAI, and LangGraph live here. They often rely on an LLM to reason about tools, routes, and steps.
-
Execution layer (executor) – actually performs the work. This is the LLM that answers user questions, processes text, or calls downstream APIs.
The Universal A2A Agent gives you the freedom to mix and match:
- Use IBM watsonx.ai for both orchestration and execution.
- Or let Watsonx.ai plan (orchestrator) while another LLM (e.g., Anthropic Claude, OpenAI GPT, Ollama local model) executes.
- Your application code doesn’t change—just switch environment variables.
A) LangChain → A2A Tool (all powered by Watsonx.ai)
First install the integrations:
pip install -e .[langchain] langchain-ibm ibm-watsonx-ai httpx
then you define your agent framework in .env file
AGENT_FRAMEWORK=langchain
examples/quickstart_langchain_watsonx.py
"""
Example: LangChain Agent + Watsonx.ai + Universal A2A

- Watsonx.ai acts as the orchestrator (LLM for planning).
- Universal A2A Agent acts as the executor (tool backend).
- Demonstrates clean error handling, memory, and environment setup.
"""

import os
import httpx
from dotenv import load_dotenv

from langchain.agents import initialize_agent, AgentType
from langchain.memory import ConversationBufferMemory
from langchain_core.tools import Tool
from langchain_ibm import ChatWatsonx


# -------------------------------------------------------------------
# Load environment variables
# -------------------------------------------------------------------
load_dotenv()

BASE = os.getenv("A2A_BASE", "http://localhost:8000")


# -------------------------------------------------------------------
# Universal A2A tool wrapper
# -------------------------------------------------------------------
def a2a_call(prompt: str) -> str:
    """Send a user message to the Universal A2A /a2a endpoint."""
    payload = {
        "method": "message/send",
        "params": {
            "message": {
                "role": "user",
                "messageId": "lc-tool",
                "parts": [{"type": "text", "text": prompt}],
            }
        },
    }

    try:
        r = httpx.post(f"{BASE}/a2a", json=payload, timeout=30.0)
        r.raise_for_status()
        data = r.json()
        for p in (data.get("message") or {}).get("parts", []):
            if p.get("type") == "text":
                return p.get("text", "")
        return "[No text part in A2A response]"
    except httpx.HTTPError as e:
        return f"[A2A HTTP Error: {e}]"
    except Exception as e:
        return f"[A2A call failed: {e}]"


# -------------------------------------------------------------------
# Main: Watsonx Orchestrator + LangChain Agent
# -------------------------------------------------------------------
if __name__ == "__main__":
    # Required environment variables
    model_id = os.getenv("MODEL_ID", "ibm/granite-3-3-8b-instruct")
    project_id = os.environ.get("WATSONX_PROJECT_ID")
    url = os.environ.get("WATSONX_URL")
    api_key = os.environ.get("WATSONX_API_KEY")

    if not all([project_id, url, api_key]):
        raise RuntimeError(
            "Missing Watsonx credentials. Please set WATSONX_PROJECT_ID, WATSONX_URL, and WATSONX_API_KEY."
        )

    # Orchestrator LLM (Watsonx.ai, via LangChain integration)
    llm = ChatWatsonx(
        model_id=model_id,
        project_id=project_id,
        base_url=url,
        apikey=api_key,
        params={"decoding_method": "greedy", "max_new_tokens": 256},
        temperature=0.0,
    )

    # Wrap Universal A2A as a LangChain Tool
    tool = Tool(
        name="a2a_hello",
        description="Send a prompt to the Universal A2A agent and return its reply.",
        func=a2a_call,
    )

    # Memory (required for chat-based agents)
    memory = ConversationBufferMemory(memory_key="chat_history")

    # Build Agent (legacy LangChain agent API)
    agent = initialize_agent(
        tools=[tool],
        llm=llm,
        agent=AgentType.CHAT_ZERO_SHOT_REACT_DESCRIPTION,
        verbose=True,
        handle_parsing_errors=True,
        memory=memory,
    )

    # Run an example query
    query = "Use the a2a_hello tool to say hello to LangChain."
    response = agent.invoke({"input": query})
    print("\n[Final Answer]:", response["output"])


"""
Notes:
- You’ll see deprecation warnings because LangChain agents are legacy.
- Migration path: LangGraph (recommended for new apps).
  See: https://langchain-ai.github.io/langgraph/

But this script will continue to run correctly with LangChain.
"""
Run it:
python examples/quickstart_langchain_watsonx.py
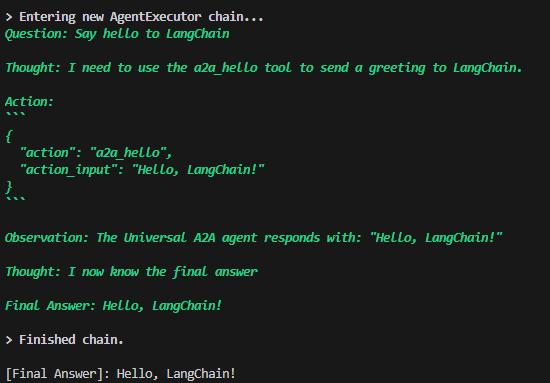
🔎 Example Run (Observed Output)
> Entering new AgentExecutor chain...
Question: Say hello to LangChain

Thought: I need to use the a2a_hello tool to send a greeting to LangChain.

Action:
{
  "action": "a2a_hello",
  "action_input": "Hello, LangChain!"
}

Observation: The Universal A2A agent responds with: "Hello, LangChain!"

Thought: I now know the final answer

Final Answer: Hello, LangChain!

> Finished chain.

[Final Answer]: Hello, LangChain!
🔄 What happens under the hood
-
LangChain orchestrator Watsonx.ai (
granite-3-3-8b-instruct) reasons about the user’s request. It concludes: “I should call thea2a_hellotool.” -
Tool invocation → Universal A2A The agent calls the A2A server at
/a2a. -
A2A Framework → Provider The A2A runtime framework takes that input and forwards it to the selected watsonx Provider.
-
Provider → IBM watsonx.ai (executor) Watsonx.ai generates the final response text.
-
Response bubbles back Execution result flows back → A2A → LangChain → your application.
⚖️ Key Advantage
Same vendor, two distinct roles:
- Orchestrator → plans the workflow (LangChain head using Watsonx.ai).
- Executor → fulfills the task (Universal A2A backend using Watsonx.ai).
This separation keeps your design modular, future-proof, and vendor-agnostic. Tomorrow you could swap in Claude or GPT as the executor without rewriting your LangChain orchestration logic.
👉 This dual-role setup—Watsonx.ai as both planner and executor—is a powerful enterprise pattern: one brain to coordinate, another brain (sometimes the same vendor, sometimes different) to deliver.
6) Reference — The watsonx Provider Plugin (used by the server)
This plugin is what build_provider() loads when LLM_PROVIDER=watsonx.
It authenticates and exposes a generate() method the framework calls.
src/a2a_universal/provider_plugins/watsonx.py
When does provider_plugins/watsonx.py run?
On server startup, a2a_universal.providers.build_provider() reads LLM_PROVIDER.
If LLM_PROVIDER=watsonx, the registry imports and instantiates provider_plugins/watsonx.py::Provider.
It authenticates with WATSONX_API_KEY, WATSONX_URL, WATSONX_PROJECT_ID, and sets ready=True if good.
On each request (/a2a, /rpc, or /openai/...):
Framework.execute(messages) → calls the injected watsonx Provider → which calls IBM watsonx.ai → returns text.
So any example that hits your server will use the watsonx provider if LLM_PROVIDER=watsonx.
You don’t call this file directly. The server builds it on startup (via
build_provider()), then the framework uses it for each request.
7) What is the Framework plugin doing?
Conceptually (simplified):
class Framework(FrameworkBase):
    id = "langgraph"
    name = "LangGraph Framework"

    def __init__(self, provider: ProviderBase):
        self.provider = provider
        self.ready = provider.ready
        self.reason = "" if provider.ready else provider.reason

    async def execute(self, messages: list[dict]) -> str:
        # Extract last user text:
        user_text = ""
        for m in reversed(messages):
            if m.get("role") == "user" and isinstance(m.get("content"), str):
                user_text = m["content"]; break
        # Call the provider (watsonx) to get a reply:
        return self.provider.generate(prompt=user_text)
That’s it: “read messages → call provider → return text.” You can later swap frameworks without touching provider code (and vice versa).
8) Troubleshooting (watsonx-specific)
readyzshows not-ready: CheckWATSONX_API_KEY,WATSONX_URL,WATSONX_PROJECT_ID,MODEL_ID.- ImportError: Install
ibm-watsonx-ai(andlangchain-ibmif you use LangChain). - 401/403: Verify the API key scope and project access in IBM Cloud.
- Timeouts: Your network or region mismatch; confirm
WATSONX_URLand model availability.
TL;DR
- Provider = watsonx.ai client (actual text generation).
- Framework = strategy wrapper that uses the provider (state/memory/graph/steps).
- Set env:
LLM_PROVIDER=watsonx,AGENT_FRAMEWORK=langgraph. - Start server, hit
/a2a(or/rpc,/openai/...). - Optional: In LangChain, use ChatWatsonx for orchestration and call A2A as a Tool.
6. Integration with Orchestration Frameworks
A key advantage of this architecture is its ability to serve as a standardized tool for higher-level frameworks.
🚨 Critical Note on Orchestrator LLMs
Frameworks like LangChain and CrewAI often use an LLM for their internal planning and routing logic (the “orchestrator”). This is separate from the LLM used for executing tasks (our watsonx.ai provider). If the framework’s default orchestrator is
ChatOpenAI, you must set anOPENAI_API_KEYfor the framework to function, even though all substantive work will be routed through our A2A agent to watsonx.ai.
6.1. LangChain Tool Integration
Here, we wrap our A2A endpoint as a Tool that a LangChain agent can decide to use.
6.2. LangGraph Node Integration
In LangGraph, our A2A agent can act as a node in a stateful graph.
# File: examples/quickstart_langgraph_watsonx.py
import asyncio
import httpx
from langgraph.graph import StateGraph, MessagesState
from langchain_core.messages import HumanMessage, AIMessage

BASE = "http://localhost:8000"

# -------------------------------------------------------------------
# A2A async call
# -------------------------------------------------------------------
async def a2a_send(text: str) -> str:
    """Send a message to Universal A2A and return its reply text."""
    payload = {
        "method": "message/send",
        "params": {
            "message": {
                "role": "user",
                "messageId": "lg-node",
                "parts": [{"type": "text", "text": text}],
            }
        },
    }
    try:
        async with httpx.AsyncClient(timeout=30.0) as client:
            r = await client.post(f"{BASE}/a2a", json=payload)
            r.raise_for_status()
            data = r.json()  # FIX: httpx .json() is synchronous
            for p in (data.get("message") or {}).get("parts", []):
                if p.get("type") == "text":
                    return p.get("text", "")
        return "[No text part in A2A response]"
    except httpx.HTTPError as e:
        return f"[A2A HTTP Error: {e}]"
    except Exception as e:
        return f"[A2A call failed: {e}]"

# -------------------------------------------------------------------
# LangGraph node: forward message to A2A
# -------------------------------------------------------------------
async def a2a_node(state: MessagesState) -> MessagesState:
    last_message = state["messages"][-1]
    user_text = getattr(last_message, "content", "")
    reply_text = await a2a_send(user_text)
    return {"messages": [AIMessage(content=reply_text)]}

# -------------------------------------------------------------------
# Build LangGraph workflow
# -------------------------------------------------------------------
graph = StateGraph(MessagesState)
graph.add_node("a2a", a2a_node)
graph.set_entry_point("a2a")
app = graph.compile()

# -------------------------------------------------------------------
# Run example
# -------------------------------------------------------------------
async def main():
    result = await app.ainvoke({"messages": [HumanMessage(content="Tell me about Genova?")]})
    print("\n[Final Answer]:", result["messages"][-1].content)

if __name__ == "__main__":
    asyncio.run(main())
First we edit the .env file
AGENT_FRAMEWORK=langgraph
then
make run
or we type
./scripts/load-dotenv.sh && .venv/bin/uvicorn a2a_universal.server:app --host 0.0.0.0 --port 8000
python examples/quickstart_langgraph_watsonx.py
6.3. CrewAI Multi-Agent System
This example demonstrates a multi-agent workflow where agents use our A2A service (backed by watsonx.ai) as their primary tool.
# File: examples/crewai_watsonx_duo.py
import os
from dotenv import load_dotenv
from crewai import Agent, Task, Crew, LLM
from a2a_universal.adapters.crewai_base_tool import A2AHelloTool
# -------------------------------------------------------------------
# Load environment variables
# -------------------------------------------------------------------
load_dotenv()
# Required environment variables for Watsonx
model_id = os.getenv("MODEL_ID", "ibm/granite-3-8b-instruct") # ✅ updated default
project_id = os.environ.get("WATSONX_PROJECT_ID")
url = os.environ.get("WATSONX_URL")
api_key = os.environ.get("WATSONX_API_KEY")
if not all([project_id, url, api_key]):
raise RuntimeError(
"Missing Watsonx credentials. Please set WATSONX_PROJECT_ID, WATSONX_URL, and WATSONX_API_KEY in your .env file."
)
# -------------------------------------------------------------------
# Watsonx LLM (CrewAI-native via LiteLLM provider)
# -------------------------------------------------------------------
# NOTE: CrewAI’s `LLM` expects a LiteLLM-compatible model string.
# For watsonx, you must prefix with "watsonx/"
watsonx_llm = LLM(
model=f"watsonx/{model_id}",
api_key=api_key,
base_url=url, # LiteLLM uses api_base/base_url for endpoint
temperature=0.0,
max_tokens=2048,
project_id=project_id, # forwarded to watsonx provider
)
# -------------------------------------------------------------------
# Main Crew workflow
# -------------------------------------------------------------------
if __name__ == "__main__":
topic = "Edge AI for autonomous drones in search & rescue"
# Shared A2A Tool
a2a_tool = A2AHelloTool()
a2a_tool.base_url = os.getenv("A2A_BASE", "http://localhost:8000")
# Researcher Agent
researcher = Agent(
role="Researcher",
goal="Gather concise, accurate notes and outline the topic.",
backstory="Methodical analyst who drafts clean bullet-point notes.",
tools=[a2a_tool],
llm=watsonx_llm, # ✅ use CrewAI-native Watsonx LLM
allow_delegation=False,
verbose=True,
)
# Writer Agent
writer = Agent(
role="Writer",
goal="Turn notes into a tidy LaTeX article (1–2 pages).",
backstory="Technical writer who produces compilable LaTeX.",
tools=[a2a_tool],
llm=watsonx_llm, # ✅ use CrewAI-native Watsonx LLM
allow_delegation=False,
verbose=True,
)
# Research Task
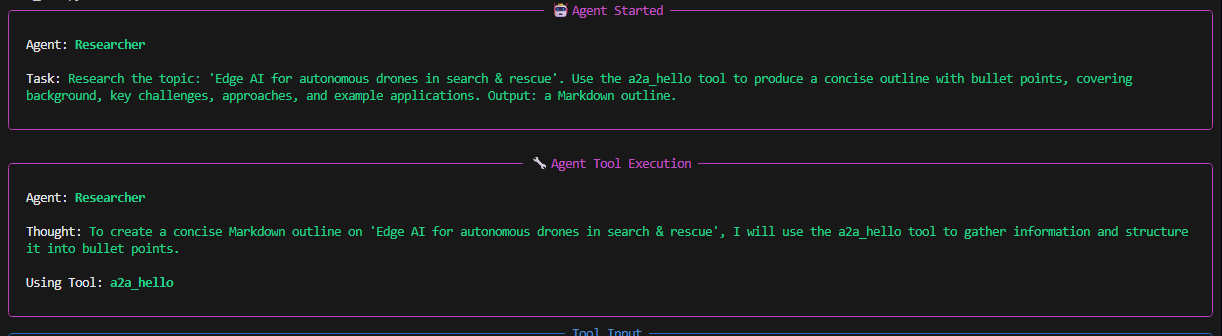
t_research = Task(
description=(
f"Research the topic: '{topic}'. "
"Use the a2a_hello tool to produce a concise outline with bullet points, "
"covering background, key challenges, approaches, and example applications. "
"Output: a Markdown outline."
),
agent=researcher,
expected_output="A clean Markdown outline of findings.",
)
# Writing Task (depends on research)
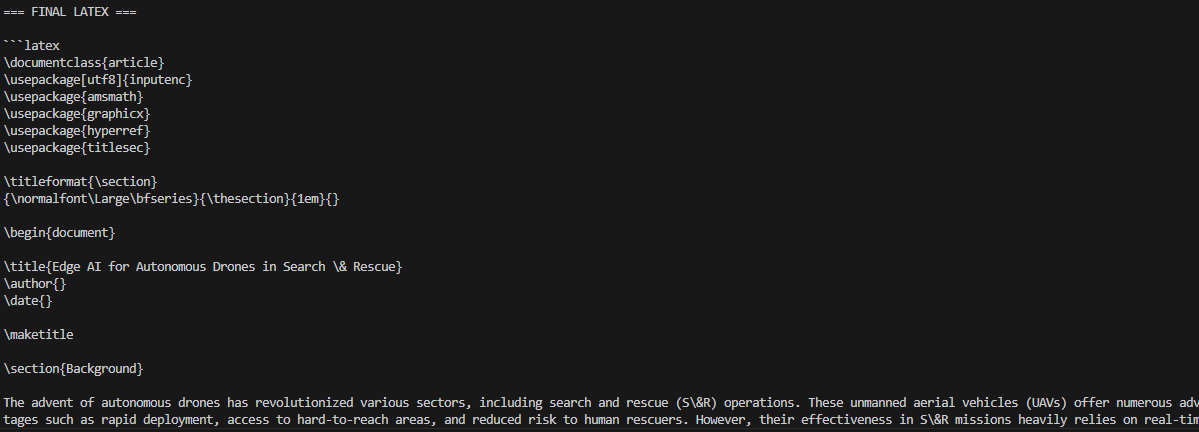
t_write = Task(
description=(
"Using the outline from the Researcher, write a compilable LaTeX article. "
"Use the a2a_hello tool to help with prose and LaTeX formatting. "
"Return only the final .tex content."
),
agent=writer,
context=[t_research],
expected_output="A single LaTeX .tex string, compilable.",
)
# Crew assembly & execution
crew = Crew(agents=[researcher, writer], tasks=[t_research, t_write])
result = crew.kickoff()
print("\n=== FINAL LATEX ===\n")
print(result)
First we edit the .env file
AGENT_FRAMEWORK=crewai
python examples/crewai_watsonx_duo.py
7. Containerization with Docker
Containerizing the application with Docker ensures consistency and portability across different environments.
Build and Run the Docker Image:
# Build the image, tagging it with a version
docker build -t ruslanmv/universal-a2a-agent:1.2.0 .

# Run the container, passing credentials as environment variables
docker run --rm -p 8000:8000 \
  -e PUBLIC_URL=http://localhost:8000 \
  -e LLM_PROVIDER=watsonx \
  -e WATSONX_API_KEY=$WATSONX_API_KEY \
  -e WATSONX_URL=$WATSONX_URL \
  -e WATSONX_PROJECT_ID=$WATSONX_PROJECT_ID \
  ruslanmv/universal-a2a-agent:1.2.0
Note: The
PUBLIC_URLvariable is used by the agent service itself. For deploying the MatrixHub service, a different variable,PUBLIC_BASE_URL, is often required.
8. Production Deployment: Publishing to MatrixHub
In a production environment, agents must be discoverable. This is achieved by publishing a manifest to MatrixHub.
8.1. Authoring the Agent Manifest
Create a manifest file (agent.manifest.yaml) that describes your agent. This file contains all the metadata needed for discovery and communication.
schema_version: 1

type: agent
id: universal-a2a-hello
version: 1.2.0
name: Universal A2A — Hello
summary: JSON-RPC echo agent, backed by IBM watsonx.ai
homepage: https://example.com/universal-a2a
license: Apache-2.0
capabilities: ["echo", "summarize"]

# A2A-specific manifest block
manifests:
  a2a:
    version: "1.0"
    # This URL must be the final, publicly accessible endpoint of your agent
    endpoint_url: "https://your-agent.example.com/a2a"
    agent_type: jsonrpc # The protocol type
    auth: { type: none, value: "" } # Can be 'bearer' or 'api_key'
    tags: ["watsonx", "demo"]
    # This block allows MatrixHub to auto-register a virtual server in MCP Gateway during install
    server:
      name: universal-a2a-hello-server
      description: Gateway virtual server exposing this A2A agent
8.2. Publishing to MatrixHub
MatrixHub ingests a catalog by fetching an index.json file that points to one or more manifest files. Host your manifest and index files on a reachable http(s):// server (e.g., GitHub Pages, S3). file:// sources are not supported.
Example index.json:
{
  "manifests": [
    "https://your-host.com/agent.manifest.yaml"
  ]
}
Ingest the catalog into MatrixHub:
# Use a non-TLS port for local dev, or https://localhost for local TLS
export HUB_BASE=${HUB_BASE:-http://localhost:8080}

# Ingest using the current route
curl -s -X POST "$HUB_BASE/catalog/ingest" -H 'Content-Type: application/json' \
  -d '{"index_url":"https://your-host.com/index.json"}' | jq

# For legacy deployments, the route might be /ingest
# curl -s -X POST "$HUB_BASE/ingest" -H 'Content-Type: application/json' \
#   -d '{"index_url":"https://your-host.com/index.json"}' | jq
Note on Database Schema: For A2A metadata to persist correctly, the MatrixHub database
entitytable requiresprotocols(jsonb) andmanifests(jsonb) columns. If these are missing, ingestion will still succeed, but A2A-specific data will not be saved.
8.3. Installing the Agent and Registering with the Gateway
The install step is what triggers the registration with MCP Gateway.
# This 'install' command triggers the best-effort Gateway registration
curl -s -X POST "$HUB_BASE/catalog/install" -H 'Content-Type: application/json' \
  -d '{"id":"agent:[email protected]","target":"/tmp/myapp"}' | jq
Corrected Behavior:
After ingestion, the agent is discoverable in MatrixHub. During the install process, if the MCP_GATEWAY_URL environment variable is configured for your MatrixHub instance and your manifests.a2a.server block is present, MatrixHub will make a best-effort attempt to register the agent with the Gateway via a POST /a2a request and create its virtual server via POST /servers.
9. Direct Registration with MCP Gateway
For more direct control, you can register the agent and its virtual server programmatically using the production gateway client or raw API calls.
Recommended Method: Using the Production Client
The preferred, production-safe method is to use the provided gateway client, which handles endpoint logic, idempotency, and authentication.
# File: scripts/register_a2a.py
import os
from src.services.gateway_client import register_a2a_agent, create_server_with_a2a

TOKEN = os.getenv("MCP_GATEWAY_TOKEN")  # optional; client can mint JWT instead

# 1. Define and register the A2A agent
agent_spec = {
    "name": "universal-a2a-hello",
    "endpoint_url": "https://your-agent.example.com/a2a",
    "agent_type": "jsonrpc",
    "auth_type": "none",
    "auth_value": None,
    "tags": ["watsonx", "demo"],
}
print(register_a2a_agent(agent_spec, idempotent=True, token=TOKEN))

# 2. Define and create the virtual server
server_payload = {
    "name": "universal-a2a-hello-server",
    "description": "Gateway virtual server exposing the A2A agent",
    "associated_a2a_agents": [agent_spec["name"]],
}
print(create_server_with_a2a(server_payload, idempotent=True, token=TOKEN))
Alternative: Raw API Requests
For transparency and understanding the underlying API calls, here is the equivalent using raw requests. Note the corrected endpoint paths (/a2a and /servers).
# File: scripts/register_a2a_raw.py
import os, requests

GATEWAY = os.getenv("MCP_GATEWAY_URL", "http://localhost:4444")
HEADERS = {"Content-Type": "application/json"}

# Handle authentication token correctly
if os.getenv("MCP_GATEWAY_TOKEN"):
    t = os.getenv("MCP_GATEWAY_TOKEN").strip()
    HEADERS["Authorization"] = t if t.lower().startswith(("bearer ", "basic ")) else f"Bearer {t}"

# 1. Register agent at POST /a2a
agent = {"name":"universal-a2a-hello","endpoint_url":"https://your-agent.example.com/a2a","agent_type":"jsonrpc","auth_type":"none","auth_value":None,"tags":["watsonx","demo"]}
print(requests.post(f"{GATEWAY}/a2a", json=agent, headers=HEADERS, timeout=15).text)

# 2. Create server at POST /servers
server = {"name":"universal-a2a-hello-server","description":"Gateway virtual server exposing the A2A agent","associated_a2a_agents":[agent["name"]]}
print(requests.post(f"{GATEWAY}/servers", json=server, headers=HEADERS, timeout=15).text)
Run your chosen script with your Gateway’s URL configured:
export MCP_GATEWAY_URL="https://gateway.example.com"
# export MCP_GATEWAY_TOKEN="your_token_if_needed"
python scripts/register_a2a.py
10. Consuming the Deployed Agent from a watsonx.ai Notebook
Once your agent is deployed and publicly accessible via an HTTPS endpoint, it can be easily consumed from any client environment, including a Jupyter Notebook running in watsonx.ai.
import os, requests

# The public base URL of your deployed agent
BASE = os.getenv("A2A_BASE", "https://your-agent.example.com")
TOKEN = os.getenv("A2A_TOKEN") # An auth token, if you configured one

headers = {"Content-Type": "application/json"}
if TOKEN:
    headers["Authorization"] = f"Bearer {TOKEN}"

body = {
    "model": "universal-a2a-hello",
    "messages": [{"role": "user", "content": "ping from watsonx.ai notebook"}],
}

# Call the OpenAI-compatible endpoint
response = requests.post(
    f"{BASE}/openai/v1/chat/completions",
    json=body,
    headers=headers,
    timeout=20
)
response.raise_for_status()
content = response.json()["choices"][0]["message"]["content"]
print(content)
Concluding Analysis: Architectural Merits
This architecture provides a robust foundation for building scalable, enterprise-grade agentic applications.
- Protocol-Driven Decoupling: By relying on standard manifests (Agent Card, A2A) and protocols (JSON-RPC, OpenAI-compatible), the agent is decoupled from any specific client or framework, promoting interoperability.
- Extensibility and Vendor Neutrality: The pluggable provider and framework layers allow the system to adapt to new LLMs and orchestration techniques without requiring a rewrite of the core service.
- Production-Grade Operations: The design includes essential operational features like health checks, structured logging, and containerization. The publishing flow via MatrixHub and MCP Gateway provides a managed, secure, and discoverable deployment pattern suitable for enterprise environments.
- Simplified Ingestion: The catalog-based approach with MatrixHub enables a safe and idempotent process for discovering and registering new agents into the ecosystem.
Congratulations!, you have learned how to build a truly robust, scalable, and enterprise-grade agentic application! By leveraging this decoupled, extensible, and production-ready architecture, you’re now equipped to create sophisticated AI agents that can seamlessly integrate and operate within any modern tech ecosystem. Happy building!
Related tutorials
- AI Agents tutorials hub
- BeeAI Framework tutorial
- watsonx Orchestrate tutorial
- Why AI agents need a kernel
FAQ
What is the A2A protocol?
Agent-to-Agent: a standard that lets agents from different frameworks interoperate. This tutorial builds a pluggable A2A agent end to end.
How does MCP Gateway fit in?
It exposes tools/resources to the agent; combined with watsonx.ai and MatrixHub you get a production-ready setup. See the AI Agents hub.
Leave a comment