
How to Speak with ChatGPT in React by using Google Cloud.
Hello everyone, today we are going to build an interesting application that allow us speak with ChatGPT by recording your voice in and reproduce the audio answer your web browser.
Introduction:
In recent years, conversational artificial intelligence (AI) has made significant advancements, allowing us to interact with AI models in a more natural and conversational manner. One such model is ChatGPT, developed by OpenAI. In this blog post, we will walk you through the process of speaking with ChatGPT using a React application that records your voice, converts it to text, sends it to ChatGPT, and plays back the AI’s response.
Prerequisites: Before we begin, make sure you have the following requirements:
- Node.js: Visit the official Node.js website (https://nodejs.org) and download the latest version of Node.js. Follow the installation instructions for your operating system.
- Google Cloud Platform Account
- OpenAI Account
Step 1: Set Up the Development Environment:
Create a new React project by opening your terminal and running the following command:
npx create-react-app speakgpt-app
Navigate to the project directory:
cd speakgpt-app
Open the project in your favorite code editor.
Step 2: Obtain the Necessary API Keys:
To use the Google Text-to-Speech and Google Speech-to-Text APIs, you need API keys. Here’s how to obtain them:
Visit the Google Cloud Console (console.cloud.google.com) and create a new project. Enable the Text-to-Speech and Speech-to-Text APIs for your project. Obtain the API keys for these services. For choose your speech voice you can see here.
Step 3: Configure the API Keys:
In the project root directory, create a new file called .env.
Open the .env file in a text editor and add the following lines:
REACT_APP_GOOGLE_API_KEY=YOUR_GOOGLE_API_KEY
REACT_APP_OPENAI_API_KEY=YOUR_OPENAI_API_KEY
Replace YOUR_GOOGLE_API_KEY with your actual Google API key and YOUR_OPENAI_API_KEY with your actual OpenAI API key. Save and close the .env file.
Step 4: Install Dependencies:
In your terminal, navigate to the project directory and run the following command to install the required dependencies:
npm install axios
Step 5: Edit App.js
Replace the contents of the src/App.js file with the following code:
/*
  Code by Ruslan Magana Vsevolodovna
  This code is provided as-is and I am not responsible for its usage.
  For any inquiries, please contact me at [email protected].
*/
import axios from 'axios';
import React, { useState, useEffect } from 'react';

async function synthesizeSpeech(text) {
  if (!process.env.REACT_APP_GOOGLE_API_KEY) {
    throw new Error("GOOGLE_API_KEY not found in the environment");
  }
  if (typeof text !== "string") {
    throw new Error(`Invalid input type: ${typeof text}. Type has to be text or SSML.`);
  }
  const apiKey = process.env.REACT_APP_GOOGLE_API_KEY;
  const apiURL = `https://texttospeech.googleapis.com/v1/text:synthesize?key=${apiKey}`;
  const requestBody = {
    input: {
      text,
    },
    voice: { languageCode: 'en-US', name: 'en-US-Polyglot-1', ssmlGender: 'MALE' },
    //voice: { languageCode: 'en-US', name: 'en-US-Neural2-H', ssmlGender: 'FEMALE' },
    //voice: { languageCode: 'it-IT', name: 'it-IT-Standard-B', ssmlGender: 'FEMALE' },
    audioConfig: {
      audioEncoding: "MP3",
    },
  };
  const response = await fetch(apiURL, {
    method: "POST",
    headers: {
      "Content-Type": "application/json",
    },
    body: JSON.stringify(requestBody),
  });

  if (!response.ok) {
    const errorData = await response.json();
    throw new Error(`Google Cloud TTS API Error: ${errorData.error.message}`);
  }
  const responseData = await response.json();
  const audioContent = responseData.audioContent;

  return audioContent;
}

// Function to convert audio blob to base64 encoded string
const audioBlobToBase64 = (blob) => {
  return new Promise((resolve, reject) => {
    const reader = new FileReader();
    reader.onloadend = () => {
      const arrayBuffer = reader.result;
      const base64Audio = btoa(
        new Uint8Array(arrayBuffer).reduce(
          (data, byte) => data + String.fromCharCode(byte),
          ''
        )
      );
      resolve(base64Audio);
    };
    reader.onerror = reject;
    reader.readAsArrayBuffer(blob);
  });
};


// Simple version gpt-3.5-turbo
async function sendMessageToChatGPT(inputText) {
  console.log(`ChatGPT message received: ${inputText}`);
  const MAX_WORD_SUGGESTION = 60;
  try {
    const response = await axios.post(
      'https://api.openai.com/v1/chat/completions',
      JSON.stringify({
        model: 'gpt-3.5-turbo',
        messages: [
          { role: "system", content: `You are a friendly and humorous assistant, providing users with a fun and engaging conversation. Keep your responses concise, no longer than ${MAX_WORD_SUGGESTION} words per response.` },
          { role: "user", content: inputText },
        ],
        //max_tokens: 70,
        temperature: 0
      }),
      {
        headers: {
          'Content-Type': 'application/json',
          'Authorization': `Bearer ${process.env.REACT_APP_OPENAI_API_KEY}`,
        },
      }
    );
    //console.log(`ChatGPT response :`, response);
    const message = response.data.choices[0].message.content.trim();
    return message;
  } catch (error) {
    console.error(error);
    throw new Error('Failed to send message to ChatGPT');
  }
}

const App = () => {
  const [recording, setRecording] = useState(false);
  const [mediaRecorder, setMediaRecorder] = useState(null);
  const [transcription, setTranscription] = useState('');
  const [messageAI, setMessageAI] = useState('');
  const [isLoading, setIsLoading] = useState(false); // Added isLoading state
  const [audioContent, setAudioContent] = useState(null); // Added useState for audioContent

  // Cleanup function to stop recording and release media resources
  useEffect(() => {
    return () => {
      if (mediaRecorder) {
        mediaRecorder.stream.getTracks().forEach(track => track.stop());
      }
    };
  }, [mediaRecorder]);

  if (!process.env.REACT_APP_GOOGLE_API_KEY) {
    throw new Error("REACT_APP_GOOGLE_API_KEY not found in the environment");
  }

  const apiKey = process.env.REACT_APP_GOOGLE_API_KEY;

  const startRecording = async () => {
    try {
      const stream = await navigator.mediaDevices.getUserMedia({ audio: true });
      const recorder = new MediaRecorder(stream);
      recorder.start();
      console.log('Recording started');

      // Event listener to handle data availability
      recorder.addEventListener('dataavailable', async (event) => {
        console.log('Data available event triggered');
        const audioBlob = event.data;

        const base64Audio = await audioBlobToBase64(audioBlob);
        //console.log('Base64 audio:', base64Audio);

        try {
          const startTime = performance.now();

          const response = await axios.post(
            `https://speech.googleapis.com/v1/speech:recognize?key=${apiKey}`,
            {
              config: {
                encoding: 'WEBM_OPUS',
                sampleRateHertz: 48000,
                languageCode: 'en-US',
              },
              audio: {
                content: base64Audio,
              },
            }
          );

          const endTime = performance.now();
          const elapsedTime = endTime - startTime;

          //console.log('API response:', response);
          console.log('Voice Recognition - Time taken (ms):', elapsedTime);

          if (response.data.results && response.data.results.length > 0) {

            const transcription = response.data.results[0].alternatives[0].transcript;
            setTranscription(transcription);
            setIsLoading(true); // Set isLoading to true during processing
            const startTimeGPT = performance.now();

            //sendMessageToChatGPT(transcription).then((message) => {
            //  console.log(message);
            //  setMessageAI(message);
            //});
            const output = await sendMessageToChatGPT(transcription);
            console.log(output);
            setMessageAI(output);

            const endTimeGPT = performance.now();
            const elapsedTimeGPT = endTimeGPT - startTimeGPT;
            console.log('AI processing -  Time taken (ms):', elapsedTimeGPT);
            setIsLoading(false); // Set isLoading back to false after processing
            const synthesizedAudio = await synthesizeSpeech(output);
            setAudioContent(synthesizedAudio);
            const audio = new Audio(`data:audio/mp3;base64,${synthesizedAudio}`);
            audio.play();

          } else {
            console.log('No transcription results in the API response:', response.data);
            setTranscription('No transcription available');
          }
        } catch (error) {
          console.error('Error with Google Speech-to-Text API:', error.response?.data || error);
        }
      });

      setRecording(true);
      setMediaRecorder(recorder);
    } catch (error) {
      console.error('Error getting user media:', error);
    }
  };

  const stopRecording = () => {
    if (mediaRecorder) {
      mediaRecorder.stop();
      console.log('Recording stopped');
      setRecording(false);
    }
  };


  // OpenAI Theme
  const default_mode = (
    <div style={{ background: '#F1F3F5', minHeight: '100vh', display: 'flex', flexDirection: 'column', justifyContent: 'center', alignItems: 'center', fontFamily: 'Roboto, sans-serif' }}>
      <h1 style={{ fontSize: '48px', color: '#3F51B5', marginBottom: '40px' }}>Speak with ChatGPT</h1>
      {!recording ? (
        <button
          onClick={startRecording}
          style={{
            background: '#4A90E2',
            color: 'white',
            fontSize: '24px',
            padding: '10px 20px',
            borderRadius: '5px',
            border: 'none',
            cursor: 'pointer',
            marginBottom: '20px',
            boxShadow: '0 3px 5px rgba(0,0,0,0.3)'
          }}
        >
          Start Recording
        </button>
      ) : (
        <button
          onClick={stopRecording}
          style={{
            background: '#F87676',
            color: 'white',
            fontSize: '24px',
            padding: '10px 20px',
            borderRadius: '5px',
            border: 'none',
            cursor: 'pointer',
            marginBottom: '20px',
            boxShadow: '0 3px 5px rgba(0,0,0,0.3)'
          }}
        >
          Stop Recording
        </button>
      )}
      <p
        style={{
          fontSize: '24px',
          color: '#212121',
          maxWidth: '80%',
          lineHeight: '1.5',
          textAlign: 'left',
          background: 'white',
          padding: '20px',
          borderRadius: '5px',
          boxShadow: '0 1px 3px rgba(0,0,0,0.2)'
        }}
      >
        User: {transcription}
      </p>
      {isLoading ? (
        <div
          style={{
            fontSize: '24px',
            color: '#212121',
            maxWidth: '80%',
            lineHeight: '1.5',
            textAlign: 'left',
            background: '#4CAF50',
            padding: '20px',
            borderRadius: '5px',
            boxShadow: '0 1px 3px rgba(0,0,0,0.2)'
          }}
        >
          <span
            style={{
              fontSize: '20px',
              fontWeight: 'bold',
              color: 'white',
              textShadow: '1px 1px 2px rgba(0,0,0,0.4)'
            }}
          >
            Processing...
          </span>
        </div>
      ) : (
        <p
          style={{
            fontSize: '24px',
            color: '#212121',
            maxWidth: '80%',
            lineHeight: '1.5',
            textAlign: 'left',
            background: 'white',
            padding: '20px',
            borderRadius: '5px',
            boxShadow: '0 1px 3px rgba(0,0,0,0.2)'
          }}
        >
          AI: {messageAI}
        </p>
      )}
    </div>
  );

  return default_mode;
};

export default App;
Save the changes to src/App.js.
Step 6: Run the Application
In the terminal, run the following command to start the React development server:
npm start
The application should automatically open in your default web browser. If it doesn’t, open your browser and navigate to http://localhost:3000. You should see the interface for speaking with ChatGPT.
Step 7: Interact with ChatGPT:
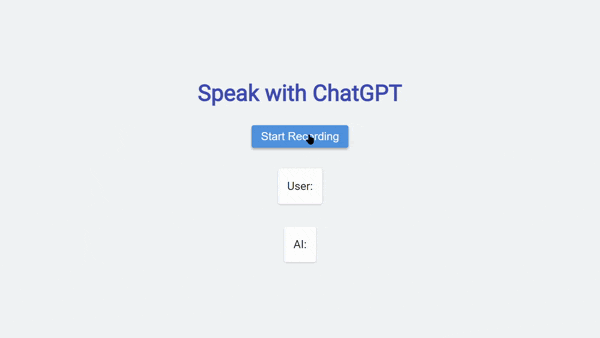
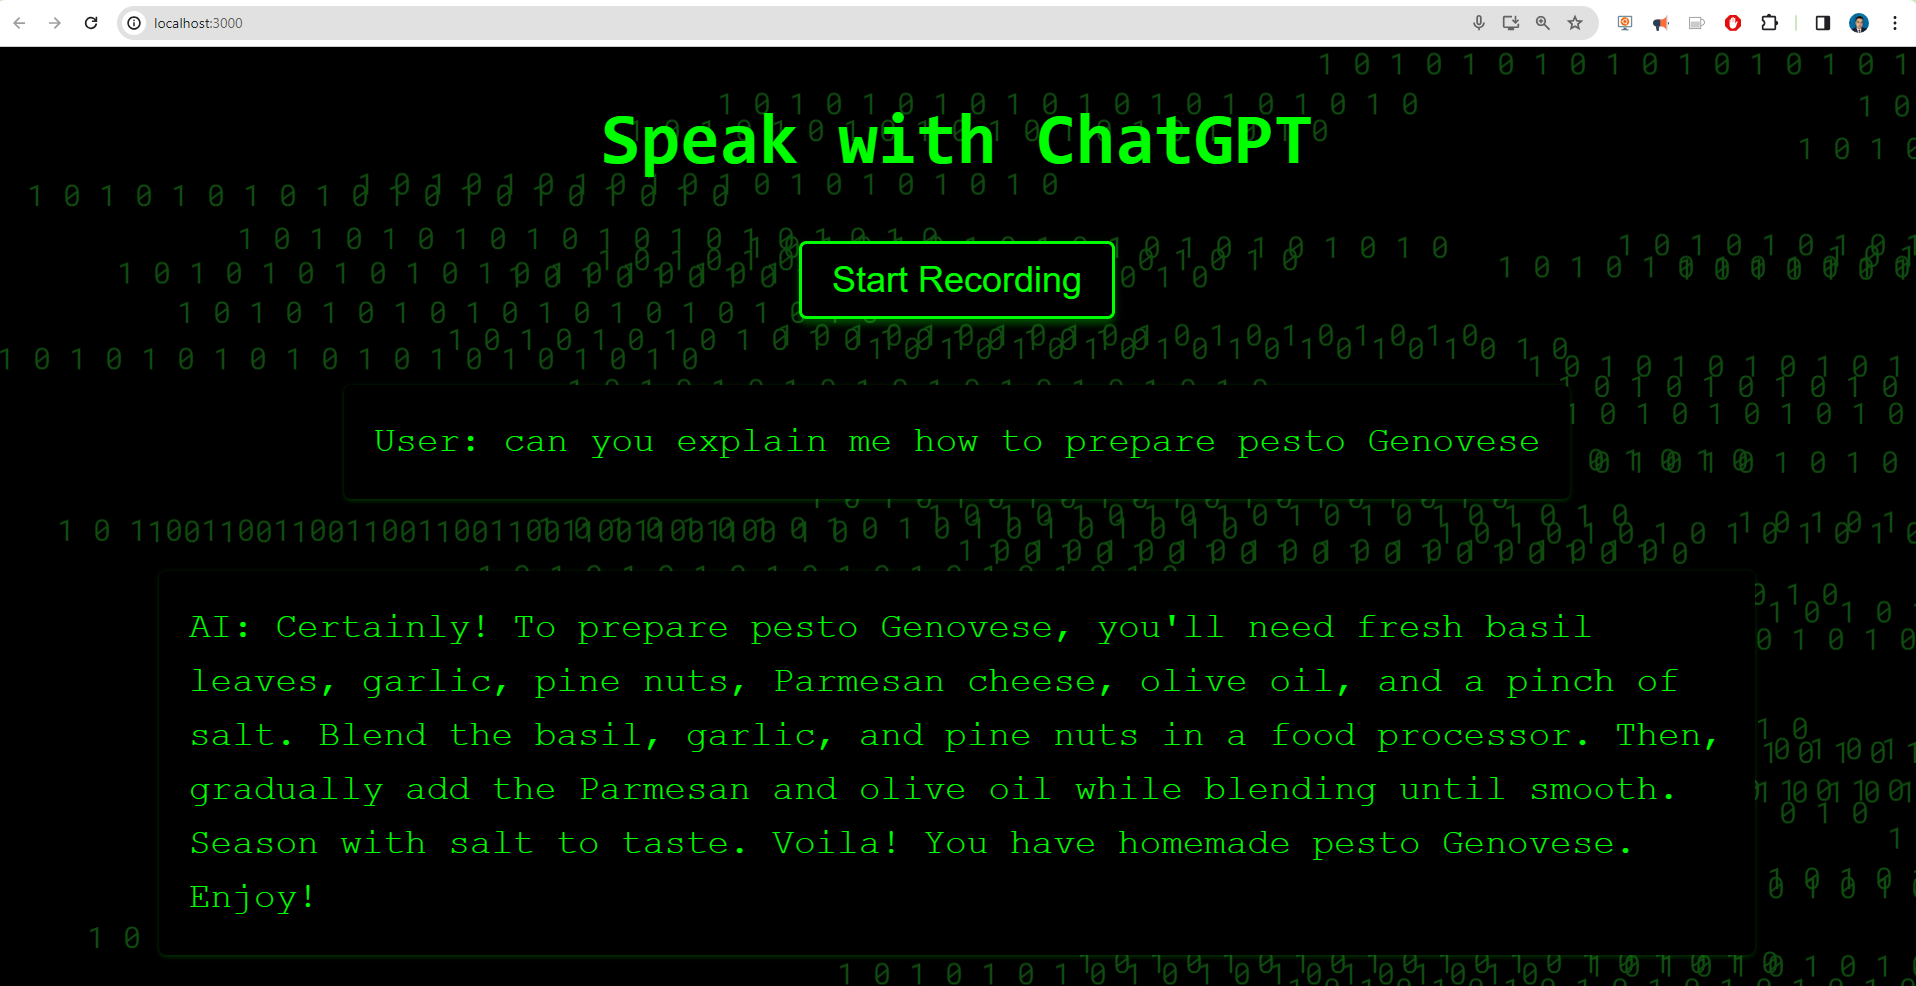
- On the web page, you will find a “Start Recording” button. Click on it to begin speaking.
- As you speak, the application will convert your voice into text and display the transcription in the user section of the interface.
- Once you stop speaking, the application will send the transcribed text to the ChatGPT API for generating a response. The AI’s response will be displayed in the AI section of the interface.
- You can continue the conversation by speaking again. The application will transcribe your speech, send it to ChatGPT, and display the AI’s response.
Description of the code
For people who is interested in the coding, I have created this program by keeping i mind the following diagram flow.
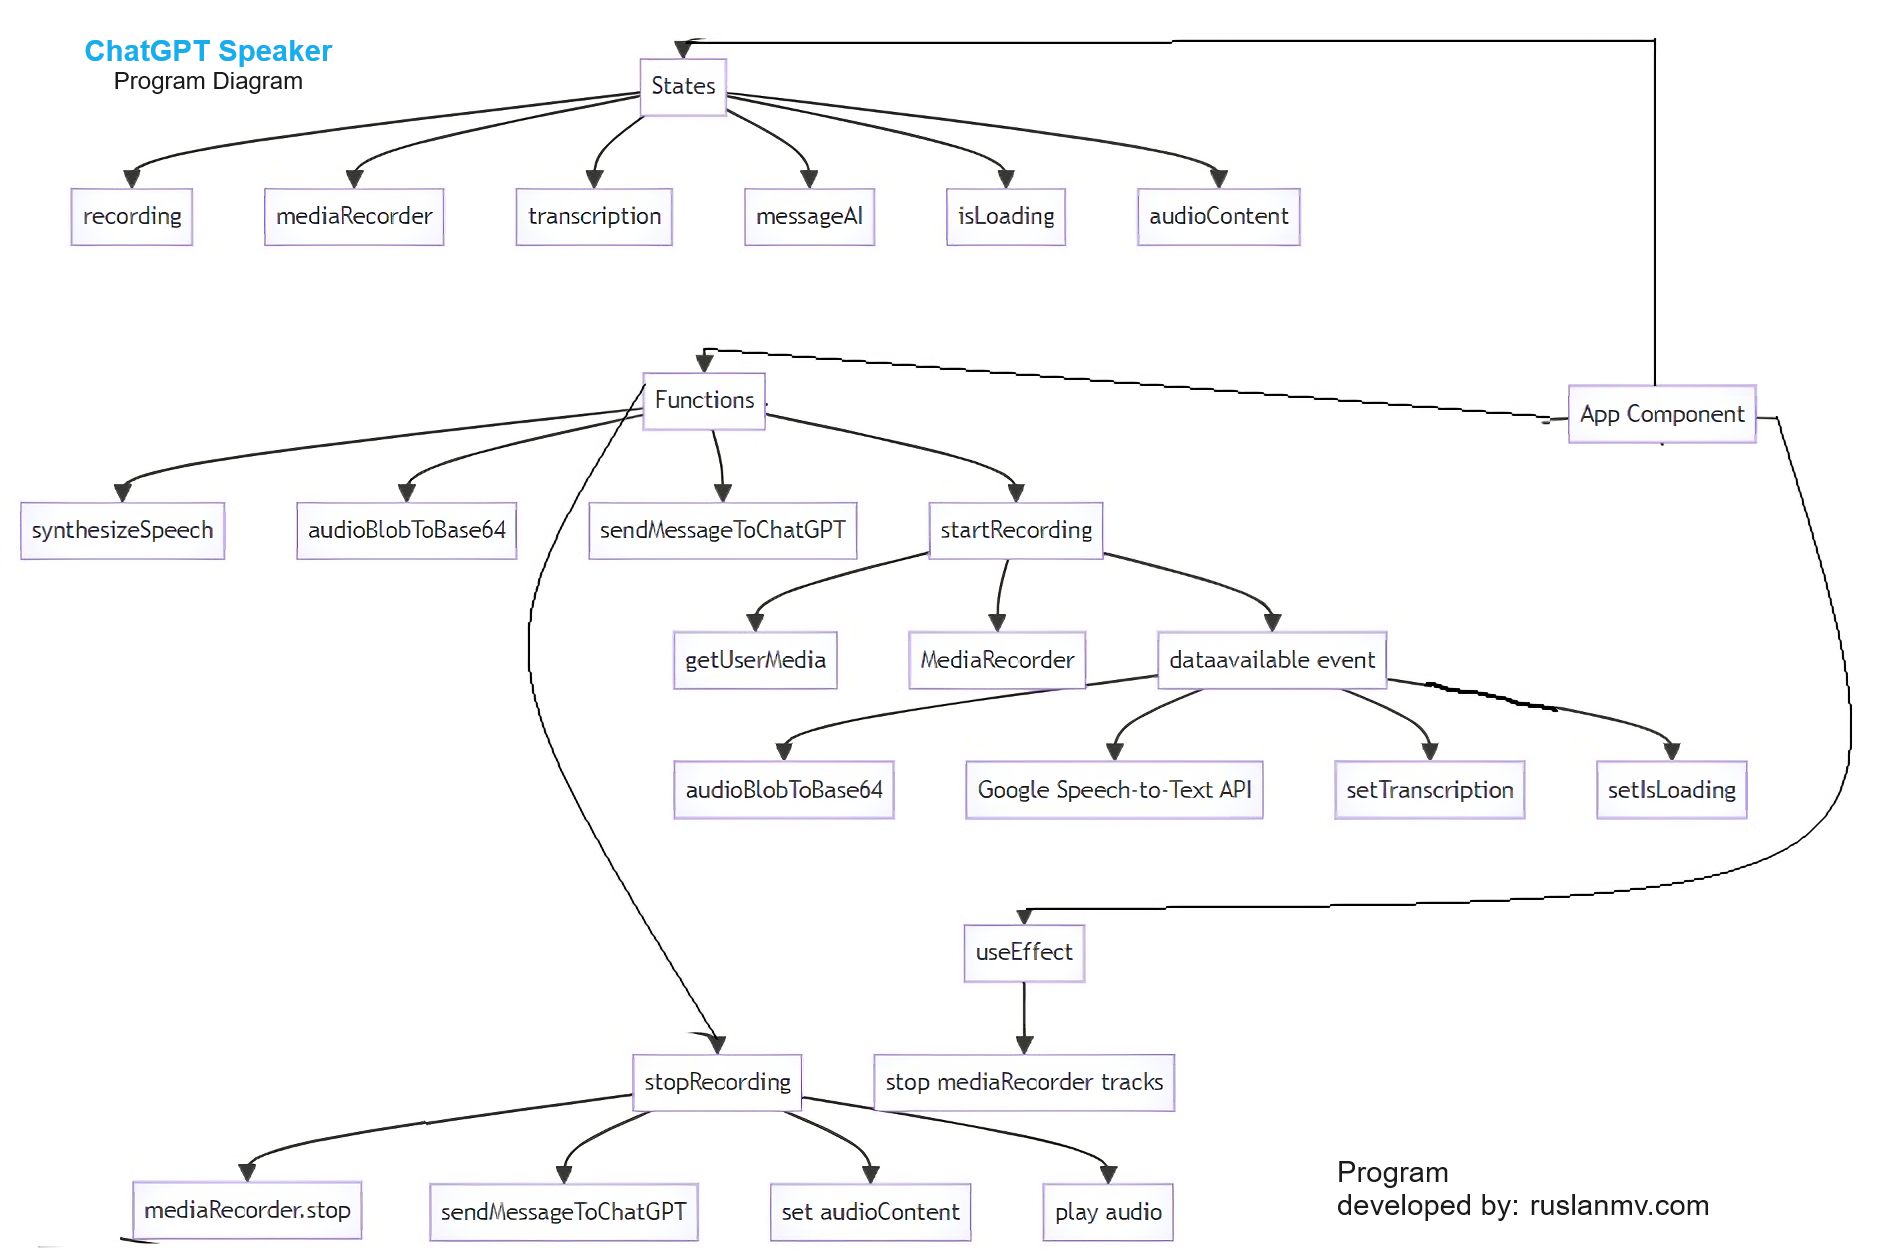
Description
-
The code starts by importing the necessary dependencies, including the axios library for making HTTP requests and React for building the user interface.
-
The code defines an asynchronous function called
synthesizeSpeechthat takes in a text input and uses the Google Text-to-Speech API to synthesize that text into audio. The function checks for the presence of a Google API key and validates the input. It then constructs the necessary API request and sends it using thefetchfunction. If the response is successful, the function extracts the audio content and returns it. -
The code defines another function called
audioBlobToBase64that converts an audio blob to a base64 encoded string. This function uses theFileReaderAPI to read the blob as an array buffer and then converts it to a base64 string. -
The code defines an asynchronous function called
sendMessageToChatGPTthat sends a user’s input text to the OpenAI ChatGPT API for a response. The function constructs the API request with the necessary parameters, including the model version, messages, and authorization headers. It uses the axios library to make the POST request to the API. If the response is successful, the function extracts the message content from the response and returns it. -
The code defines the main component of the React application called
App. It sets up several state variables using theuseStatehook, includingrecordingto track the recording state,mediaRecorderto hold the media recorder object,transcriptionto store the text transcription of the user’s voice,messageAIto store the response from ChatGPT,isLoadingto indicate if the application is processing the user’s voice, andaudioContentto hold the synthesized audio content. -
The code also includes a cleanup function that stops recording and releases media resources when the component is unmounted.
-
In the component’s render function, it first checks for the presence of the Google API key and throws an error if it is not found.
-
The
startRecordingfunction is defined to start recording the user’s voice. It uses thegetUserMediafunction from thenavigator.mediaDevicesAPI to request access to the user’s microphone. If access is granted, it creates a newMediaRecorderobject and starts recording. It also sets up an event listener for thedataavailableevent, which is triggered when data is available from the recording. In the event listener, it converts the recorded audio to base64 using theaudioBlobToBase64function and sends it to the Google Speech-to-Text API for transcription. It then calls thesendMessageToChatGPTfunction with the transcription and sets thetranscription,isLoading, andmessageAIstate variables accordingly. It also calls thesynthesizeSpeechfunction with the response from ChatGPT to convert it to audio, sets theaudioContentstate variable, and plays the audio using theAudioobject. -
The
stopRecordingfunction is defined to stop the recording by calling thestopmethod on themediaRecorderobject. -
The code defines a React component called
modethat represents the user interface for the application. It displays a heading, a button to start or stop recording, a text area to display the user’s transcription, and a text area to display the AI’s response. If the application is currently processing the user’s voice, it displays a loading message. For the Matrix Animation I will explain later. -
Finally, the
Appcomponent returns themodecomponent as the rendered output.
That’s a high-level overview of what the code does. Let me know if you have any specific questions about any part of the code!
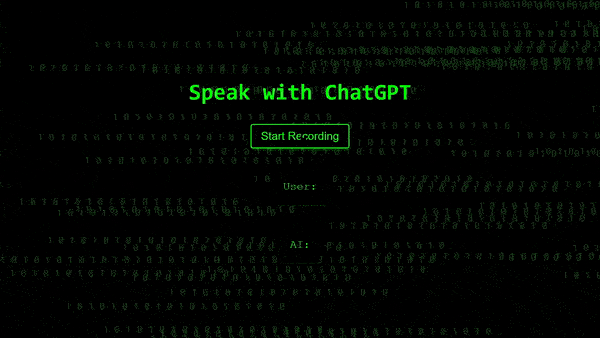
GPT Matrix Theme
If you want to add the Matrix animation.
Create a new CSS file in your project folder. You can create it in the same folder as your React component or in a separate folder for styles. For this example, let’s create a file called MatrixTheme.css in the src folder.
Open the MatrixTheme.css file and paste the provided CSS code:
@import url('https://fonts.googleapis.com/css2?family=Roboto+Mono:wght@400;700&display=swap');

.matrix-background {
  position: fixed;
  top: 0;
  left: 0;
  width: 100%;
  height: 100%;
  overflow: hidden;
  z-index: -1;
}

.matrix-background span {
  position: absolute;
  font-family: 'Roboto Mono', monospace;
  font-size: 20px;
  color: #104c10;
  display: inline-block;
  white-space: nowrap;
  animation: fall linear infinite;
}

@keyframes fall {
  0% {
    transform: translateY(-100%);
  }
  100% {
    transform: translateY(100%);
  }
}
In your React component file (e.g., MatrixComponent.js), import the MatrixTheme.css file at the top by adding the following line:
import './MatrixTheme.css';
Make sure the path to the CSS file is correct. If you created the CSS file in a different folder, adjust the path accordingly. Now, you can use the CSS classes defined in MatrixTheme.css in your React component you use the code here and wuala you got this:
In this blog post, we explored the process of speaking with ChatGPT using a React application. By leveraging the Google Text-to-Speech and Speech-to-Text APIs, we were able to create a voice-enabled interface that transcribes user speech, sends it to ChatGPT for response generation, and converts the AI’s response into audio for playback. This showcases the exciting possibilities of conversational AI and its potential for creating engaging user experiences. Remember to handle the security and privacy aspects of using API keys and ensure proper error handling in your code.
Congratulation! You have build your own ChatGPT in JavaScript with Google Cloud Platform
Leave a comment