
How to install a local proxy with cntlm in Windows and Linux
If you are working in an industry and your internet is an enterprise where all the traffic passes through your enterprise proxy and you need to use some applications where require internet and authentication requires a strong password. You can set up your local proxy with your strong password and use your local proxy to use it to use on several applications like a Virtual Machine or web browsing with Firefox.
What is Cntlm?
Cntlm is an authenticating HTTP proxy intended to help you break free from the chains of Microsoft proprietary world. It takes the address of your proxy or proxies (host1..N and port1..N) and opens a listening socket, forwarding each request to the parent proxy (moving in a circular list if the active parent stops working). Along the way, a connection to the parent is created a new and authenticated or, if available, previously cached connection is reused to achieve higher efficiency and faster responses.
Let us download Cntlm for your operative system:
Windows Setup
After download. Run setup.exe installer
Edit cntlm.ini
After installation, you have to locate the configuration file.
for Windows installer it’s %PROGRAMFILES%\Cntlm\cntlm.ini (usually X:\Program Files\Cntlm\cntlm.ini, where X is your system drive).
cd  "C:\Program Files (x86)"\Cntlm\
code cntlm.ini
When you have found it, fire up your favorite editor (not a word processor) and open the file.
First a few rules, though - lines beginning with a hash, #, are comments: completely ignored. There is no required formatting and option names are case insensitive. Option values are parsed literally: a quote means a quote and is taken as part of the string, so do not quote, escape, etc. Anyway, you need to set these core options:
- Username - your domain/proxy account name
- Domain - the actual domain name
- Workstation - NetBIOS name of your workstation; Cntlm tries to autodetect it, but you might want to set it explicitly should dialect detection fail (see below)
- Proxy - IP address (or ping-able hostname) of your proxy; if you use several alternative proxies or know of backup ones, use this option multiple times; if one stops working, Cntlm will move on to the next
- Listen - local port number which Cntlm should bind to; the default is OK, but remember you can’t have more than one application per port; you can use netstat to list used up ports (lines with LISTEN)
Next, we need to find out which NTLM dialect your proxy understands.
Username ruslanmv
Domain YOURCOMPANYDOMAIN
Auth NTLM
PassLM EC6398A6D871d8B777E43632D37E2957
PassNT RF5EAAE6B9274EdCE8BC9B1589FD33F3
#PassNTLMv2 5E812882dC6FB537ACA3024C448E6B22    # Only for user 'ruslanmv', domain 'HOMEDOMAIN'
Proxy private_proxy.company.com:8080
NoProxy dev.company.com,*dev.company.com
Listen 3128
SOCKS5Proxy 3129
If you have more than one proxy server on your network, you can define each with the Proxy entry (one per line).
Save the configuration and run the following command; when asked, enter your proxy access password:
$ cntlm -I -M http://test.com
Config profile  1/11... OK (HTTP code: 200)
Config profile  2/11... OK (HTTP code: 200)
Config profile  3/11... OK (HTTP code: 200)
Config profile  4/11... OK (HTTP code: 200)
Config profile  5/11... OK (HTTP code: 200)
Config profile  6/11... Credentials rejected
Config profile  7/11... Credentials rejected
Config profile  8/11... OK (HTTP code: 200)
Config profile  9/11... OK (HTTP code: 200)
Config profile 10/11... OK (HTTP code: 200)
Config profile 11/11... OK (HTTP code: 200)
----------------------------[ Profile  0 ]------
Auth            NTLMv2
PassNTLMv2      4AC6525378DFc69CF6Bv234532943AC
------------------------------------------------
When you get your options (might be more than just Auth and Pass* here), remove all previous password settings and paste the profile into the configuration file and save it. (Re)start Cntlm and it should work. To use it in your applications, replace the old proxy settings with “localhost”, port same as you chose for Listen.
Visit http://cntlm.sf.net for HOWTO’s and configuration tips.
Start Cntlm
You can use Cntlm Start Menu shortcuts to start, stop and configure the application. Cntlm is installed as an auto-start service.
OR: Start -> Settings -> Control Panel -> Administrative Tools -> Services
OR (command line): net start cntlm
cd "C:\Program Files (x86)"\Cntlm\
C:\Program Files (x86)\Cntlm>net start cntlm
Servizio Cntlm Authentication Proxy in fase di avvio .
Avvio del servizio Cntlm Authentication Proxy riuscito.
Check
If you need to check from a command line try this:
sc query cntlm
This command should return something like this, if CNTLM is running:
SERVICE_NAME: cntlm
    TYPE               : 10  WIN32_OWN_PROCESS
    STATE              : 4  RUNNING
                            (STOPPABLE, NOT_PAUSABLE, IGNORES_SHUTDOWN)
    WIN32_EXIT_CODE    : 0  (0x0)
    SERVICE_EXIT_CODE  : 0  (0x0)
    CHECKPOINT         : 0x0
    WAIT_HINT          : 0x0
If stopped the result looks like this:
SERVICE_NAME: cntlm
    TYPE               : 10  WIN32_OWN_PROCESS
    STATE              : 1  STOPPED
    WIN32_EXIT_CODE    : 0  (0x0)
    SERVICE_EXIT_CODE  : 0  (0x0)
    CHECKPOINT         : 0x0
    WAIT_HINT          : 0x0
If you need to stop the service
net stop cntlm
Environment variables
in windows, optionally , you can add this to your environment
set http_proxy=http://127.0.0.1:3128/
set https_proxy=http://127.0.0.1:3128/
set socks_proxy=http://127.0.0.1:3129/
Uninstalling
Stop Cntlm service, run uninstaller from your Start Menu, or use native Windows “Add/Remove Programs” Control Panel.
Troubleshooting
If you have recently changed your windows password, and your proxy depends on your windows password, you should update of group policies that are applied by your company.
gpupdate /force
Changes made in the Group Policy are not applied immediately but after 90 mins by default (with a ~30 min offset to spread the load). By using the GPUpdate command we can force the update.
Group Policies are used to change security settings and for system management (like deploying printers or mapping network drives). For troubleshooting IT problems, it’s sometimes necessary to update the group policy manually.
Linux setup
Before you install CNTLM, it’s best to update and upgrade your machine.
sudo apt-get update
sudo apt-get upgrade -y
Once the upgrade is complete, and install CNTLM, with the command:
sudo apt-get install cntlm -y
sudo cntlm -H -d DOMAIN -u USERNAME
Where DOMAIN is the domain to be used and USER is the Windows user.
Password:
PassLM          EC6398A6D87148B777E43632D37E2957
PassNT          AF5EEAE6B9272E4CE8BC9B1589FD33F3
PassNTLMv2      5E8128822C6FB537ACA3024C448E6B22    # Only for user 'USERNAME'
Copy theses hashed passwords (you’ll use one of them in the configuration file).
The configuration of CNTLM is done within a single file. Issue the command:
The default for Linux packages is /etc/cntlm.conf
sudo nano /etc/cntlm.conf
Within that file, you’ll find four lines that need to be configured:
Username USERNAME
Domain DOMAIN
Proxy IP:PORT
Password PASSWORD
Where:
- USERNAME is your actual Windows user name.
- DOMAIN is your Windows domain.
- IP is the IP address of the MS proxy server you want to connect to.
- PORT is the port used by the MS proxy server (most likely 8080).
- PASSWORD is the hashed password you created for your Windows user.
Once you’ve finished your configurations, save and close the file.
Restart CNTLM with the command:
sudo systemctl restart cntlm
At this point, your machine is now capable of connecting to the MS NTLM proxy server. You will then need to configure apps or services to connect using the proxy. If you don’t want to configure the apps, one at a time, you can try this.
nano ~/.bashrc
Paste the following to the bottom of that file: in linux
export http_proxy=http://127.0.0.1:3128
export https_proxy=http://127.0.0.1:3128
export socks_proxy=http://127.0.0.1:3129
Finally, issue the command:
. ~/.bashrc
That’s it. So long as your MS proxy server is configured
nano /etc/apt/apt.conf.d/proxy.conf
Acquire::http::Proxy "http://127.0.0.1:3128";
Acquire::https::Proxy "http://127.0.0.1:3128";
Browser and machine network connection
In order to allow the internet connection using proxy, you need to enable the proxy configuration on the target ubuntu machine:
Go to start and search “Proxy” with the searchbox on the top-right side Enable “Manual” proxy configuration Copy the value of the /etc/cntlm.conf if the field are not automatically filled After that goes to Firefox browser (or the browser you prefer ) and go to: Preferences>Proxy and enable “Use system proxy”
in wsl just add the following
nano ~/.bash_profile
export http_proxy=http://127.0.0.1:3128/
export https_proxy=http://127.0.0.1:3128/
export socks_proxy=http://127.0.0.1:3129/
Additional Checks
Install firefox, then go to Settings>General> Network Settings
and add manual proxy configuration
for HTTP proxy
localhost 3128
check Also use this proxy for HTTPS
and for SOCK HOST
localhost 3129
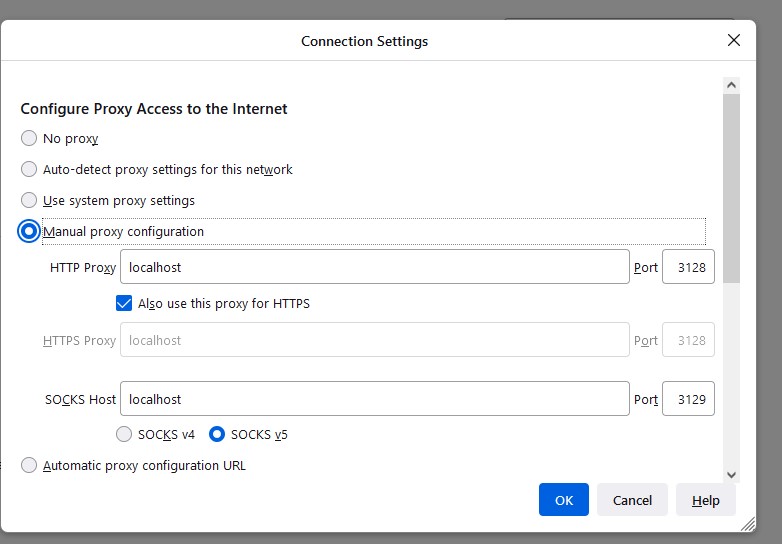 then you can enter to google and see how is working your custom proxy
Congratulations! You have installed your local proxy.
Leave a comment