
How to run a PostgreSQL server without a static IP address with custom Domain
Hello there, today we are going to discuss an amazing procedure to create a private PostgreSQL server with a dynamic IP and a custom domain by using MacOS and give an example about how to create a table in Python, this is really interesting.

PostgreSQL is a powerful, open source object-relational database system with over 30 years of active development that has earned it a strong reputation for reliability, feature robustness, and performance.
How to install PostgreSQL server?
There are two methods
a) Install via the installer
https://www.postgresql.org/download/
and we download the Mac Os version

b) The second is by using brew.
brew update
brew install postgresql
In this tutorial I will follow th method a)
In ordert to know where was installed the server files you can
ps aux | grep postgres | grep -- -D
postgres 16592 0.0 0.1 4480060 6592 ?? Ss 1:01AM 0:00.05 /Library/PostgreSQL/13/bin/postgres -D /Library/PostgreSQL/13/data
Threfore our server is in the folder
/Library/PostgreSQL/13
How to start and stop PostgreSQL server?
a) If you installed PostgreSQL via the installer
We can create a database with the command
/Library/PostgreSQL/13/scripts/runpsql.sh
and we obtain
Server [localhost]: localhost
Database [postgres]: postgres
Port [5432]: 5432
Username [postgres]: postgres
Password for user postgres: password
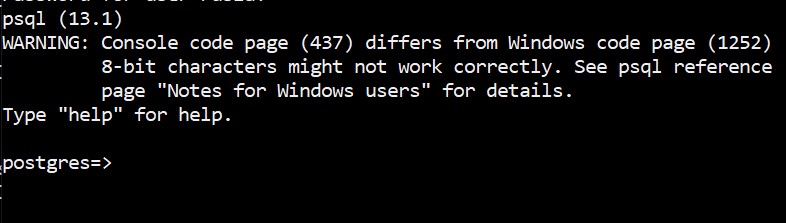
psql (13.1)
Type "help" for help.
postgres=#
We can check in another termial if is running our server by using
ps auxwww | grep postgres
And look for a command that looks something like this
/Library/PostgreSQL/13/bin/psql -h localhost -p 5432 -U postgres postgres
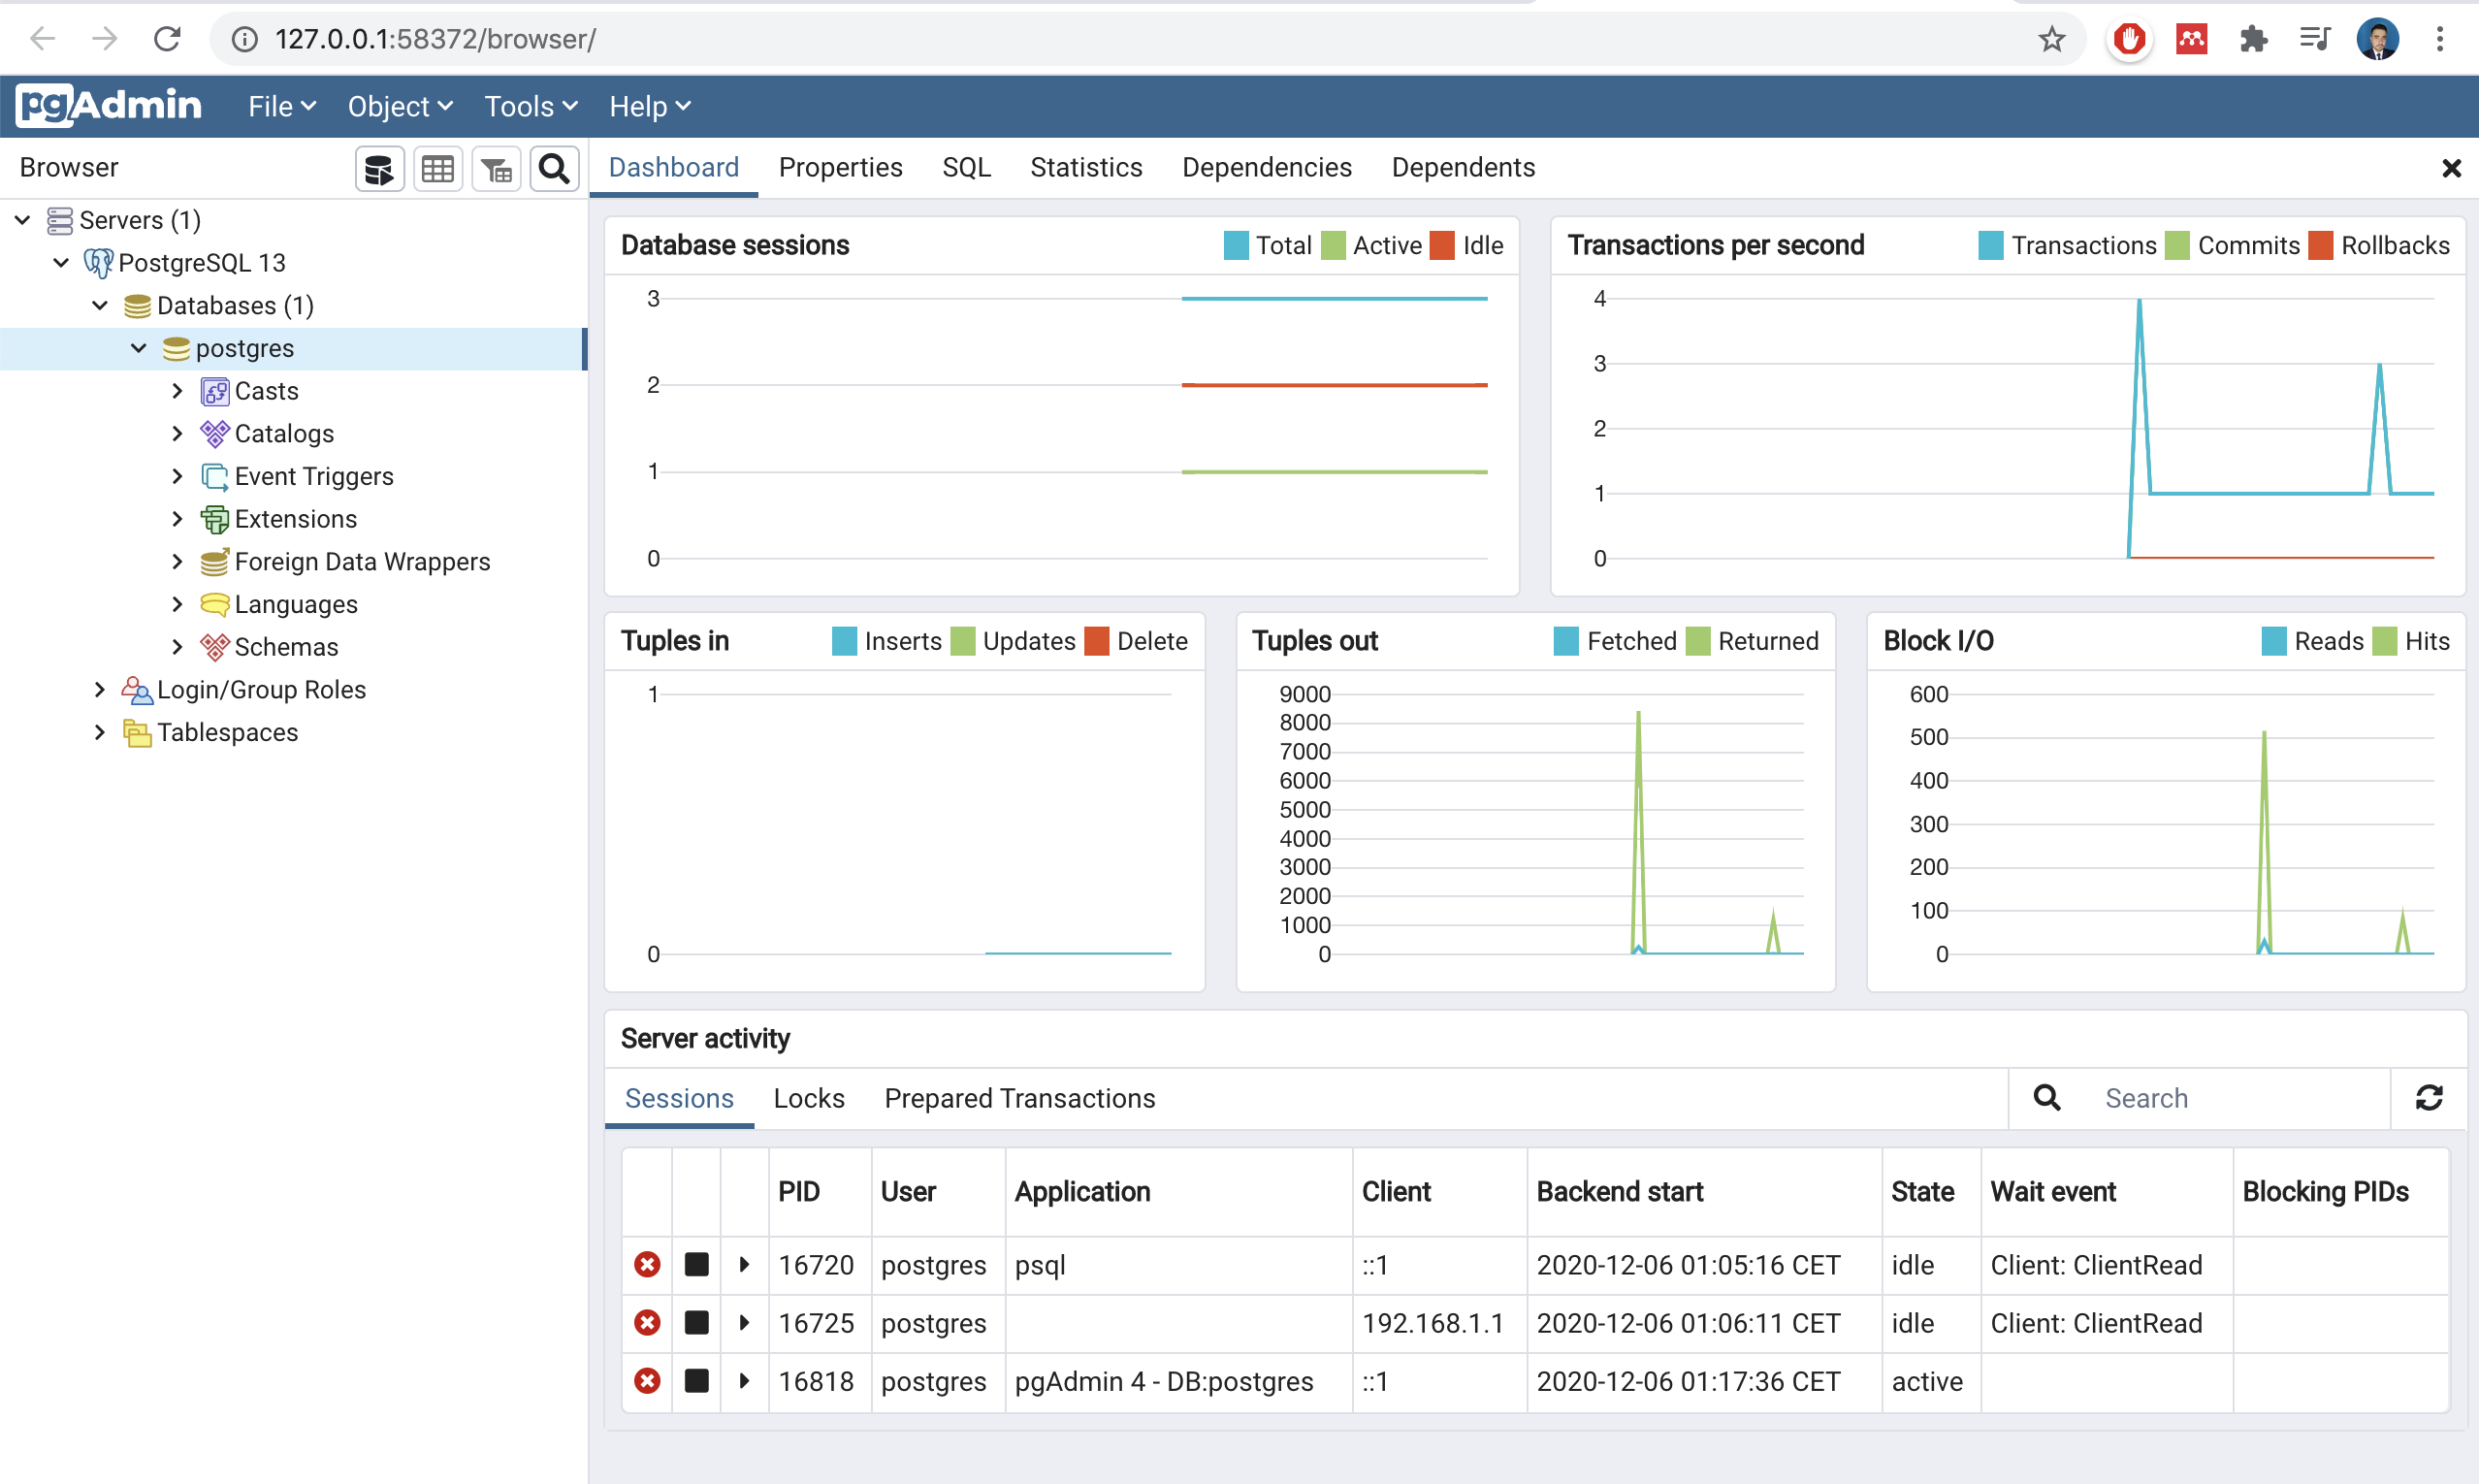
Another way to check if is running is by using the program pgAdmin 4

and you can see
If wee need to stop or restart we can do by using the postgresql account
su postgresql
If we want to do the things manually we can
- To start manually:
/Library/PostgreSQL/13/bin/pg_ctl start -D /Library/PostgreSQL/13/data/
- To stop manually:
/Library/PostgreSQL/13/bin/pg_ctl stop -D /Library/PostgreSQL/13/data/
- And stop PostgreSQL:
/Library/PostgreSQL/13/bin/pg_ctl restart -D /Library/PostgreSQL/13/data
b) If you installed PostgreSQL via Homebrew:
- To start manually:
pg_ctl -D /usr/local/var/postgres start
- To stop manually:
pg_ctl -D /usr/local/var/postgres stop
- To start PostgreSQL server now and relaunch at login:
brew services start postgresql
- And stop PostgreSQL:
brew services stop postgresql
Good now we have the Postgree Running but now let us connect with our public ip.
Enable client authentication
We need edit the PostgreSQL configuration file, edit the PostgreSQL configuration file,
Login as postgres user using su / sudo command, enter:
su postgresql
export PGDATA="/Library/PostgreSQL/13/data"
we can see if the server is running
/Library/PostgreSQL/13/bin/pg_ctl status
you got
pg_ctl: server is running (PID: 69)
/Library/PostgreSQL/13/bin/postgres "-D/Library/PostgreSQL/13/data"
Now, we can edit the file
nano /Library/PostgreSQL/13/data/pg_hba.conf
Append the following configuration lines to give access to all
host postgres postgres 0.0.0.0/0 md5
Just in case you need any particual range of ip as example 10.10.29.0/24 network
host all all 10.10.29.0/24 trust But I will consider all ips.
more information you can see at
https://www.postgresql.org/docs/current/auth-pg-hba-conf.html
We should be carefull when we open the ports!
https://postgresql.verite.pro/blog/2019/02/08/open-instances.html
Allow TCP/IP socket
You need to open PostgreSQL configuration file
nano /Library/PostgreSQL/13/data/postgresql.conf
Find configuration line that read as follows:
listen_addresses='localhost'
Next set IP address(es) to listen on; you can use comma-separated list of addresses; defaults to ‘localhost’, and ‘*’ is all ip address:
listen_addresses='*'
Restart PostgreSQL Server
/Library/PostgreSQL/13/bin/pg_ctl restart -D /Library/PostgreSQL/13/data
Remote PostgreSQL connection method
You can use either of the following methods to access your PostgreSQL databases remotely:
- SSH tunnel: This is the more secure method. You set up an SSH tunnel that forwards a port on your local computer to the remote PostgreSQL server. The PostgreSQL traffic is encrypted by the SSH tunnel.
- Direct connection: You can set up a direct connection between your local computer and the remote PostgreSQL server on port 5432.
For security reasons, the PostgreSQL port cannot be accessed over a public IP address. To connect to PostgreSQL from a different machine, you must open port 5432 for remote access.
IMPORTANT: By default, the database port for the nodes in this solution cannot be accessed over a public IP address. As a result, you will only be able to connect to your database nodes from machines that are running in the same network. For security reasons, we do not recommend making the database port accessible over a public IP address. If you must make it accessible over a public IP address, we recommend restricting access to a trusted list of source IP addresses using firewall rules. For development purposes, you can also use a VPN or SSH tunnel. Refer to the FAQ for information on accessing restricted ports using an SSH tunnel or opening ports in the server firewall.
Make sure iptables is not blocking communication, open port 5432
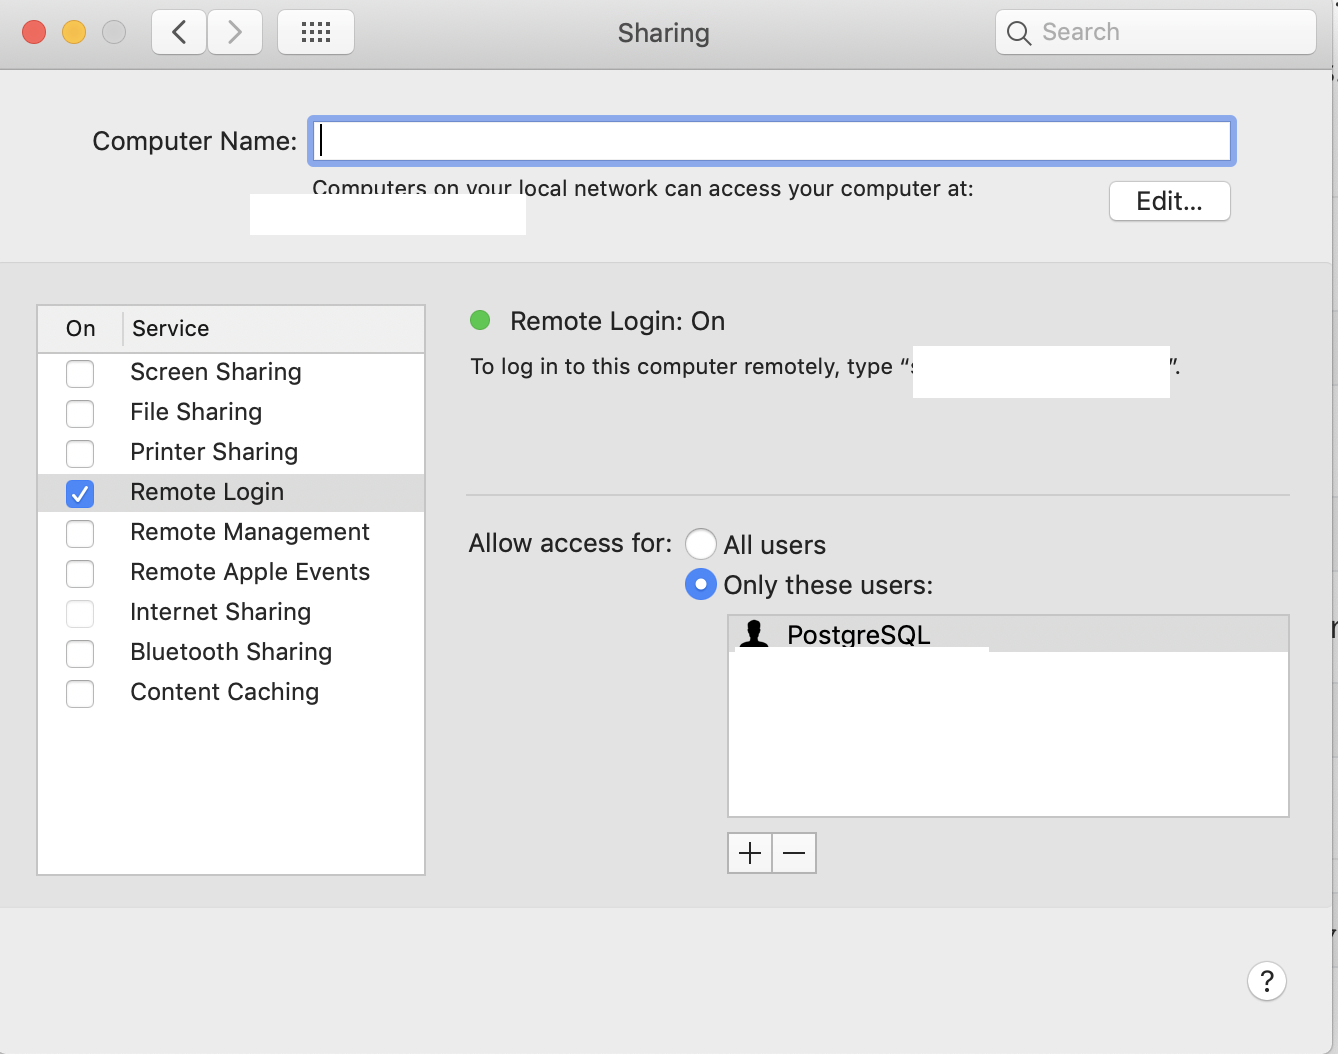
in MacOs we proceed with the manual form
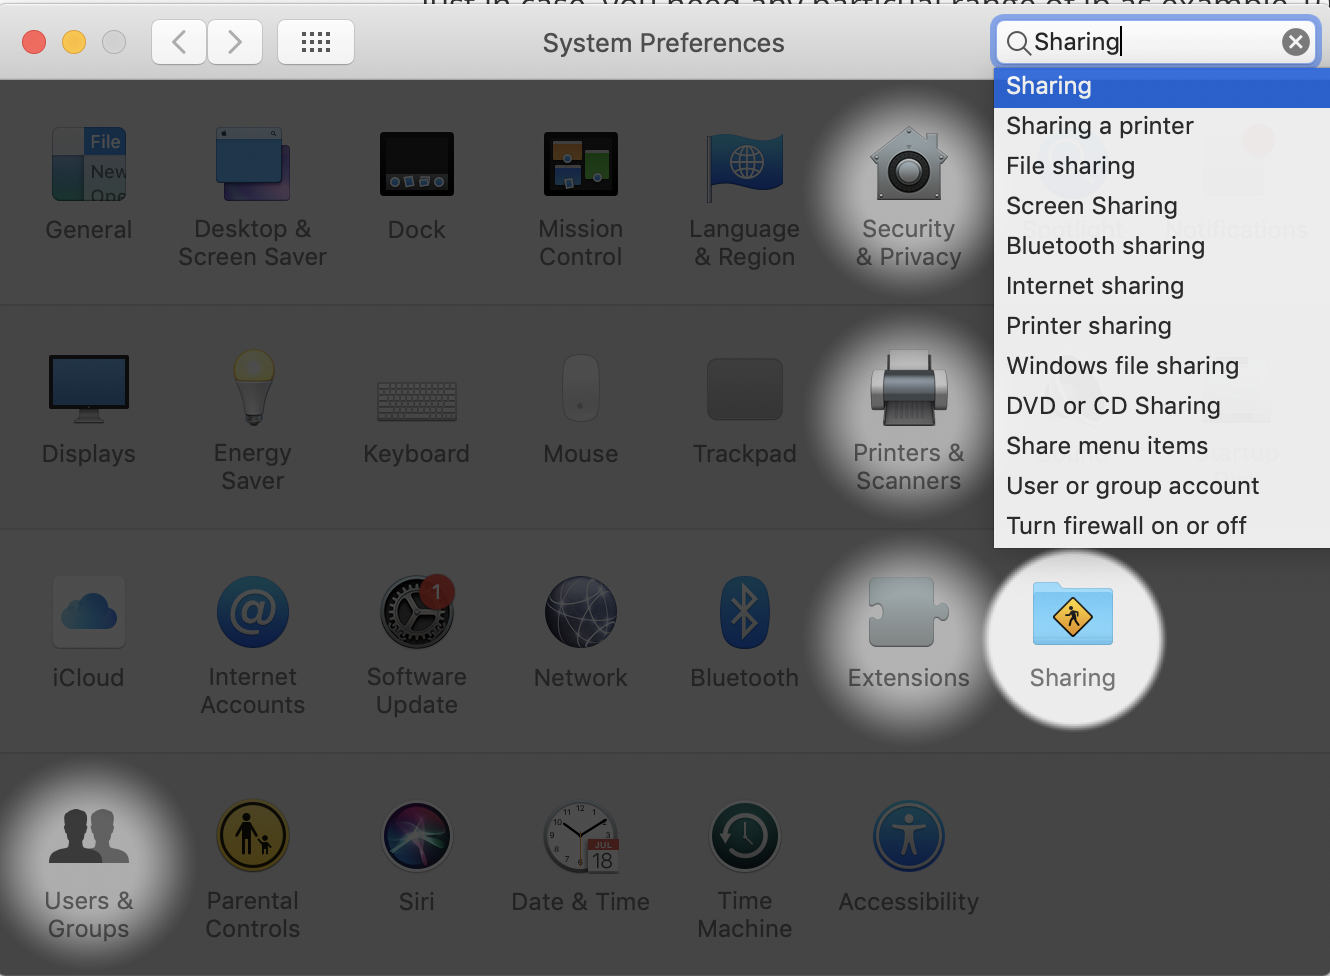
and there we activate Remote login
NAT for Public Access to Servers with Private IP Addresses on the Private Network
Let us consider as an example that we have two main servers with private IP addresses on the optional network .
We requiere two routers
The Router 1 has internet from our ISP
and the Second Router 2 is connected with our Router 1 .
We require setup the IP of the Router 2 in a zone DMZ
How to configure DMZ Host
Step 1: Login to the management page
Open the web browser and type the IP address of the Router 1 of the device in the address bar ( Press Enter.
Step 2: Configure the DMZ
What is a DMZ
A DMZ (demilitarized zone) on a home router refers to a DMZ Host. Strictly speaking, this is not a true DMZ. A home router DMZ host is a host on the internal network that has all UDP and TCP ports open and exposed, except those ports otherwise forwarded. They are often used a simple method to forward all ports to another firewall/NAT device.
Click: Forwarding > DMZ > Enable/Disable. We find the the IP of our Router 2 (here takes and we put the we put them in the DMZ then click Save.
Network Topology
In this use case, the two Servers have private IP addresses and are located behind theoptional network of Router 2
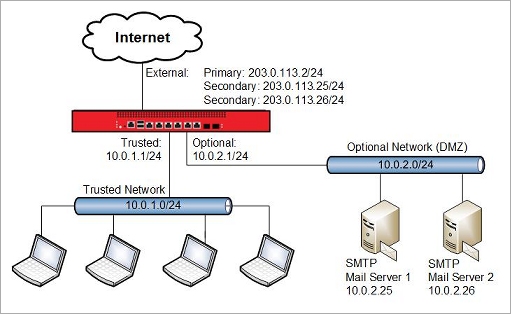
This configuration example demonstrates two different types of NAT configuration that can be used to translate the public IP addresses servers to the corresponding private IP addresses for inbound and outbound traffic
The second step , is we open the ports that we want to use,
in this case we can open the port 22 and 5432 of the Router 2.
Usually is found in the section of Port Forward.
There we write the IP of the Server that we want to use PosgreSQL
In this part we neet open the ports of the WAN
Wide Area Network (WAN) Port - the port on your router, that connects to your modem with an ethernet cable. Local Area Network (LAN) Port - the port on your router that connects you to the home network. WAN is not Wireless Area Network, thats WLAN (Wireless Local Area Network) and not a common term. WAN is the public side of the internet, its assigned a public IP Address.
LAN is the local side of the internet (home network), and assigned a private IP Addresses, one per device on the network. A router works by intercepting requests from the devices on the LAN, transforming the private IP address to a public one, and then going out to the internet (websites or web servers). Then this process works in reverse when going back to your device;
The website or web server sends the request back to the router via the public IP, the router transforms the public IP back to a private IP, and forwards the information back to the device that made the request. This process is called Network Address Translation WAN port is only used to connect to the internet, and not to connect to another router. To increase the size of your LAN and your WiFi network, you can connect them via LAN ports. This requires special configuration, refer to the article here:
https://networkingguides.com/connect-two-routers/
If we assume the the PosgreSQL server in MacOS has the IP 10.0.2.25 we need add the following
IP forwarding in the Router 2
10.0.2.25 ssh 22
10.0.2.25 ssh 5432

Then we need a dynamic dns installed on our Server Postgre
There are several sites where you can get a free account and install on your
server:
After installed your dynamic dns , you can point the
adddres from those sites to the ns servers
One domain two name servers
We can rememebr that you can have on domain with one nameservers and a subdomain with another name servers,
For example;
*.yourdomain.com   NS dina.ns.cloudflare.com
*.yourdomain.com   NS mike.ns.cloudflare.com
And point a subdomain to a name servers of your dynamic ip
server.yourdomain.com NS ns1.dynu.com
Subdomain that points to a server name
I suggest use create account in Cloudflare for your custom domain
https://www.cloudflare.com/
- Login to Cloudflare
- Use the drop-down menu in the upper left of your screen and click your domain that you want the redirect to take place on.
- Click the DNS icon at the top of the screen.
- Select
CNAMEusing the drop-down options - Add the sub domain in
NAME - Add your domain name in
Domain name - Leave TTL as automatic and Cloudclare enabled, click
Add Recordbutton. - Click Page Rules icon
- Click Create Page Rule button
- Add
subdomain.yourdomain/*in the URL match field - Click + Add a Setting, find
Forwarding URLand click it - Select the status code
301 - Permanent Redirect - Add the Enter destination URL as
ns servers ofyour_dynamic_dns.com - Click Save and Deploy button.

How do I SSH into my server with my domain name instead of the IP address
Public key authentication is a way of logging into an SSH/SFTP account using a cryptographic key rather than a password.
If you use very strong SSH/SFTP passwords, your accounts are already safe from brute force attacks. However, using public key authentication provides many benefits when working with multiple developers. For example, with SSH keys you can
- allow multiple developers to log in as the same system user without having to share a single password between them;
- revoke a single developer’s access without revoking access by other developers; and
- make it easier for a single developer to log in to many accounts without needing to manage many different passwords.
How Public Key Authentication Works
Keys come in pairs of a public key and a private key. Each key pair is unique, and the two keys work together.
These two keys have a very special and beautiful mathematical property: if you have the private key, you can prove you have it without showing what it is. It’s like proving you know a password without having to show someone the password.
Public key authentication works like this:
- Generate a key pair.
- Give someone (or a server) the public key.
- Later, anytime you want to authenticate, the person (or the server) asks you to prove you have the private key that corresponds to the public key.
- You prove you have the private key.
You don’t have to do the math or implement the key exchange yourself. The SSH server and client programs take care of this for you.
Generate an SSH Key Pair
You should generate your key pair on your laptop, not on your server. All Mac and Linux systems include a command called ssh-keygen that will generate a new key pair.
If you’re using Windows, you can generate the keys on your server. Just remember to copy your keys to your laptop and delete your private key from the server after you’ve generated it.
We enter to our server where we have Postgre installed.
To generate an SSH key pair, run the command ssh-keygen.
ssh-keygen
It will look like this when you run it:
laptop1:~ yourname$ ssh-keygen
Generating public/private rsa key pair.
You’ll be prompted to choose the location to store the keys. The default location is good unless you already have a key. Press Enter to choose the default location.
Enter file in which to save the key (/Users/yourname/.ssh/id_rsa):
Next, you’ll be asked to choose a password. Using a password means a password will be required to use the private key. It’s a good idea to use a password on your private key.
Enter passphrase (empty for no passphrase):
Enter same passphrase again:
After you choose a password, your public and private keys will be generated. There will be two different files. The one named id_rsa is your private key. The one named id_rsa.pub is your public key.
Your identification has been saved in /Users/yourname/.ssh/id_rsa.
Your public key has been saved in /Users/yourname/.ssh/id_rsa.pub.
You’ll also be shown a fingerprint and “visual fingerprint” of your key. You do not need to save these.
The key fingerprint is:
d7:21:c7:d6:b8:3a:29:29:11:ae:6f:79:bc:67:63:53 yourname@laptop1
The key's randomart image is:
+--[ RSA 2048]----+
|                 |
|           . o   |
|      .   . * .  |
|     . .   = o   |
|      o S . o    |
|     . . o oE    |
|    . .oo +.     |
|     .o.o.*.     |
|     ....= o     |
+-----------------+
The standard OpenSSH suite of tools contains the ssh-keygen utility, which is used to generate key pairs. Run it on your local computer to generate a 2048-bit RSA key pair, which is fine for most uses.The utility prompts you to select a location for the keys. By default, the keys are stored in the ~/.ssh directory with the filenames id_rsa for the private key and id_rsa.pub for the public key. Using the default locations allows your SSH client to automatically find your SSH keys when authenticating, so we recommend accepting them by pressing ENTER.Once you select a location for the key, you’ll be prompted to enter an optional passphrase which encrypts the private key file on disk.
Configure an SSH/SFTP User for Your Key
Now that you have an SSH key pair, you’re ready to configure your app’s system user so you can SSH or SFTP in using your private key.
To copy your public key to your server, run the following command. Be sure to replace “x.x.x.x” with your server’s IP address and SYSUSER with the name of the the system user your app belongs to.
ssh-copy-id [email protected]
How to Disable SSH Password Authentication (optional)
As long as you use strong passwords, it is not necessary to disable SSH password authentication for your server; however, you can disable it if you would like.
Before you proceed, keep these things in mind:
- Disabling password authentication makes it more likely for you to be locked out of your server.
- You can become locked out if you lose your private key or break your
~/.authorized_keysfile. - If you are locked out, you will no longer be able to access the files of any apps.
You should only disable SSH password authentication if you are extremely familiar with public key authentication and understand the potential consequences of locking yourself out of your server.
To disable SSH password authentication, SSH in to your server as root to edit this file:
/etc/ssh/sshd_config
Then, change the line
PasswordAuthentication yes
to
PasswordAuthentication no
After making that change, restart the SSH service by running the following command as root:
sudo launchctl unload /System/Library/LaunchDaemons/ssh.plist
sudo launchctl load -w /System/Library/LaunchDaemons/ssh.plist
In linux should be
sudo service ssh restart
Be careful! , I suggest disable after add all your clients to your main server otherwise you will have troubles to login to your server.
HOW TO CONNECT TO THE POSTGRESQL SERVER FROM NON LOCAL NETWORK
There are several ways to connect to the server.
a) Using python with direct connection
b) Using python by using ssh tunneling
c)Using the terminal in windows for example
Direct connection with python
In this example I will use anaconda with Jupyter Notebook
and we import the following library
import psycopg2
if is not installed you can installa
conda install -c anaconda psycopg2
if does not work you can try
!pip install psycopg2
We create a connection to the database
try:
    conn = psycopg2.connect("host=server.yourdomain.com dbname=postgres user=postgres password=yourpassword")
except psycopg2.Error as e:
    print("Error: Could not make connection to the Postgres database")
    print(e)
Here server.yourdomain.com is your subdomain that is pointing you server PostgreSQL
Use the connection to get a cursor that can be used to execute queries.
try:
    cur = conn.cursor()
except psycopg2.Error as e:
    print("Error: Could not get curser to the Database")
    print(e)
Use automactic commit so that each action is commited without having to call conn.commit() after each command. The ability to rollback and commit transactions is a feature of Relational Databases.
conn.set_session(autocommit=True)
Create a database to work in
I choose create a database called ruslanmv
try:
    cur.execute("create database ruslanmv")
except psycopg2.Error as e:
    print(e)
Close our connection to the default database, reconnect to the ruslanmv database, and get a new cursor.
try:
    conn.close()
except psycopg2.Error as e:
    print(e)

try:
    conn = psycopg2.connect("host=server.yourdomain.com dbname=postgres user=postgres password=yourpassword")
except psycopg2.Error as e:
    print("Error: Could not make connection to the Postgres database")
    print(e)

try:
    cur = conn.cursor()
except psycopg2.Error as e:
    print("Error: Could not get curser to the Database")
    print(e)

conn.set_session(autocommit=True)
We will create a Music Library of albums. Each album has a lot of information we could add to the music library table. We will start with album name, artist name, year
Table Name: music_library
column 1: Album Name
column 2: Artist Name
column 3: Year
Review this document on PostgreSQL datatypes: https://www.postgresql.org/docs/9.5/datatype.html
Translate this information into a Create Table Statement
try:
    cur.execute("CREATE TABLE IF NOT EXISTS music_library (album_name varchar, artist_name varchar, year int);")
except psycopg2.Error as e:
    print("Error: Issue creating table")
    print (e)
No error was found, but lets check to ensure our table was created. select count(*) which should return 0 as no rows have been inserted in the table
try:
    cur.execute("select count(*) from music_library")
except psycopg2.Error as e:
    print("Error: Issue creating table")
    print (e)

print(cur.fetchall())
[(0,)]
Insert two rows
Insert two rows
try:
    cur.execute("INSERT INTO music_library (album_name, artist_name, year) \
                 VALUES (%s, %s, %s)", \
                 ("Let It Be", "The Beatles", 1970))
except psycopg2.Error as e:
    print("Error: Inserting Rows")
    print (e)

try:
    cur.execute("INSERT INTO music_library (album_name, artist_name, year) \
                 VALUES (%s, %s, %s)", \
                 ("Rubber Soul", "The Beatles", 1965))
except psycopg2.Error as e:
    print("Error: Inserting Rows")
    print (e)
Validate your data was inserted into the table. The while loop is used for printing the results. If executing queries in the Postgres shell, this would not be required. Note: If you run the insert statement code more than once, you will see duplicates of your data. PostgreSQL allows for duplicates
try:
    cur.execute("SELECT * FROM music_library;")
except psycopg2.Error as e:
    print("Error: select *")
    print (e)

row = cur.fetchone()
while row:
   print(row)
   row = cur.fetchone()
('Let It Be', 'The Beatles', 1970)
('Rubber Soul', 'The Beatles', 1965)
Drop the table to avoid duplicates and clean up
try:
    cur.execute("DROP table music_library")
except psycopg2.Error as e:
    print("Error: Dropping table")
    print (e)
SSH Tunnels
Access to important services are usually blocked behind a firewall or router. Since ssh, when setup correctly, is quite secure, you can usually get access to a server with ssh even when other protocols are blocked. (Though some administrators move ssh access to a different port than the default 22.)
You can use ssh port forwarding or ‘tunneling’ to gain access to other services through ssh.
We want to use Jupyter notebook or the terminal to connect to a remote server Mac (server.yourdomain.com').
PostgreSQL uses the 5432 to connect to a remote Mac.
Since have unknown open ports itself is inherently insecure, the unknown ports is blocked by many firewalls.
However, I do have ssh access to server.yourdomain.com.
So, how do I tell both systems to ‘tunnel’ the PostgreSQL traffic through ssh?
(When you test this, remember to enable either ‘Screen Sharing’ or ‘Remote Management’ (i.e Apple Remote Desktop) access in the ‘Sharing’ pane in System Preferences on the remote Mac.)
The tunnel starts on my local machine and ends on server.yourdomain.com at port 5432 (where PostgreSQL service is listening on the remote Mac.)
The starting point also needs a port number, and I can basically choose freely. Port numbers under 1000 and over 49000 are reserved for the system and require root privileges.
I will choose 5431 for the local port.
To connect the local port 5431to port 5432 on the remote Mac use the following command:
$ ssh -N -L localhost:5431:localhost:5432 server.yourdomain.com
Where
The -N option tells ssh that we do not want to invoke a remote shell or run a remote command.
The -L option creates a local port forwarding setup. This option takes a parameter with three or four parts, separated by colons :. The first pair (localhost:5431) are the tunnel start point. The second pair (`localhost:5432) are the remote end point of the tunnel.
The second localhost is resolved on the remote host, so this means port 5432 on the remote host.
The last parameter states the remote host, to connect to, server.yourdomain.com.
This commands tell ssh to connect to server.yourdomain.com and establish a tunnel that transfers traffic from port 5431 on my computer to port 5432 on the remote computer.
Since the origin of my tunnel is usually on my local computer, the first localhost can be omitted, so you only see the origin port.
$ ssh -N -L 5431:localhost:5432 server.yourdomain.com
When you execute the command nothing will happen. You will not even get a new prompt, because the ssh process is running until you cancel it with ctrl-C. Don’t cancel it yet, however, since it needs to run to provide the tunnel.
So, when you open PostgreSQL application (from /Library/PostgreSQL/13/bin) and connect to localhost:5431 all traffic will be forwarded by sshto port 5432 on the remote Mac.
SSH tunneling connection with python
You need the sshtunel
!pip install sshtunnel
import sshtunnel
sshtunnel.SSH_TIMEOUT = 5.0
sshtunnel.TUNNEL_TIMEOUT = 5.0

with sshtunnel.SSHTunnelForwarder(
    ('server.yourdomain.com'),
    ssh_username='postgresql', ssh_password='password',
    remote_bind_address=('server.yourdomain.com', 5431)
) as tunnel:
    conn = psycopg2.connect(
        user='postgres', password='password',
        host='server.yourdomain.com', port=5432,
        database='postgres',
    )
    # Do stuff
we repeat the previous actions
try:
    cur = conn.cursor()
except psycopg2.Error as e:
    print("Error: Could not get curser to the Database")
    print(e)
conn.set_session(autocommit=True)
try:
    cur.execute("create database ruslanmv")
except psycopg2.Error as e:
    print(e)


try:
    cur = conn.cursor()
except psycopg2.Error as e:
    print("Error: Could not get curser to the Database")
    print(e)

conn.set_session(autocommit=True)

try:
    cur.execute("CREATE TABLE IF NOT EXISTS music_library (album_name varchar, artist_name varchar, year int);")
except psycopg2.Error as e:
    print("Error: Issue creating table")
    print (e)

try:
    cur.execute("select count(*) from music_library")
except psycopg2.Error as e:
    print("Error: Issue creating table")
    print (e)

print(cur.fetchall())

try:
    cur.execute("INSERT INTO music_library (album_name, artist_name, year) \
                 VALUES (%s, %s, %s)", \
                 ("Let It Be", "The Beatles", 1970))
except psycopg2.Error as e:
    print("Error: Inserting Rows")
    print (e)

try:
    cur.execute("INSERT INTO music_library (album_name, artist_name, year) \
                 VALUES (%s, %s, %s)", \
                 ("Rubber Soul", "The Beatles", 1965))
except psycopg2.Error as e:
    print("Error: Inserting Rows")
    print (e)


try:
    cur.execute("SELECT * FROM music_library;")
except psycopg2.Error as e:
    print("Error: select *")
    print (e)

row = cur.fetchone()
while row:
   print(row)
   row = cur.fetchone()
cur.close()
conn.close()
database "ruslanmv" already exists

[(2,)]
('Let It Be', 'The Beatles', 1970)
('Rubber Soul', 'The Beatles', 1965)
('Let It Be', 'The Beatles', 1970)
('Rubber Soul', 'The Beatles', 1965)
SSH tunneling connection with Windows on Terminal
If we wont use python to use our server we can install PosgreSQL on our client
Unfortunately there is no real client “only” installer.
What you can do, is to download the ZIP archive of the complete Postgres binaries:
http://www.enterprisedb.com/products-services-training/pgbindownload
In the server side you should add the user
Creating PostgreSQL users
A default PostgresSQL installation always includes the postgres superuser. Initially, you must connect to PostgreSQL as the postgres user until you create other users (which are also referred to as roles).
To create a PostgreSQL user, follow these steps:
-
At the command line, type the following command as the server’s
root user:
su - postgres -
You can now run commands as the PostgreSQL superuser. To create a user, type the following command:
/Library/PostgreSQL/13/bin/createuser --interactive --pwprompt -
At the Enter name of role to add: prompt, type the user’s name.( here is the username that you have in windows , if you have windows 10 you remove the last letter. Ie. if the username is alexa, you create alex)
-
At the Enter password for new role: prompt, type a password for the user.
-
At the Enter it again: prompt, retype the password.
-
At the Shall the new role be a superuser? prompt, type y if you want to grant superuser access. Otherwise, type n.
-
At the Shall the new role be allowed to create databases? prompt, type y if you want to allow the user to create new databases. Otherwise, type n.
-
At the Shall the new role be allowed to create more new roles? prompt, type y if you want to allow the user to create new users. Otherwise, type n.
-
PostgreSQL creates the user with the settings you specified.
Netx step you are in the client computer with windows for example, and you need start
Once you have an active SSH tunnel or you opened the port for remote access, you can then connect to PostgreSQL
To set up an SSH tunnel
Open a terminal window and type the following command at the command line.
ssh -N -L 5432:localhost:5432 [email protected]
and nothing happens, but you keep open this tunnel and open a new terminal
and unzip the file that you downloaded , for example
cd C:\Users\yournam\Downloads\pgsql\bin>
and execute the following command
.\psql.exe -h localhost -p 5432 postgres
and write your password of the database user created,
Congratulation we have created a PostgreSQL server with our dynamic ip within a custom domain.
Leave a comment