Fundamentals of Scala and Spark in Practice
Hi everyone, today I am going to introduce the basis of Spark and Scala from a perspective of a python programmer.
Why it is important Apache Spark?
One of the main reasons that Apache Spark is important is that allows developers to run multiple tasks in parallel across hundreds of machines in a cluster or across multiple cores on a desktop.All thanks to the primary interaction point of apache spark RDD so call Resilient Distributed Datasets (RDD).Under the hood, these RDD’s are stored in partitions and operated in parallel. We will provide in this blog some code practices with RDDs.
Differences Between Python vs Scala
What is Scala? Scala, an acronym for “scalable language,” is a general-purpose, concise, high-level programming language that combines functional programming and object-oriented programming. It runs on JVM (Java Virtual Machine) and interoperates with existing Java code and libraries.
What is Python? Python developers define the language as “…an interpreted, object-oriented, a high-level programming language with dynamic semantics.
You can choose either Scala or Python depending what type of software should be developed. For large amount of data such in an ETL pipeline called some times Big Data it is recommendable use Scala with Apache Spark.
Installation of Spark and Scala on Windows
Let us assume you have already installed property Intellij and winutils for Spark on your computer and downloaded spark you can follow this tutorial.
Creation of Project
The first step you should perform is create a folder, let us call for example dev
and inside the folder you have you create a file called build.sbt
name := "DEV"

version := "0.1"

scalaVersion := "2.12.12"

libraryDependencies ++= Seq(
  "org.apache.spark" %% "spark-core" % "3.0.0",
  "org.apache.spark" %% "spark-sql" % "3.0.0",
  "org.apache.spark" %% "spark-mllib" % "3.0.0",
  "org.apache.spark" %% "spark-streaming" % "3.0.0"
)
the next step is open file and create new project

then select the folder where you have the .sbt file

, please select source and choose scala version 2.12.12 and press finish and choose the new project in a new window.
To install Scala plugin, press Ctrl+Alt+S , open the Plugins page, browse repositories to locate the Scala plugin, click Install and restart IntelliJ IDEA. Now you can successfully check out from VCS, create, or import Scala projects.
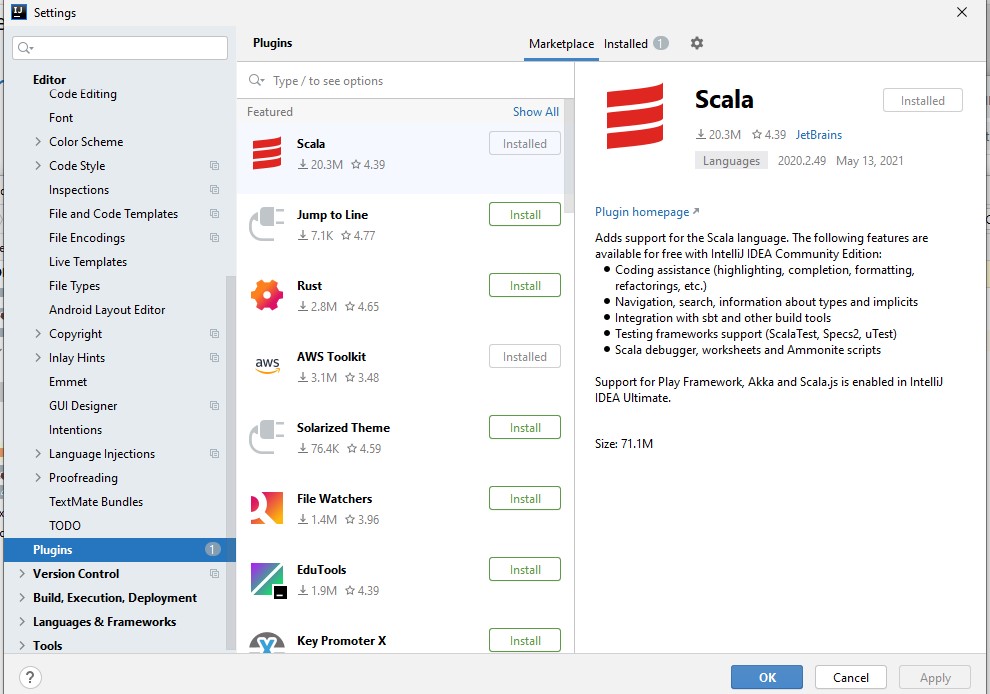
You can configure the IDE to automatically add import statements if there are no options to choose from.
-
In the Settings/Preferences dialog Ctrl+Alt+S, click **Editor General Auto Import**. -
Select the Add unambiguous imports on the fly checkbox, and apply the changes.
When you are pasting blocks of code that contain references to classes or static methods and fields that are not yet imported, the IDE automatically inserts the missing import statements. If you want to change that, from the Insert imports on paste list, select Ask to confirm every insertion or Never to insert import statements manually.

Creation of the folders
The next step is create new folder from the root src/main/scala/com.ruslanmv.spark
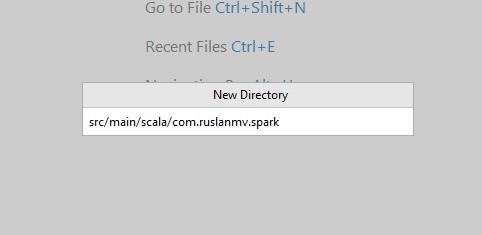
you will have something like

The first thing that we are going to do is do the My first Hello World in Scala with Spark.
Hello World in Apache Spark-Scala
you can create a file called HelloWorld.scala
object HelloWorld extends App {
  println("Hello World!")
}
and you can associated the scala support

then you can build the project

and then just run the object

and then you get you first run Hello world. I know is very simple but just we were doing only the simple setup.

the exit code 0 means that the compilation was done successfully!.
Importing libraries to your project
The first thing that is really important when you want to compile your applications are the libraries needed.
So let us first create a Scala class called demo_Hello and define a method there and return hello string

package com.ruslanmv.spark
/**
 * We are creating our first scala class
 *
 */
class demo_Hello {
  def sayHello(name: String ) = s"Hello, $name!"
}
since we want to be sure our code is correct we will write an appropiate test before
implement that method to do that we need to add scholar test library to the project
let’ts do it with the SBT file and we add the following line in the build.sbt file
libraryDependencies += "org.scalactic" %% "scalactic" % "3.2.7"
libraryDependencies += "org.scalatest" %% "scalatest" % "3.2.7" % "test"
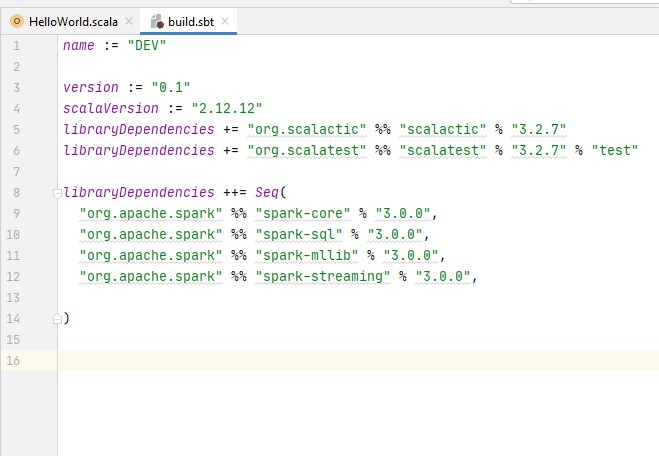
when we change as be tabled files the IDE offers us to synchronize these changes with the project
once we confirm to refresh the project it takes a bit to download and configure the added libraries

as you see in External Libraries, the Scala test library has been added to the library.
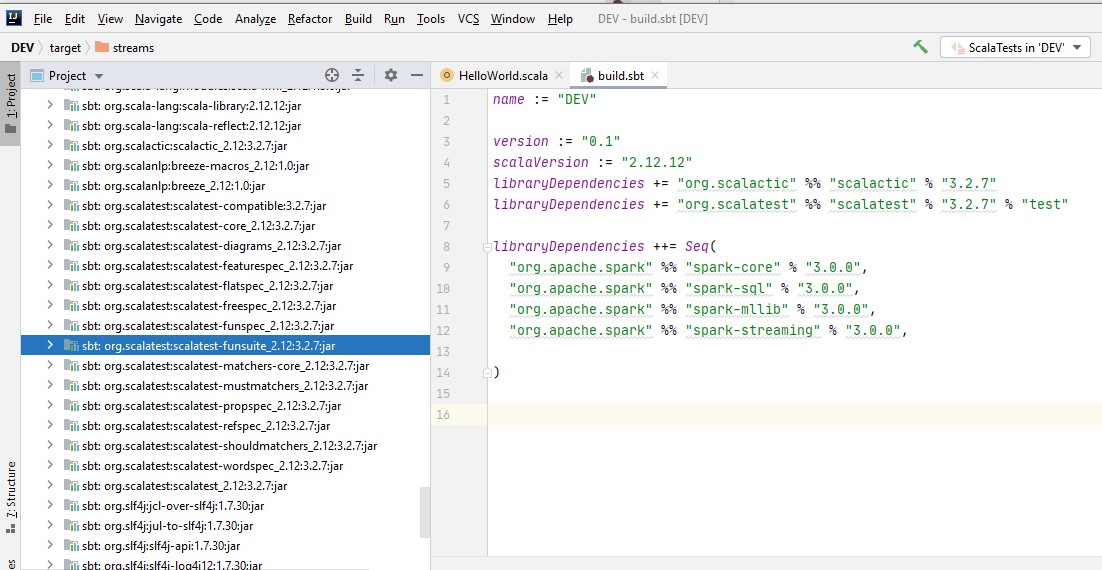
let back to the class let’s use the navigate to test action
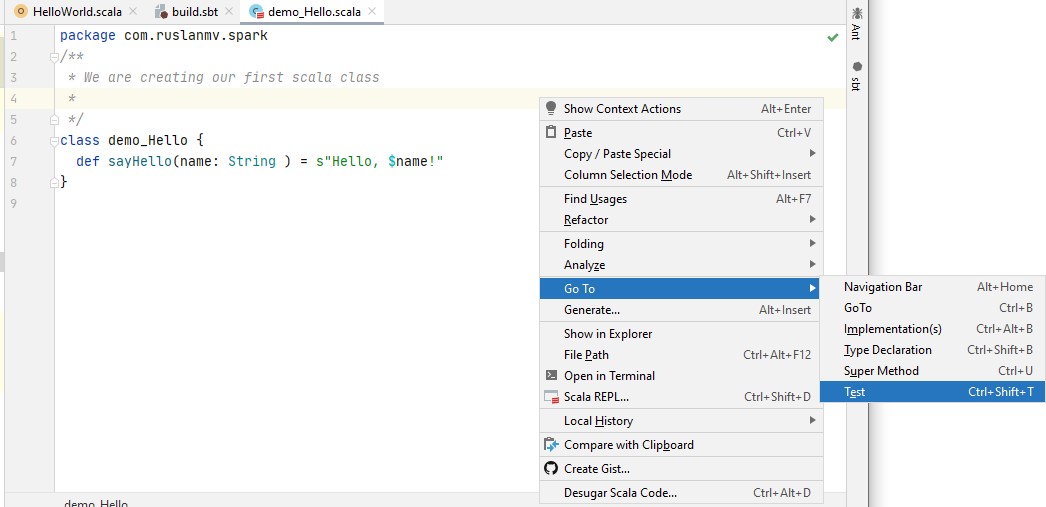
and we create a test action
package com.ruslanmv.spark
import org.scalatest.funsuite._
class demo_HelloTest extends AnyFunSuite {
  test("sayHello method works correctly") {
    val demo_Hello = new demo_Hello
    assert(demo_Hello.sayHello("Scala") == "Hello, Scala!")
  }
}
and as you see you can run this program because you have already loaded the libraries.
Correct way to add external jars (lib/*.jar) to an IntelliJ IDEA project
If we require to tp add external jars we can follow the following steps for adding external jars in IntelliJ IDEA:
-
Click File from the toolbar
-
Select Project Structure option (CTRL + SHIFT + ALT + S on Windows/Linux, ⌘ + ; on Mac OS X)
-
Select Modules at the left panel
-
Select Dependencies tab
-
Select + icon
-
Select 1 JARs or directories option

Now that we have learn some of the essential things of the IntelliJ IDEA let us start to work with datasets.
Basic concepts of Scala
One application in scala may be written into two different ways:
The first way is given by the definition of the main
object Application {
    def main(args: Array[String]): Unit = {
        println("Hello World");
    }
}
and the second is given by App trait
object Application extends App {
   println("Hello World")
}
DataFrame1
Let us first write the simplest way by using the App trait, let us create a file called Dataframe1.scala
package com.ruslanmv.spark
import org.apache.spark.sql._


// We create  a simple dataframe using App trait
object DataFrame1 extends App {

  // Use new SparkSession interface in Spark 2.0
  val spark = SparkSession
    .builder
    .appName("SparkSQL")
    .master("local[*]")
    .getOrCreate()

  val Data = Seq(("James",34,"true","M","3000.6089"),
    ("Michael",33,"true","F","3300.8067"),
    ("Robert",37,"false","M","5000.5034")
  )
  import spark.implicits._

  val df = Data.toDF("firstname","age","isGraduated","gender","salary")
  df.printSchema()


  //spark.stop()

}
when it is compiled we will get

** Discussion **
The App trait that is a convenient way of creating an executable scala program.
However in the case of Apache Spark jobs, documentation states “that applications should define a main() method instead of extending scala.App. Subclasses of scala.App may not work correctly
The difference to the main method altenative is that the App trait uses the delayed initalization feature.
Dataframe2
Due to it is recommendable use the main method , we create another file called DataFrame2.scala
package com.ruslanmv.spark
import org.apache.spark.sql._


// We create  a simple dataframe using main
object DataFrame2 {
  def main(args: Array[String]): Unit = {
    // Use new SparkSession interface in Spark 2.0
    val spark = SparkSession
      .builder
      .appName("SparkSQL")
      .master("local[*]")
      .getOrCreate()

    val Data = Seq(("James", 34, "true", "M", "3000.6089"),
      ("Michael", 33, "true", "F", "3300.8067"),
      ("Robert", 37, "false", "M", "5000.5034")
    )
    import spark.implicits._

    val df = Data.toDF("firstname", "age", "isGraduated", "gender", "salary")
    df.printSchema()
    //spark.stop()
  }
}
Discussion:
In the previous code we have created an application by using the main(), we have initialized SparkSession.
SparkSession it is an entry point to underlying Spark functionality in order to programmatically create Spark RDD, DataFrame and DataSet.
SparkSession’s object *spark* is default available in spark-shell and it can be created programmatically using SparkSession builder pattern.
SparkSession will be created using SparkSession.builder() builder patterns.
From Apache spark source code, implicits is an object class inside SparkSession class.
The implicits class has extended the SQLImplicits like this : object implicits extends org.apache.spark.sql.SQLImplicits with scala.Serializable.
The SQLImplicits provides some more functionalities like:
- Convert scala object to dataset. (By toDS)
- Convert scala object to dataframe. (By toDF)
- Convert “$name” into Column.
Convert scala object to dataset. (By toDS) Convert scala object to dataframe.
Let now perform additional manipulations of dataframe created before.
  import org.apache.spark.sql.functions.col
  import org.apache.spark.sql.types.IntegerType
  // Convert String to Integer Type
  val df2= df.withColumn("salary",col("salary").cast(IntegerType))
  df2.printSchema()
  df2.show()

  df.withColumn("salary",col("salary").cast("int")).printSchema()
  df.withColumn("salary",col("salary").cast("integer")).printSchema()

  // Using select
  df.select(col("salary").cast("int").as("salary")).printSchema()

  //Using selectExpr()
  df.selectExpr("cast(salary as int) salary","isGraduated").printSchema()
  df.selectExpr("INT(salary)","isGraduated").printSchema()

  //Using with spark.sql()
  df.createOrReplaceTempView("CastExample")
  spark.sql("SELECT INT(salary),BOOLEAN(isGraduated),gender from CastExample").printSchema()
  spark.sql("SELECT cast(salary as int) salary, BOOLEAN(isGraduated),gender from CastExample").printSchema()
so we can include the code in the new file called DataFrame3.scala
Dataframe3
package com.ruslanmv.spark
import org.apache.spark.sql._


//Cast String To Int
object DataFrame3 {
  def main(args: Array[String]): Unit = {
    // Use new SparkSession interface in Spark 2.0
    val spark = SparkSession
      .builder
      .appName("SparkSQL")
      .master("local[*]")
      .getOrCreate()

    val Data = Seq(("James", 34, "true", "M", "3000.6089"),
      ("Michael", 33, "true", "F", "3300.8067"),
      ("Robert", 37, "false", "M", "5000.5034")
    )
    import spark.implicits._

    val df = Data.toDF("firstname", "age", "isGraduated", "gender", "salary")
    //df.printSchema()
    //spark.stop()

    import org.apache.spark.sql.functions.col
    import org.apache.spark.sql.types.IntegerType
    // Convert String to Integer Type
    val df2= df.withColumn("salary",col("salary").cast(IntegerType))
    df2.printSchema()
    df2.show()

    df.withColumn("salary",col("salary").cast("int")).printSchema()
    df.withColumn("salary",col("salary").cast("integer")).printSchema()

    // Using select
    df.select(col("salary").cast("int").as("salary")).printSchema()

    //Using selectExpr()
    df.selectExpr("cast(salary as int) salary","isGraduated").printSchema()
    df.selectExpr("INT(salary)","isGraduated").printSchema()

    //Using with spark.sql()
    df.createOrReplaceTempView("CastExample")
    spark.sql("SELECT INT(salary),BOOLEAN(isGraduated),gender from CastExample").printSchema()
    spark.sql("SELECT cast(salary as int) salary, BOOLEAN(isGraduated),gender from CastExample").printSchema()


  }
}
and the first lines of the output will be

Dataframe4 - Read files and Cache
Let us now read a single file called Dataframe4.scala
package com.ruslanmv.spark
import org.apache.spark.sql.SparkSession
import org.apache.spark.sql.functions._


//Cache Example
object Dataframe4 extends App {

  val spark:SparkSession = SparkSession.builder()
    .master("local[1]")
    .appName("Spark")
    .getOrCreate()

  //read csv with options
  val df = spark.read.options(Map("inferSchema"->"true","delimiter"->",","header"->"true"))
    .csv("src/main/resources/zipcodes.csv")

  val df2 = df.where(col("State") === "PR").cache()
  df2.show(false)

  println(df2.count())

  val df3 = df2.where(col("Zipcode") === 704)


  println(df2.count())

}
after compiling and run this code , the preliminary output is

Discussion
Spark Cache and Persist are optimization techniques in DataFrame / Dataset for iterative and interactive Spark applications to improve the performance of Jobs.
Though Spark provides computation faster than traditional Map Reduce jobs, If you have not designed the jobs to reuse the repeating computations you will see degrade in performance .
Using cache() and persist() methods, Spark provides an optimization mechanism to store the intermediate computation of a Spark DataFrame so they can be reused in subsequent actions.
When you persist a dataset, each node stores it’s partitioned data in memory and reuses them in other actions on that dataset.
Spark DataFrame or Dataset cache() method by default saves it to storage level MEMORY_AND_DISK because recomputing the in-memory columnar representation of the underlying table is expensive.
Note that this is different from the default cache level of RDD.cache() which is MEMORY_ONLY‘
Spark persist() method is used to store the DataFrame or Dataset to one of the storage levels MEMORY_ONLY,MEMORY_AND_DISK, MEMORY_ONLY_SER, MEMORY_AND_DISK_SER, DISK_ONLY, MEMORY_ONLY_2,MEMORY_AND_DISK_2` and more.
Caching or persisting of Spark DataFrame or Dataset is a lazy operation, meaning a DataFrame will not be cached until you trigger an action
Dataframe5 - Read files and Cache
package com.ruslanmv.spark

import org.apache.spark.sql.types.{StringType, StructField, StructType}
import org.apache.spark.sql.{Row, SparkSession}
// We create a Dataframe
object DataFrame5 {

  def main(args:Array[String]):Unit={

    val spark:SparkSession = SparkSession.builder()
      .master("local[1]").appName("Spark")
      .getOrCreate()

    import spark.implicits._
    val columns = Seq("language","users_count")
    val data = Seq(("Java", "20000"), ("Python", "100000"), ("Scala", "3000"))
    val rdd = spark.sparkContext.parallelize(data)


    //From RDD (USING toDF())
    val dfFromRDD1 = rdd.toDF("language","users")
    dfFromRDD1.printSchema()
    //From RDD (USING createDataFrame)
    val dfFromRDD2 = spark.createDataFrame(rdd).toDF(columns:_*)
    dfFromRDD2.printSchema()
    //From RDD (USING createDataFrame and Adding schema using StructType)
    //convert RDD[T] to RDD[Row]
    val schema = StructType( Array(StructField("language", StringType,  true),
      StructField("language", StringType,  true)))

    val rowRDD = rdd.map(attributes => Row(attributes._1, attributes._2))
    val dfFromRDD3 = spark.createDataFrame(rowRDD,schema)


    //From Data (USING toDF())
    val dfFromData1 = data.toDF()

    //From Data (USING createDataFrame)
    var dfFromData2 = spark.createDataFrame(data).toDF(columns:_*)

    //From Data (USING createDataFrame and Adding schema using StructType)
    import scala.collection.JavaConversions._
    val rowData = data
      .map(attributes => Row(attributes._1, attributes._2))
    var dfFromData3 = spark.createDataFrame(rowData,schema)

    //From Data (USING createDataFrame and Adding bean class)
    //To-DO
  }
}
DataFrame6
package com.ruslanmv.spark

import org.apache.spark.sql.{Row, SparkSession}
import org.apache.spark.sql.types.{IntegerType, StringType, StructField, StructType}
//Creating Empty DataFrame
object DataFrame6 extends App {

  val spark: SparkSession = SparkSession.builder()
    .master("local[1]")
    .appName("Spark")
    .getOrCreate()
  import spark.implicits._


  val schema = StructType(
    StructField("firstName", StringType, true) ::
      StructField("lastName", IntegerType, false) ::
      StructField("middleName", IntegerType, false) :: Nil)

  val colSeq = Seq("firstName","lastName","middleName")

  case class Name(firstName: String, lastName: String, middleName:String)

  // Create empty dataframe using StructType schema
  val df = spark.createDataFrame(spark.sparkContext
    .emptyRDD[Row], schema)

  // Using implicit encoder
  Seq.empty[(String,String,String)].toDF(colSeq:_*)

  //Using case class

  Seq.empty[Name].toDF().printSchema()

  //Using emptyDataFrame
  spark.emptyDataFrame


  //Using emptyDataset


}
Dataframe7
package com.ruslanmv.spark

import org.apache.spark.sql.{Row, SparkSession}
import org.apache.spark.sql.types.{StringType, StructType}
import org.apache.spark.sql.functions._
//WithColumn
object DataFrame7 {

  def main(args:Array[String]):Unit= {

    val spark: SparkSession = SparkSession.builder()
      .master("local[1]")
      .appName("Spark")
      .getOrCreate()

    val dataRows = Seq(Row(Row("James;","","Smith"),"36636","M","3000"),
      Row(Row("Michael","Rose",""),"40288","M","4000"),
      Row(Row("Robert","","Williams"),"42114","M","4000"),
      Row(Row("Maria","Anne","Jones"),"39192","F","4000"),
      Row(Row("Jen","Mary","Brown"),"","F","-1")
    )

    val schema = new StructType()
      .add("name",new StructType()
        .add("firstname",StringType)
        .add("middlename",StringType)
        .add("lastname",StringType))
      .add("dob",StringType)
      .add("gender",StringType)
      .add("salary",StringType)

    val df2 = spark.createDataFrame(spark.sparkContext.parallelize(dataRows),schema)

    //Change the column data type
    df2.withColumn("salary",df2("salary").cast("Integer"))

    //Derive a new column from existing
    val df4=df2.withColumn("CopiedColumn",df2("salary")* -1)

    //Transforming existing column
    val df5 = df2.withColumn("salary",df2("salary")*100)

    //You can also chain withColumn to change multiple columns

    //Renaming a column.
    val df3=df2.withColumnRenamed("gender","sex")
    df3.printSchema()

    //Droping a column
    val df6=df4.drop("CopiedColumn")
    println(df6.columns.contains("CopiedColumn"))

    //Adding a literal value
    df2.withColumn("Country", lit("USA")).printSchema()

    //Retrieving
    df2.show(false)
    df2.select("name").show(false)
    df2.select("name.firstname").show(false)
    df2.select("name.*").show(false)

    import spark.implicits._

    val columns = Seq("name","address")
    val data = Seq(("Robert, Smith", "1 Main st, Newark, NJ, 92537"), ("Maria, Garcia","3456 Walnut st, Newark, NJ, 94732"))
    var dfFromData = spark.createDataFrame(data).toDF(columns:_*)
    dfFromData.printSchema()

    val newDF = dfFromData.map(f=>{
      val nameSplit = f.getAs[String](0).split(",")
      val addSplit = f.getAs[String](1).split(",")
      (nameSplit(0),nameSplit(1),addSplit(0),addSplit(1),addSplit(2),addSplit(3))
    })
    val finalDF = newDF.toDF("First Name","Last Name","Address Line1","City","State","zipCode")
    finalDF.printSchema()
    finalDF.show(false)

    df2.createOrReplaceTempView("PERSON")
    spark.sql("SELECT salary*100 as salary, salary*-1 as CopiedColumn, 'USA' as country FROM PERSON").show()
  }

}
Read data files
we create a file called DatasetRead.scala
package com.ruslanmv.spark
import org.apache.spark._
import org.apache.log4j._

object DatasetRead {
  def main(args: Array[String]): Unit = {

    Logger.getLogger("org").setLevel(Level.ERROR)

    val sc = new SparkContext("local[*]", "DatasetRead")

    val lines = sc.textFile("data/ml-100k/u.data")
    val numLines = lines.count()

    println("Hello world! The u.data file has " + numLines + " lines.")

    sc.stop()
  }
}
DataSet1
Let us create a new file called DataSet1.scala
package com.ruslanmv.spark
import org.apache.spark.sql.SparkSession


//We create Simple Dataset
object DataSet1 {

  def main(args:Array[String]):Unit= {

    val spark: SparkSession = SparkSession.builder()
      .master("local[1]")
      .appName("SparkApp")
      .getOrCreate()


    val Data = Seq(("James","Sales","NY",90000,34,10000),
      ("Michael","Sales","NY",86000,56,20000),
      ("Robert","Sales","CA",81000,30,23000),
      ("Maria","Finance","CA",90000,24,23000),
      ("Raman","Finance","CA",99000,40,24000),
      ("Scott","Finance","NY",83000,36,19000),
      ("Jen","Finance","NY",79000,53,15000),
      ("Jeff","Marketing","CA",80000,25,18000),
      ("Kumar","Marketing","NY",91000,50,21000)
    )

    // up to now have created our Dataset

    println(Data)


  }
}
we can compile the program and we printed the dataset in a single line

Let us create another DataSet, called Datset2.scala
Dataset2
package com.ruslanmv.spark

import org.apache.spark.sql.SparkSession
import org.apache.spark.sql.types.{IntegerType, StringType, StructField, StructType}
//Create Empty Dataset Example
object DataSet2 extends App {

  val spark: SparkSession = SparkSession.builder()
    .master("local[1]")
    .appName("Spark")
    .getOrCreate()
  spark.sparkContext.setLogLevel("ERROR");
  import spark.implicits._

  val schema = StructType(
    StructField("firstName", StringType, true) ::
      StructField("lastName", IntegerType, false) ::
      StructField("middleName", IntegerType, false) :: Nil)

  val colSeq = Seq("firstName","lastName","middleName")

  case class Name(firstName: String, lastName: String, middleName:String)
  case class Empty()
  val ds0 = spark.emptyDataset[Empty]
  ds0.printSchema()

  val ds1=spark.emptyDataset[Name]
  ds1.printSchema()

  val ds2 = spark.createDataset(Seq.empty[Name])
  ds2.printSchema()

  val ds4=spark.createDataset(spark.sparkContext.emptyRDD[Name])
  ds4.printSchema()

  val ds3=spark.createDataset(Seq.empty[(String,String,String)])
  ds3.printSchema()
  val ds5=Seq.empty[(String,String,String)].toDS()
  ds5.printSchema()

  val ds6=Seq.empty[Name].toDS()
  ds6.printSchema()
}
RDD Transformations are lazy operations meaning none of the transformations get executed until you call an action on Spark RDD. Since RDD’s are immutable, any transformations on it result in a new RDD leaving the current one unchanged.
RDD Transformation Types
There are two types are transformations.
Narrow Transformation
Narrow transformations are the result of map() and filter() functions and these compute data that live on a single partition meaning there will not be any data movement between partitions to execute narrow transformations.
Functions such as map(), mapPartition(), flatMap(), filter(), union() are some examples of narrow transformation
For example, we create an input RDD with ten integers, and then we apply the filter operation with the predicate x % 2 != 0 to select only the odd numbers. The resulting filteredRDD will contain the elements 1, 3, 5, 7, 9.
import org.apache.spark.sql.SparkSession
// Create SparkSession
val spark = SparkSession.builder()
        .appName("Creating DataFrame")
        .master("local[*]")
        .getOrCreate()

// Create RDD
val inputRDD = spark.sparkContext
        .parallelize(Seq(1, 2, 3, 4, 5, 6, 7, 8, 9, 10))

// RDD filter() usage
val filteredRDD = inputRDD.filter(x => x % 2 != 0)

// printing results 1, 3, 5, 7, 9.
filteredRDD.collect().foreach(println)
Wider Transformation
Wider transformations are the result of groupByKey() functions and these compute data that live on many partitions meaning there will be data movements between partitions to execute wider transformations. Since these shuffles the data, they also called shuffle transformations.
Functions such as groupByKey(), aggregateByKey(), aggregate(), join(), repartition() are some examples of a wider transformations.
Transformation 1 - Wider Transformation groupBy()
Similar to SQL “GROUP BY” clause, Spark groupBy() function is used to collect the identical data into groups on DataFrame/Dataset and perform aggregate functions on the grouped data.
We create a file called Transformation1.scala
package com.ruslanmv.spark

import org.apache.spark.sql.SparkSession
//Group by Key  Example - Shuffling
object Transformation1 extends App {

  val spark:SparkSession = SparkSession.builder()
    .master("local[1]")
    .appName("SparkByExamples.com")
    .getOrCreate()

  import spark.implicits._

  val simpleData = Seq(("James","Sales","NY",90000,34,10000),
    ("Michael","Sales","NY",86000,56,20000),
    ("Robert","Sales","CA",81000,30,23000),
    ("Maria","Finance","CA",90000,24,23000),
    ("Raman","Finance","CA",99000,40,24000),
    ("Scott","Finance","NY",83000,36,19000),
    ("Jen","Finance","NY",79000,53,15000),
    ("Jeff","Marketing","CA",80000,25,18000),
    ("Kumar","Marketing","NY",91000,50,21000)
  )
  val df = simpleData.toDF("employee_name","department","state","salary","age","bonus")

  val df2 = df.groupBy("state").count()
  df2.show(false)
  println(df2.rdd.getNumPartitions)


}
Discussion
We have used Spark DataFrame to run groupBy() on “department” columns and calculate aggregates like minimum, maximum, average, total salary for each group using min(), max() and sum() aggregate functions respectively. and finally, we will also see how to do group and aggregate on multiple columns.
Note: When compared to Narrow transformations, wider transformations are expensive operations due to shuffling.
Transformation2 - Wider Transformation reduceByKey()
Spark RDD reduceByKey() transformation is used to merge the values of each key using an associative reduce function. It is a wider transformation as it shuffles data across multiple partitions and it operates on pair RDD (key/value pair).
The output will be partitioned by either numPartitions or the default parallelism level.
package com.ruslanmv.spark
import org.apache.spark.sql.SparkSession

// Reduce By Key Example
object Transformation2 extends App{

  val spark: SparkSession = SparkSession.builder()
    .master("local[1]")
    .appName("Spark")
    .getOrCreate()

  val data = Seq(("Project", 1),
    ("Gutenberg’s", 1),
    ("Alice’s", 1),
    ("Adventures", 1),
    ("in", 1),
    ("Wonderland", 1),
    ("Project", 1),
    ("Gutenberg’s", 1),
    ("Adventures", 1),
    ("in", 1),
    ("Wonderland", 1),
    ("Project", 1),
    ("Gutenberg’s", 1))

  val rdd=spark.sparkContext.parallelize(data)

  val rdd2=rdd.reduceByKey(_ + _)

  rdd2.foreach(println)
Transformation3 - Narrow Transformation Map
package com.ruslanmv.spark

import org.apache.spark.sql.{Row, SparkSession}
import org.apache.spark.sql.types.{IntegerType, StringType, StructType,ArrayType,MapType}
//MapTransformation
object Transformation3 extends App{

  val spark:SparkSession = SparkSession.builder()
    .master("local[5]")
    .appName("Spark")
    .getOrCreate()

  val structureData = Seq(
    Row("James","","Smith","36636","NewYork",3100),
    Row("Michael","Rose","","40288","California",4300),
    Row("Robert","","Williams","42114","Florida",1400),
    Row("Maria","Anne","Jones","39192","Florida",5500),
    Row("Jen","Mary","Brown","34561","NewYork",3000)
  )

  val structureSchema = new StructType()
    .add("firstname",StringType)
    .add("middlename",StringType)
    .add("lastname",StringType)
    .add("id",StringType)
    .add("location",StringType)
    .add("salary",IntegerType)

  val df2 = spark.createDataFrame(
    spark.sparkContext.parallelize(structureData),structureSchema)
  df2.printSchema()
  df2.show(false)

  import spark.implicits._
  val util = new Util()
  val df3 = df2.map(row=>{

    val fullName = util.combine(row.getString(0),row.getString(1),row.getString(2))
    (fullName, row.getString(3),row.getInt(5))
  })
  val df3Map =  df3.toDF("fullName","id","salary")

  df3Map.printSchema()
  df3Map.show(false)

  val df4 = df2.mapPartitions(iterator => {
    val util = new Util()
    val res = iterator.map(row=>{
      val fullName = util.combine(row.getString(0),row.getString(1),row.getString(2))
      (fullName, row.getString(3),row.getInt(5))
    })
    res
  })
  val df4part = df4.toDF("fullName","id","salary")
  df4part.printSchema()
  df4part.show(false)

}
Discussion
map() transformation is used the apply any complex operations like adding a column, updating a column e.t.c, the output of map transformations would always have the same number of records as input
Repartitions
repartition() Return a dataset with number of partition specified in the argument. This operation reshuffles the RDD randamly, It could either return lesser or more partioned RDD based on the input supplied.
coalesce() Similar to repartition by operates better when we want to the decrease the partitions. Betterment acheives by reshuffling the data from fewer nodes compared with all nodes by repartition.
We create a file called Repartition1.scala
Repartition1
package com.ruslanmv.spark

import org.apache.spark.sql.{SaveMode, SparkSession}

object Repartition1 extends App {

  val spark:SparkSession = SparkSession.builder()
    .master("local[5]")
    .appName("Spark")
    //    .config("spark.default.parallelism", "500")
    .getOrCreate()

  // spark.sqlContext.setConf("spark.default.parallelism", "500")
  //spark.conf.set("spark.default.parallelism", "500")
  val df = spark.range(0,20)
  df.printSchema()
  println(df.rdd.partitions.length)

  df.write.mode(SaveMode.Overwrite)csv("c:/tmp/df-partition.csv")

  val df2 = df.repartition(10)

  println(df2.rdd.partitions.length)

  val df3 = df.coalesce(2)
  println(df3.rdd.partitions.length)

  val df4 = df.groupBy("id").count()
  println(df4.rdd.getNumPartitions)
}
We create a file called Repartition2.scala
Repartition2 - Repartition with respect range
package com.ruslanmv.spark

import org.apache.spark.sql.SparkSession
import org.apache.spark.sql.functions.col

//RangePartition
object Repartition2 extends App{

  val spark: SparkSession = SparkSession.builder()  .master("local[1]")
    .appName("Spark.com")
    .getOrCreate()

  /**
   * Simple using columns list
   */
  val data = Seq((1,10),(2,20),(3,10),(4,20),(5,10),
    (6,30),(7,50),(8,50),(9,50),(10,30),
    (11,10),(12,10),(13,40),(14,40),(15,40),
    (16,40),(17,50),(18,10),(19,40),(20,40)
  )

  import spark.sqlContext.implicits._
  val dfRange = data.toDF("id","count")
    .repartitionByRange(5,col("count"))

  dfRange.write.option("header",true).csv("c:/tmp/range-partition")
  dfRange.write.partitionBy()

}
Actions
Actions are RDD’s operation, that value returns back to the spar driver programs, which kick off a job to execute on a cluster. Transformation’s output is an input of Actions.
Some of the actions of Spark are:
- collect()
- foreach()
- reduce()
- count()
- saveAsTextfile
- saveAsSequenceFile
- take(n)
- top() .
- countByValue()
- fold()
- aggregate()
Let us just show two simple examples.
The action collect() -Return the complete dataset as an Array.
We create a file called Action1.scala
Action 1 - collect()
package com.ruslanmv.spark

import org.apache.spark.sql.{Row, SparkSession}
import org.apache.spark.sql.types.{IntegerType, StringType, StructType}
//CollectExample
object Action1 extends App {

  val spark:SparkSession = SparkSession.builder()
    .master("local[1]")
    .appName("Spark")
    .getOrCreate()

  val data = Seq(Row(Row("James ","","Smith"),"36636","M",3000),
    Row(Row("Michael ","Rose",""),"40288","M",4000),
    Row(Row("Robert ","","Williams"),"42114","M",4000),
    Row(Row("Maria ","Anne","Jones"),"39192","F",4000),
    Row(Row("Jen","Mary","Brown"),"","F",-1)
  )

  val schema = new StructType()
    .add("name",new StructType()
      .add("firstname",StringType)
      .add("middlename",StringType)
      .add("lastname",StringType))
    .add("id",StringType)
    .add("gender",StringType)
    .add("salary",IntegerType)

  val df = spark.createDataFrame(spark.sparkContext.parallelize(data),schema)
  df.printSchema()
  df.show(false)

  val colList = df.collectAsList()
  val colData = df.collect()

  colData.foreach(row=>
  {
    val salary = row.getInt(3)//Index starts from zero
    println(salary)
  })

  //Retrieving data from Struct column
  colData.foreach(row=>
  {
    val salary = row.getInt(3)
    val fullName:Row = row.getStruct(0) //Index starts from zero
    val firstName = fullName.getString(0)//In struct row, again index starts from zero
  val middleName = fullName.get(1).toString
    val lastName = fullName.getAs[String]("lastname")
    println(firstName+","+middleName+","+lastName+","+salary)
  })

}
The second example foreach(f: (T) ⇒ Unit):
Where unit Iterates all elements in the dataset by applying function f to all elements. Lets create
another file called Action2.scala
Action 2 - foreach()
package com.ruslanmv.spark
import org.apache.spark.sql.SparkSession
// For Each Example
object Action2 extends App {

  val spark: SparkSession = SparkSession.builder()
    .master("local[1]")
    .appName("Spark")
    .getOrCreate()

  val data = Seq(("Banana",1000,"USA"), ("Carrots",1500,"USA"), ("Beans",1600,"USA"),
    ("Orange",2000,"USA"),("Orange",2000,"USA"),("Banana",400,"China"),
    ("Carrots",1200,"China"),("Beans",1500,"China"))

  //DataFrame
  val df = spark.createDataFrame(data).toDF("Product","Amount","Country")
  df.foreach(f=> println(f))

  val longAcc = spark.sparkContext.longAccumulator("SumAccumulator")
  df.foreach(f=> {
    longAcc.add(f.getInt(1))
  })
  println("Accumulator value:"+longAcc.value)
  //rdd
  val rdd = spark.sparkContext.parallelize(Seq(1,2,3,4,5,6,7,8,9))
  rdd.foreach(print)

  //rdd accumulator
  val rdd2 = spark.sparkContext.parallelize(Seq(1,2,3,4,5,6,7,8,9))
  val longAcc2 = spark.sparkContext.longAccumulator("SumAccumulator2")
  rdd .foreach(f=> {
    longAcc2.add(f)
  })
  println("Accumulator value:"+longAcc2.value)
}
The last step of our current project is write
Save1
package com.ruslanmv.spark

import org.apache.spark.sql.{DataFrame, SparkSession}
//SaveDataFrame
object Save1 {

  def main(args: Array[String]): Unit = {
    val spark: SparkSession = SparkSession.builder()
      .master("local[1]")
      .appName("SparkByExample")
      .getOrCreate()

    val filePath = "C://000_Projects/opt/BigData/zipcodes.csv"

    var df:DataFrame = spark.read.option("header","true").csv(filePath)

    df.repartition(5).write.option("header","true").csv("c:/tmp/output/df1")
  }
}
Finally I would like finish to this discussion of scala and sparkk with the example to
convert Parquet To Csv.
We create a single file called Save2.scala
Save2
package com.ruslanmv.spark

import org.apache.spark.sql.{SaveMode, SparkSession}
//ParquetToCsv
object Save2 extends App {

  val spark: SparkSession = SparkSession.builder()
    .master("local[1]")
    .appName("SparkByExamples.com")
    .getOrCreate()

  spark.sparkContext.setLogLevel("ERROR")

  //read parquet file
  val df = spark.read.format("parquet")
    .load("src/main/resources/zipcodes.parquet")
  df.show()
  df.printSchema()

  //convert to csv
  df.write.mode(SaveMode.Overwrite)
    .csv("/tmp/csv/zipcodes.csv")

}
I would like to say that during the developing of our programs, it is recommendable assign the priority to transformations that cost less network cost as
-
Narrow transformations
- Wider transformations
- Applications
And always try to keep in mind to distribute the computation charge around all possible
partitions in a uniform way. Some times should be hard but we can try.
Setup configuration in Scala
When we need to load our passwords or configuration parameters of our program in scala. It is important to know how to load them. The separation of configuration from code is a good practice that makes our system customisable as we can load different configurations according to the environment we are running it in.
Configurations from a file
The first thing that we have to do is add the library in build.sbt
libraryDependencies += "com.typesafe" % "config" % "1.2.0"
And the location of the property file is /src/main/resources/application.conf
my {
    secret {
        value = "super-secret"
        value = ${?VALUE}
    }
}
and then we create a file called Configuration1.scala
package com.ruslanmv.spark
// config-tutorial.scala
object Configuration1 {

  def main(args: Array[String]): Unit = {

    // config-tutorial.scala
    import com.typesafe.config.ConfigFactory
    val value = ConfigFactory.load().getString("my.secret.value")
    println(s"My secret value is $value")

  }
}
and when it is compiled you get

A simple script that will try to load configurations in the following order: 1) From properly named environment variables 2) From command line paramenters 3) From the configuration file
package com.ruslanmv.spark

// config-tutorial.scala
object Configuration2 {

  def main(args: Array[String]): Unit = {

    // config-tutorial.scala
    import com.typesafe.config.ConfigFactory
    import scala.util.Properties

    class MyConfig(fileNameOption: Option[String] = None) {
      val config = fileNameOption.fold(
        ifEmpty = ConfigFactory.load() )(
        file => ConfigFactory.load(file) )

      def envOrElseConfig(name: String): String = {
        Properties.envOrElse(
          name.toUpperCase.replaceAll("""\.""", "_"),
          config.getString(name)
        )
      }
    }
    val myConfig = new MyConfig()
    val value = myConfig.envOrElseConfig("my.secret.value")
    println(s"My secret value is $value")

  }
}
and we again obtain the same

Congratulation we have practiced Scala and Apache Spark with IntelliJ
You can download the project here :https://github.com/ruslanmv/Scala-and-Spark-in-Practice

Leave a comment