
Text to Speech with TensorFlow with Heroku and Google Colab
Text to Speech with TensorFlow APP
Text-to-Speech TTS To Synthesize Speech That Sounds Like a Real Human Person
In this project we can Synthesize Speech with TensorFlowTTS
This tutorial will have you deploying a Python app (a simple Gradio app) in minutes.
by using Google Colaboratory and Heroku. TensorflowTTS Notebook is used to launch TensorflowTTS on browser using Gradio in Google Colaboratory which gives you better way to interact Text-to-Speech TTS To Synthesize Speech.
![]()
Introduction
TensorFlowTTS provides real-time state-of-the-art speech synthesis architectures such as Tacotron-2, Melgan, Multiband-Melgan, FastSpeech, FastSpeech2 based-on TensorFlow 2. With Tensorflow 2, we can speed-up training/inference progress, optimizer further by using fake-quantize aware and pruning, make TTS models can be run faster than real-time and be able to deploy on mobile devices or embedded systems
The tutorial assumes that you have a free Heroku account and Google Account Colab.
In this step you’ll install the Heroku Command Line Interface (CLI). You use the CLI to manage and scale your applications, provision add-ons, view your application logs, and run your application locally.
Download and run the installer for your platform: macOS
Also available via Homebrew:
$ brew install heroku/brew/heroku
Windows
Download the appropriate installer for your Windows installation:
Ubuntu
Run the following from your terminal:
$ sudo snap install heroku --classic
Once installed, you can use the heroku command from your command shell.
Install environment with Anaconda
conda create -n tts python==3.6
We have selected python 3.6 because it is compatible with Tensorflow 2.0, and this version of tensor flow is smaller in size with respect to Tensor flow 2.6 that is compatible with python 3.7
conda activate tts
conda install ipykernel
python -m ipykernel install --user --name tts --display-name "Python (tts)"
conda install -c conda-forge ipywidgets
jupyter nbextension enable --py widgetsnbextension
we create a file called requirements.txt
TensorFlowTTS
gradio
numpy
SoundFile
git+https://github.com/repodiac/german_transliterate
tensorflow-cpu
Notice that we have selected tensorflow-cpu instead tensorflow-gpu because the free version of Heroku does not support gpu. In case you will requiere use GPU, you need first install Cuda 11 and Cudnn, for further versions you can check the nvidia site.
It is installed the libraries by typing the following
pip install -r requirements.txt
we create a file app.py
import numpy as np
import soundfile as sf
import yaml
import tensorflow as tf
from tensorflow_tts.inference import TFAutoModel
from tensorflow_tts.inference import AutoProcessor
import gradio as gr
# initialize fastspeech2 model.
fastspeech2 = TFAutoModel.from_pretrained("tensorspeech/tts-fastspeech2-ljspeech-en")
# initialize mb_melgan model
mb_melgan = TFAutoModel.from_pretrained("tensorspeech/tts-mb_melgan-ljspeech-en")
# inference
processor = AutoProcessor.from_pretrained("tensorspeech/tts-fastspeech2-ljspeech-en")
def inference(text):
input_ids = processor.text_to_sequence(text)
# fastspeech inference
mel_before, mel_after, duration_outputs, _, _ = fastspeech2.inference(
input_ids=tf.expand_dims(tf.convert_to_tensor(input_ids, dtype=tf.int32), 0),
speaker_ids=tf.convert_to_tensor([0], dtype=tf.int32),
speed_ratios=tf.convert_to_tensor([1.0], dtype=tf.float32),
f0_ratios =tf.convert_to_tensor([1.0], dtype=tf.float32),
energy_ratios =tf.convert_to_tensor([1.0], dtype=tf.float32),
)
# melgan inference
audio_before = mb_melgan.inference(mel_before)[0, :, 0]
audio_after = mb_melgan.inference(mel_after)[0, :, 0]
# save to file
sf.write('./audio_before.wav', audio_before, 22050, "PCM_16")
sf.write('./audio_after.wav', audio_after, 22050, "PCM_16")
return './audio_after.wav'
inputs = gr.inputs.Textbox(lines=5, label="Input Text")
outputs = gr.outputs.Audio(type="file", label="Output Audio")
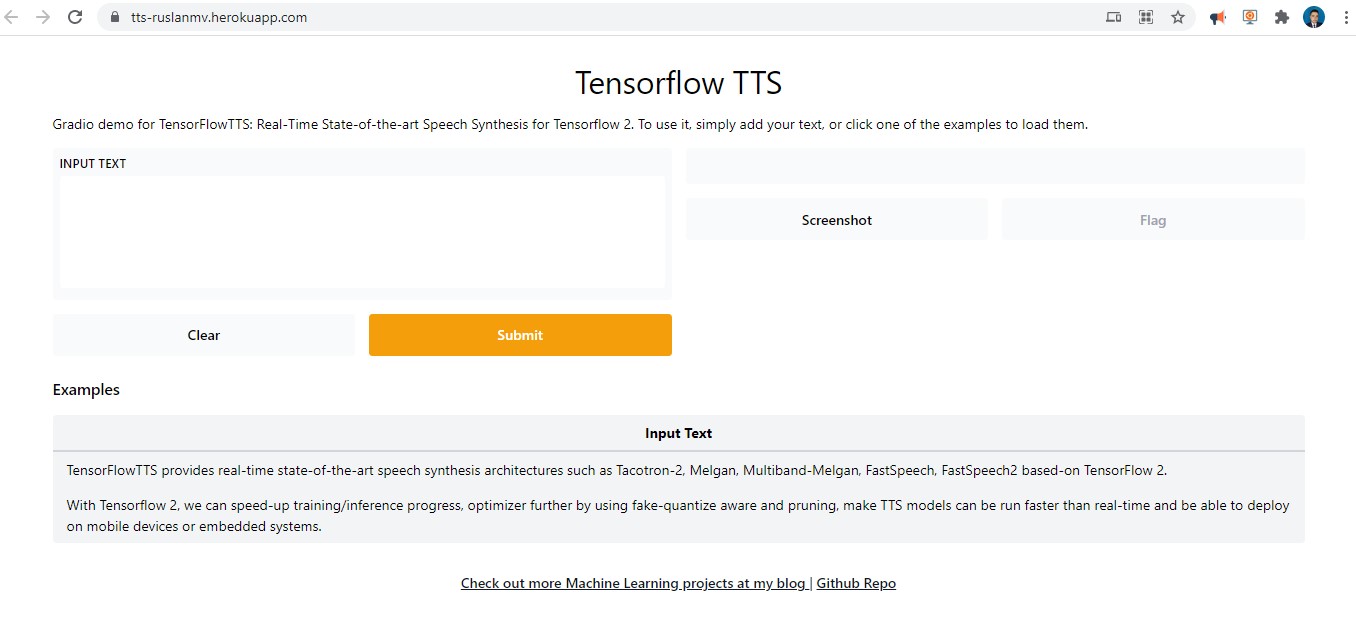
title = "Tensorflow TTS"
description = "Gradio demo for TensorFlowTTS: Real-Time State-of-the-art Speech Synthesis for Tensorflow 2. To use it, simply add your text, or click one of the examples to load them."
article = "<p style='text-align: center'><a href='https://ruslanmv.com/'> Check out more Machine Learning projects at my blog </a> | <a href='https://github.com/ruslanmv/TensorFlowTTS'>Github Repo</a></p>"
examples = [
["TensorFlowTTS provides real-time state-of-the-art speech synthesis architectures such as Tacotron-2, Melgan, Multiband-Melgan, FastSpeech, FastSpeech2 based-on TensorFlow 2."],
["With Tensorflow 2, we can speed-up training/inference progress, optimizer further by using fake-quantize aware and pruning, make TTS models can be run faster than real-time and be able to deploy on mobile devices or embedded systems."]
]
gr.Interface(inference, inputs, outputs, title=title, description=description, article=article, examples=examples).launch()
we create a file called runtime.txt
python-3.6.14
we create a file called setup.sh
export GRADIO_SERVER_NAME=0.0.0.0
export GRADIO_SERVER_PORT="$PORT"
we create a file Procfile
web: source setup.sh && python app.py
In this step you’ll install the Heroku Command Line Interface (CLI). You use the CLI to manage and scale your applications, provision add-ons, view your application logs, and run your application locally.
Install the Heroku CLI
Download and install the Heroku CLI.
If you haven’t already, log in to your Heroku account and follow the prompts to create a new SSH public key.
$ heroku login
If you haven’t already added these files to a git repo, do it by running the following in your terminal:
git init
git add -A
git commit -am "commit message here"
We just need to push this to a Heroku dyno. First, let’s allocate a Heroku dyno for our app by running:
Deploy the app
In this step you will deploy the app to Heroku.
Create an app on Heroku, which prepares Heroku to receive your source code:
heroku create tts-ruslanmv
if we type only heroku create it is automatically generated instance name plus the Heroku domain.
When you create an app, a git remote (called heroku) is also created and associated with your local git repository.
Heroku generates a random name (in this case ruslanmv-tts) for your app, or you can pass a parameter to specify your own app name.
Configure your application to use two buildpacks:
heroku buildpacks:set heroku/python
heroku buildpacks:add --index 1 heroku-community/apt
heroku buildpacks
# Should show apt first, then python
Add an Aptfile listing Ubuntu packages to be installed:
Create an ‘Aptfile’ and add the following lines:
libsndfile-dev
Now deploy your code:
git push heroku master
Give this a few minutes to install all of the dependencies on your dyno. It’s possible to run into dependency issues here, which you can resolve by reading the error messages and installing the right version of each library (see my note above about Heroku’s size limits). If you don’t see any errors, then you should be able to open up your app by running:
heroku ps:scale web=1
The application is now deployed. Ensure that at least one instance of the app is running
Now visit the app at the URL generated by its app name. As a handy shortcut, you can open the website as follows:
heroku open
You’ll notice the web address is https://tts-ruslanmv.herokuapp.com/ . If you enter, you should wait at least one minute to initialize the application.
To get a better performance of this program we have created a Colab notebook version that runs much faster than the Heroku version.
![]()
Congratulations!, we have created a web app, with TensorFlowTTS.
Leave a comment