Create Fashion images with DCGANs
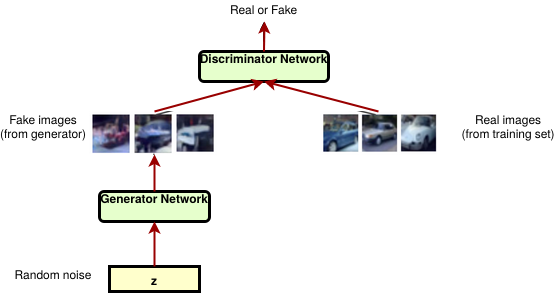
A generative adversarial network (GAN) is a class of machine learning frameworks . Two neural networks contest with each other in a game. Given a training set, this technique learns to generate new data with the same statistics as the training set. For example, a GAN trained on photographs can generate new photographs that look at least superficially authentic to human observers, having many realistic characteristics.
The core idea of a GANs is based on the “indirect” training through the discriminator, which itself is also being updated dynamically. This basically means that the generator is not trained to minimize the distance to a specific image, but rather to fool the discriminator. This enables the model to learn in an unsupervised manner.
We are going to Design and train DCGANs using the Keras API in Python abd we will build and train a Deep Convolutional GAN (DCGAN) with Keras to generate images of fashionable clothes.
Fashion-MNIST is a dataset of Zalando’s article images—consisting of a training set of 60,000 examples and a test set of 10,000 examples. Each example is a 28x28 grayscale image, associated with a label from 10 classes. Zalando intends Fashion-MNIST to serve as a direct drop-in replacement for the original MNIST dataset for benchmarking machine learning algorithms. It shares the same image size and structure of training and testing splits.
Each training and test example is assigned to one of the following labels:
- 0 T-shirt/top
- 1 Trouser
- 2 Pullover
- 3 Dress
- 4 Coat
- 5 Sandal
- 6 Shirt
- 7 Sneaker
- 8 Bag
- 9 Ankle boot
1. Setup
First we requiere a an application which will help us to plot the images called plot_utils.py
import numpy as np
import matplotlib.pyplot as plt

def show(images, n_cols=None):
    n_cols = n_cols or len(images)
    n_rows = (len(images) - 1) // n_cols + 1
    if images.shape[-1] == 1:
        images = np.squeeze(images, axis=-1)
    plt.figure(figsize=(n_cols, n_rows))
    for index, image in enumerate(images):
        plt.subplot(n_rows, n_cols, index + 1)
        plt.imshow(image, cmap="binary")
        plt.axis("off")
The next step is create a project where we will import the libraries
Libraries
%matplotlib inline
import tensorflow as tf
from tensorflow import keras
import numpy as np
import plot_utils
import matplotlib.pyplot as plt
from tqdm import tqdm
from IPython import display
print('Tensorflow version:', tf.__version__)
Tensorflow version: 2.3.0
2. Load and Preprocess the Data
(x_train, y_train), (x_test, y_test) = tf.keras.datasets.fashion_mnist.load_data()
x_train = x_train.astype(np.float32)/255.0
x_test = x_test.astype(np.float32) /255.0
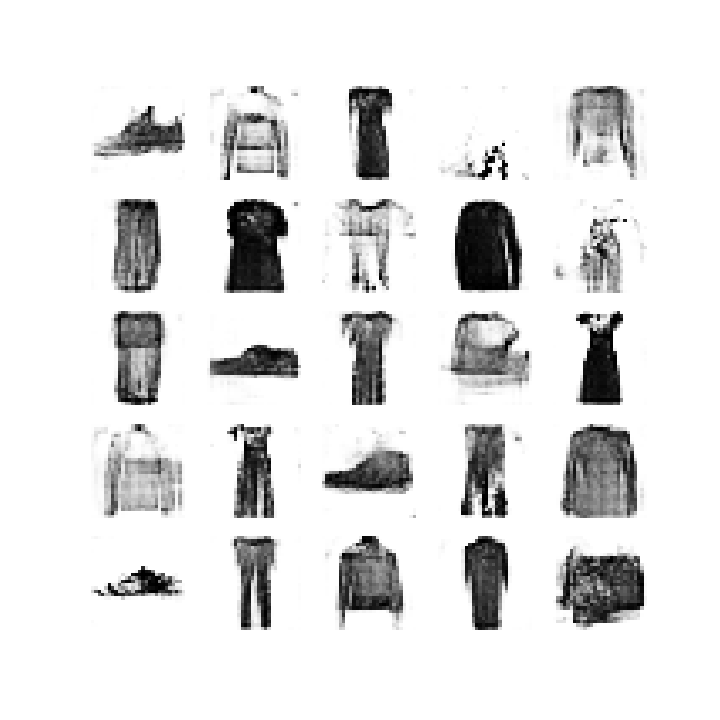
plt.figure(figsize=(10,10))
for i in range(25):
    plt.subplot(5,5,i+1)
    plt.xticks([])
    plt.yticks([])
    plt.grid(False)
    plt.imshow(x_train[i],cmap=plt.cm.binary)
plt.show()
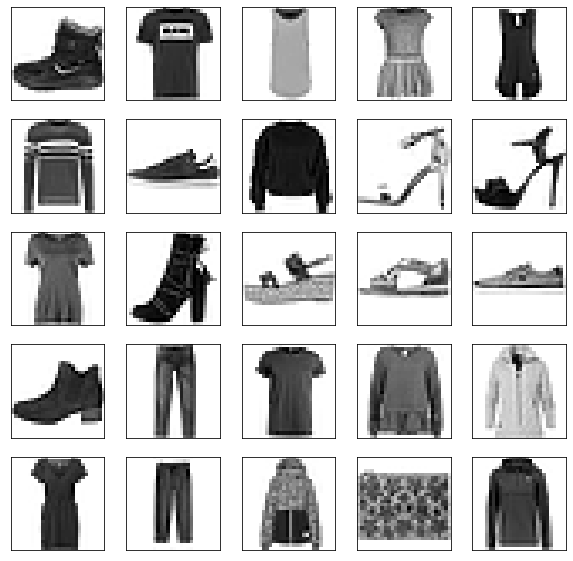
Each image is 28 pixels in height and 28 pixels in width, for a total of 784 pixels in total. Each pixel has a single pixel-value associated with it, indicating the lightness or darkness of that pixel, with higher numbers meaning darker. This pixel-value is an integer between 0 and 255. The training and test data sets have 785 columns. The first column consists of the class labels (see above), and represents the article of clothing. The rest of the columns contain the pixel-values of the associated image.
- To locate a pixel on the image, suppose that we have decomposed x as x = i * 28 + j, where i and j are integers between 0 and 27. The pixel is located on row i and column j of a 28 x 28 matrix.
- For example, pixel31 indicates the pixel that is in the fourth column from the left, and the second row from the top, as in the ascii-diagram below.
3. Create Batches of Training Data
batch_size = 32
dataset = tf.data.Dataset.from_tensor_slices(x_train).shuffle(1000)
dataset = dataset.batch(batch_size, drop_remainder=True).prefetch(1)
Task 4: Build the Generator Network for DCGAN
Generator is an upsampling network with fractionally-strided convolutions
Discriminator is a convolutional network
Architecture guidelines for stable Deep Convolutional GANs:
- Replace any pooling layers with strided convolutions (discriminator) and fractional-strided convolutions (generator).
- Use batchnorm in both the generator and the discriminator.
- Remove fully connected hidden layers for deeper architectures.
- Use ReLU activation in generator for all layers expect for the output, which uses Tanh.
- Use LeakyReLU activation in the discriminator for all layers.
Source: Radford et al, “Unsupervised Representation Learning with Deep Convolutional Generative Adversarial Networks”, ICLR 2016
num_features = 100
generator = keras.models.Sequential([
    keras.layers.Dense(7*7*128, input_shape = [num_features]),
    keras.layers.Reshape([7,7,128]),
    keras.layers.BatchNormalization(),
    keras.layers.Conv2DTranspose(64,(5,5),(2,2), padding = 'same',activation = 'selu'),
    keras.layers.BatchNormalization(),
    keras.layers.Conv2DTranspose(1,(5,5),(2,2), padding = 'same',activation = 'tanh'),
])
noise = tf.random.normal(shape=[1,num_features])
generated_image = generator(noise, training=False)
plot_utils.show(generated_image,1)

5. Build the Discriminator Network for DCGAN
discriminator = keras.models.Sequential([
    keras.layers.Conv2D(64, (5,5),(2,2), padding='same', input_shape=[28,28,1]),
    keras.layers.LeakyReLU(0.2),
    keras.layers.Dropout(0.3),
    keras.layers.Conv2D(128, (5,5), (2,2), padding='same'),
    keras.layers.LeakyReLU(0.2),
    keras.layers.Dropout(0.3),
    keras.layers.Flatten(),
    keras.layers.Dense(1, activation='sigmoid')
])
decision = discriminator(generated_image)
print(decision)
tf.Tensor([[0.50194454]], shape=(1, 1), dtype=float32)
6. Compile the Deep Convolutional Generative Adversarial Network (DCGAN)
discriminator.compile(loss='binary_crossentropy', optimizer='rmsprop')
discriminator.trainable = False
gan = keras.models.Sequential([generator, discriminator])
gan.compile(loss = 'binary_crossentropy', optimizer='rmsprop')
7. Define Training Procedure
seed = tf.random.normal(shape=[batch_size,100])
def train_dcgan(gan, dataset, batch_size, num_features, epochs=5):
    generator, discriminator = gan.layers
    for epoch in tqdm(range(epochs)):
        print("Epochs {}/{}".format(epoch + 1, epochs))
        for X_batch in dataset:
            noise = tf.random.normal(shape=[batch_size, num_features])
            generated_images = generator(noise)
            X_fake_and_real = tf.concat([generated_images,X_batch], axis=0)
            y1= tf.constant([[0.]]*batch_size + [[1.]] * batch_size)
            discriminator.trainable = True
            discriminator.train_on_batch(X_fake_and_real,y1)
            y2 = tf.constant([[1.]] * batch_size)
            discriminator.trainable =False
            gan.train_on_batch(noise, y2)
        display.clear_output(wait = True)
        generate_and_save_images(generator, epoch + 1, seed)
    display.clear_output(wait=True)
    generate_and_save_images(generator, epochs,seed)
## Source https://www.tensorflow.org/tutorials/generative/dcgan#create_a_gif
def generate_and_save_images(model, epoch, test_input):
    predictions = model(test_input, training=False)
    fig = plt.figure(figsize=(10,10))

    for i in range(25):
        plt.subplot(5, 5, i+1)
        plt.imshow(predictions[i, :, :, 0] * 127.5 + 127.5, cmap='binary')
        plt.axis('off')
    plt.savefig('image_at_epoch_{:04d}.png'.format(epoch))
    plt.show()
8. Train DCGAN
x_train_dcgan = x_train.reshape(-1, 28,28,1)*2. -1.
batch_size = 32
dataset = tf.data.Dataset.from_tensor_slices(x_train_dcgan).shuffle(1000)
dataset = dataset.batch(batch_size, drop_remainder=True).prefetch(1)
%%time
train_dcgan(gan, dataset, batch_size, num_features, epochs=10)
CPU times: user 1h 9min 19s, sys: 19min 17s, total: 1h 28min 37s
Wall time: 30min 13s
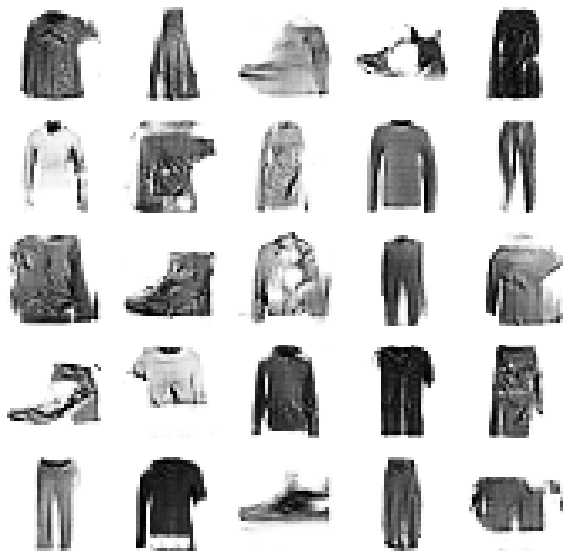
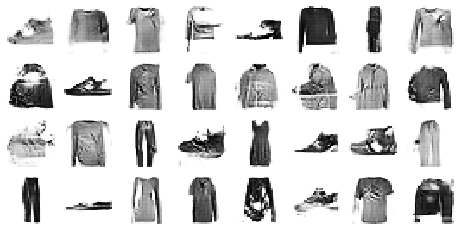
9. Generate Synthetic Images with DCGAN
noise = tf.random.normal(shape=[batch_size, num_features])
generated_images = generator(noise)
plot_utils.show(generated_images,8)
## Source: https://www.tensorflow.org/tutorials/generative/dcgan#create_a_gif

import imageio
import glob

anim_file = 'dcgan.gif'

with imageio.get_writer(anim_file, mode='I') as writer:
    filenames = glob.glob('image*.png')
    filenames = sorted(filenames)
    last = -1
    for i,filename in enumerate(filenames):
        frame = 2*(i**0.5)
        if round(frame) > round(last):
            last = frame
        else:
            continue
        image = imageio.imread(filename)
        writer.append_data(image)
    image = imageio.imread(filename)
    writer.append_data(image)

import IPython
display.Image(filename=anim_file)
Congratulations! We have generated images with images with DCGAN.
Acknowledgements
- Original dataset was downloaded from https://github.com/zalandoresearch/fashion-mnist
- Dataset was converted to CSV with this script: https://pjreddie.com/projects/mnist-in-csv/
- Coursera https://www.coursera.com
- Wikipedia https://en.wikipedia.org/wiki/Generative_adversarial_network
Leave a comment