
How to deploy a WebApp on AWS Cloud SageMaker Notebook
Sometimes when you need to deploying machine learning models in production and graphics-intensive applications and you have not enough power computing to satisfy your needs. Then you can use the following blog post to solve this issue. Instead of upgrade your cluster of your company or personal computer, you can use the cloud.
With Amazon Web Services you can simply create an instance with the adequate requirements for your Web Application .
In this blog post I will show how to create a web application on AWS SageMaker Notebook and connect with from your computer.
In particular we will create a demo application by using Gradio, that is the fastest way to demo your machine learning model with a friendly web interface so that anyone can use it, anywhere.
Architecture
AWS does not natively support SSH-ing into SageMaker notebook instances, but nothing really prevents you from setting up SSH yourself.
There are two possible solutions to connect :
a) Reverse proxy
b) Bastion box.
In a previous blog post we have discussed the How to connect to Sagemaker via SSH, which is based on the Bastion box. This is useful when you want to control all the pieces of your Cloud Infrastructure. In this new blog post we focus in a more simpler solution that is given by the Reverse proxy.
Reverse proxy Solution
A reverse proxy is a type of proxy server. Unlike a traditional proxy server, which is used to protect clients, a reverse proxy is used to protect servers. A reverse proxy is a server that accepts a request from a client, forwards the request to another one of many other servers, and returns the results from the server that actually processed the request to the client as if the proxy server had processed the request itself. The client only communicates directly with the reverse proxy server and it does not know that some other server actually processed its request.
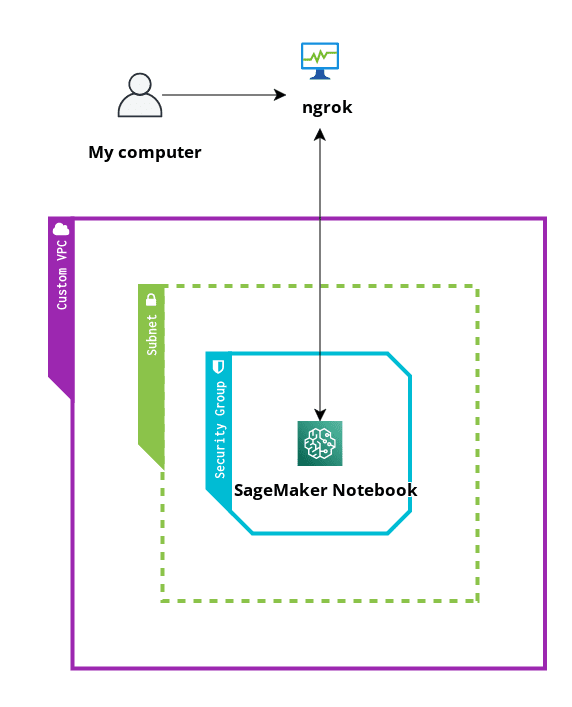
Due to AWS Sagemaker notebook officially does not support ssh support natively and we want to connect from our Laptop to our Sagemaker Server. We are going to a use a simply application called ngrok that will allow us connect it to our server.
Step 1 - Creation of ngrok Account
First create account on https://ngrok.com/signup
after you created your account and confirm your email, you can copy the Authtoken
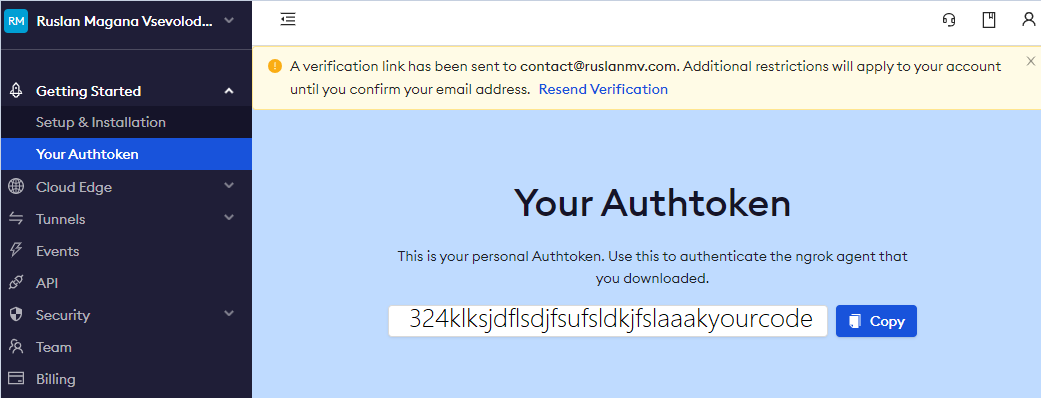
you will use this Token to get the URL site of your web applications.
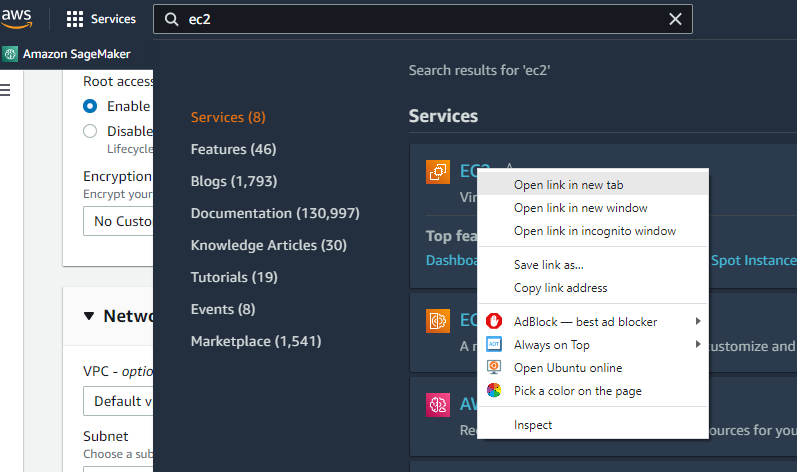
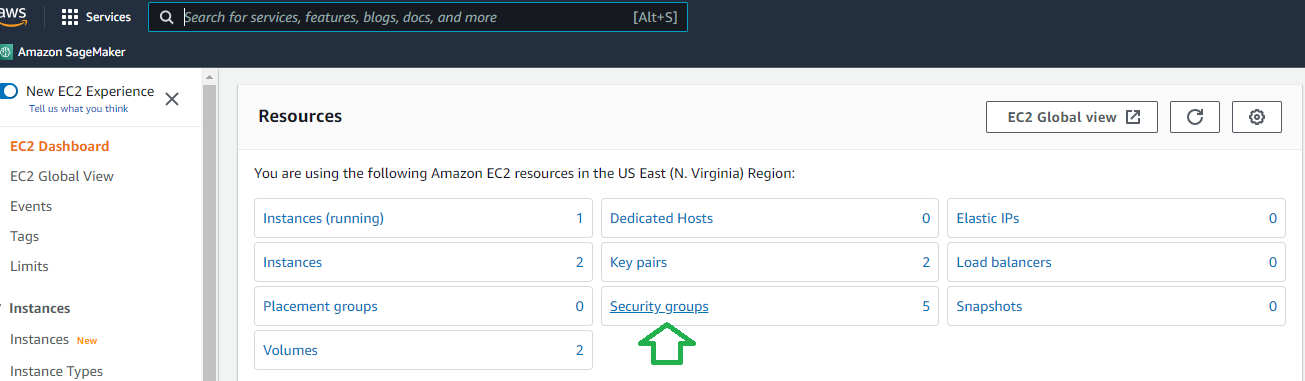
Step 2- Creation of Security Group for SageMaker
In ordering to communicate with Sagemaker Notebook Instance we need create a custom Security Groups.
Head to the AWS Console and from there, under All Services, choose EC2, open a new tab
in the new window , click Security Groups
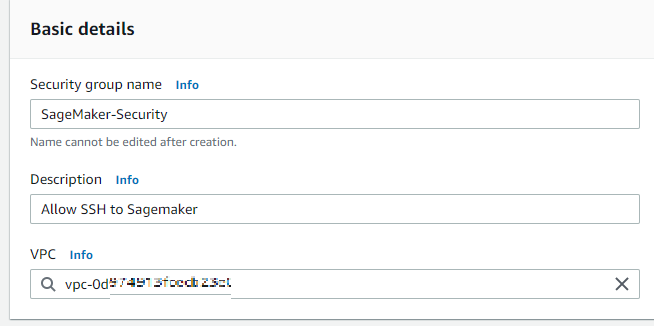
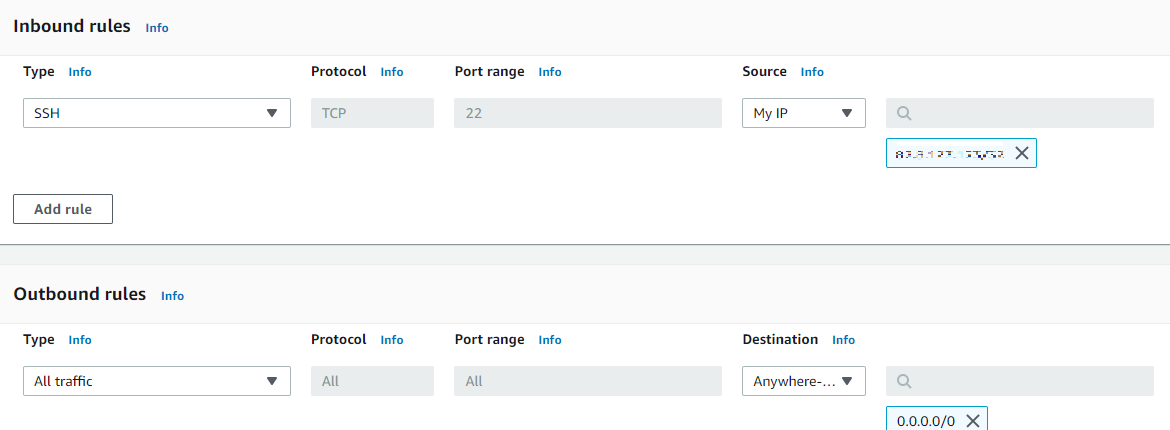
and then Create Security Group. Give it a name, such as SageMaker-Security, and then create an SSH rule to only allow the my IP in the inboud
and outbout Anywhere
once was created we can continue to create a new SageMaker notebook.
Step 3 - Creation of SageMaker Notebook
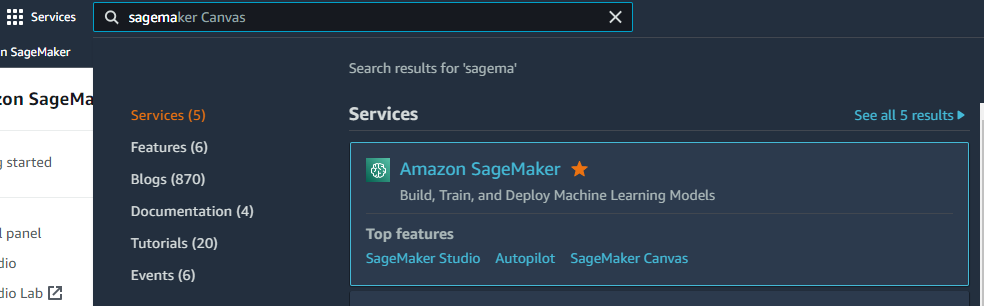
Head to the AWS Console and from there, under All Services, choose SageMaker.
In Sagemaker we will choose the Notebook instances, click create a notebook instance

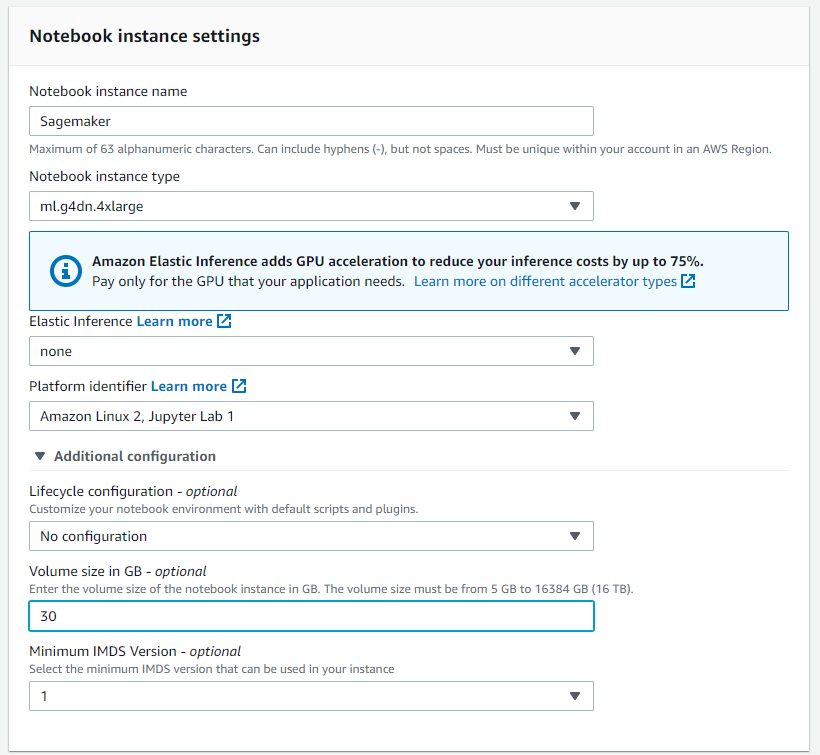
then we name our server as SageMaker . There are a vast of types of AWS Instances, for our GPU consuming
We choose the ml.g4dn.4xlarge instances. You should be careful, choose the appropriate instance, to avoid extra costs!!!
| Accelerated Computing | vCPU | Memory | Price per Hour | GPU Memory (GiB) |
|---|---|---|---|---|
| ml.p3.8xlarge | 32 | 244 GiB | $14.688 | 64 |
| ml.g5.12xlarge | 48 | 192 GiB | $7.09 | 96 |
| ml.g4dn.8xlarge | 32 | 128 GiB | $2.72 | 16 |
| ml.g4dn.4xlarge | 16 | 64 GiB | $1.505 | 16 |
| ml.g5.xlarge | 4 | 16 GiB | $1.41 | 24 |
| ml.g4dn.xlarge | 4 | 16 GiB | $0.7364 | 16 |
In particular this instance ml.g4dn.xlarge , during the writing time, you will pay $1.505 per Hour so be sure to delete your Instance after you finish!!!.
In the Notebook instance settings, we name the instance as Sagemaker and Notebook Instance ml.g4dn.xlarge we need to add an extra Volume Size of the instance, for this project we choose 30gb.
To save the conda environments after your SageMaker machine stops.
In AWS console, go to SageMaker -> Lifecycle configurations
Create a new lifecycle configuration. If your machines already use some lifecycle configuration, just open that one.
Under Scripts section make sure “Start notebook” tab is opened
Paste this code at the end
#!/usr/bin/env bash
set -e
# set up persisted conda environments
curl https://raw.githubusercontent.com/ruslanmv/Save-conda-environments-on-Sagemaker/master/start.sh | bash
then click Create configuration.
In the Network section, we choose our Default VPC and we choose the first subnet that you can see then, in the Security Group
we create create one with the In SSH and port 7860. If you are planning to use Gradio, 5000 for Flask etc… And you can choose the input my IP address.
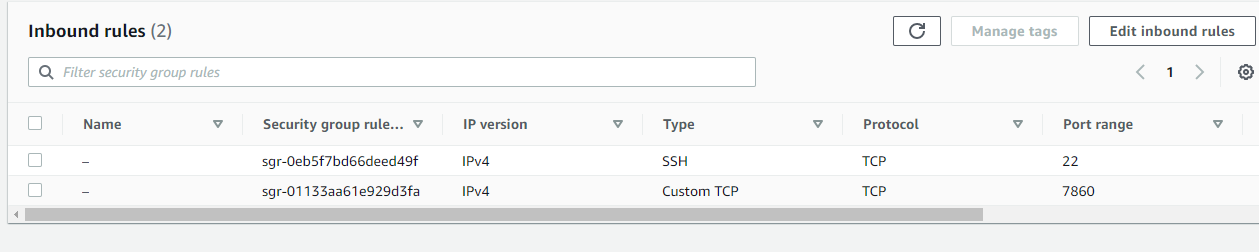
we select SageMaker-Security
and finally create the notebook instance and we wait until the Status changes from Pending to InService.

Step 4- Setup SageMaker Notebook
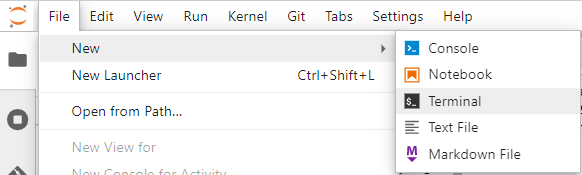
Click Open Jupyter Lab and click File > New>Terminal
To install the Python packages in the correct Conda environment, first activate the environment before running pip install or conda install from the terminal.
source activate python3
and there you can type
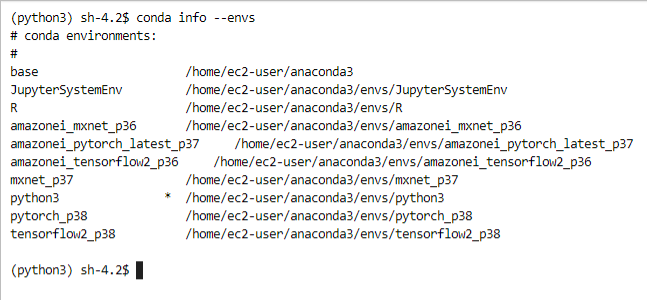
conda info --envs
as you see , in SageMaker you have different environments ready to work,
For example, if we want to create a project where the name is VideoMessage, we type
conda create --name YourKernel python=3.7.13
To activate any conda environment, run the following command in the terminal.
conda activate YourKernel
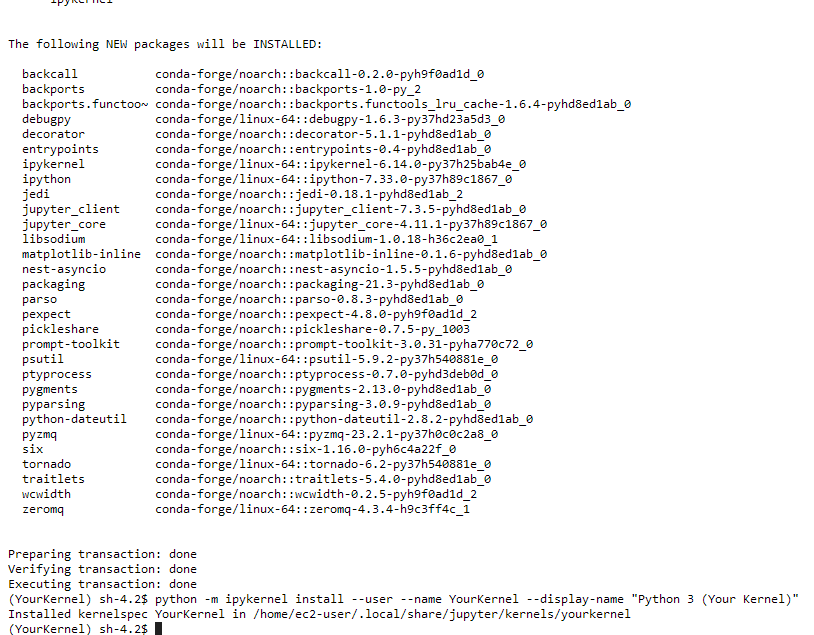
To use your new conda environments with notebooks, make sure the ipykernel package is installed in the environment.
conda install ipykernel -y
After you have created the environment, you can select it as the kernel for your notebook.
python -m ipykernel install --user --name YourKernel --display-name "Python 3 (Your Kernel)"
Step 5 - Hello World project
First enter to SageMaker folder
cd SageMaker
then
git clone https://github.com/ruslanmv/How-to-run-WebApp-SageMaker-Notebook.git
cd How-to-run-WebApp-on-SageMaker-Notebook
cd Sagemaker
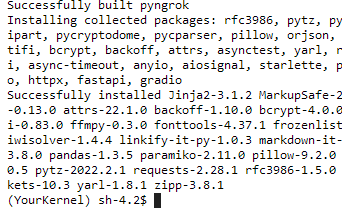
in addition we need we need install pyngrok to get the reverse proxy and gradio to test the environment
pip install -r requirements.txt
after all the requirements well installed.
Step 6 - Setup Pyngrok
Then select data.json, open with editor
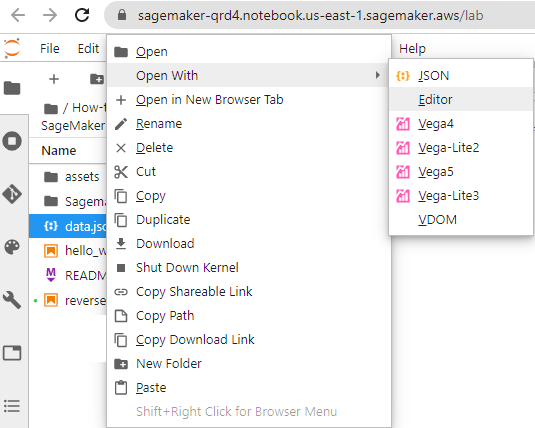
and paste your token between the “ “ and save with ctrl+s
{
    "token": "2DwxLpbhkJVZ2UdJ2Ls0p8tlxTB_6oshozHRwcgL3Z2KtUz11"
}
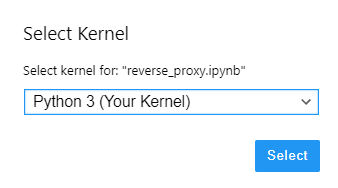
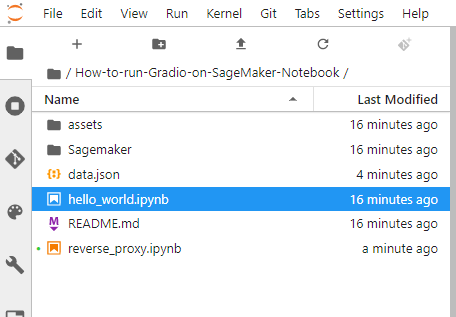
Let us open a the reverse_proxy.ipynb notebook
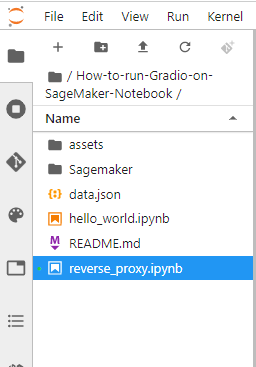
be sure that you are using the kernel Python 3 (Your Kernel)
then for the notetbook reverse_proxy run the fill cell
#Setup of your token for first time
import sys, IPython
from pyngrok import ngrok
import json
# Opening JSON file
f = open('data.json')
# returns JSON object as
# a dictionary
data = json.load(f)
#print(data)
YOUR_TOKEN=data['token']
ngrok.set_auth_token(YOUR_TOKEN)
IPython.Application.instance().kernel.do_shutdown(True)
if you see
{'status': 'ok', 'restart': True}
means that was done well the authentication, then run the next cells
# If is installed the token you can use this code
import sys, IPython
from pyngrok import ngrok
from IPython.core.display import display, HTML
# Open a HTTP tunnel on port 7860
# <NgrokTunnel: "http://<public_sub>.ngrok.io" -> "http://localhost:7860">
http_tunnel = ngrok.connect(7860, bind_tls=True)
http_url = http_tunnel.public_url
display(HTML(f'<b><a target="blank" href="{http_url}">Load test: {http_url}</a></b>'))
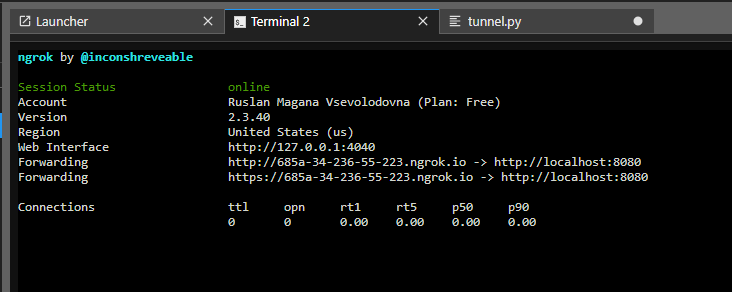
You will have something similar like:
Load test: https://e870-34-236-55-223.ngrok.io
# Open a SSH tunnel
# <NgrokTunnel: "tcp://0.tcp.ngrok.io:12345" -> "localhost:22">
ssh_tunnel = ngrok.connect(22, "tcp")
display(HTML(f'<b><a target="blank" href="{ssh_tunnel}">SSH test: {ssh_tunnel}</a></b>'))
You will have something similar like:
“localhost:22”“>SSH test: NgrokTunnel: “tcp://8.tcp.ngrok.io:15159” -> “localhost:22”
you can see your status
tunnels = ngrok.get_tunnels()
print(tunnels)
and the output is
[<NgrokTunnel: "tcp://8.tcp.ngrok.io:15159" -> "localhost:22">, <NgrokTunnel: "https://e870-34-236-55-223.ngrok.io" -> "http://localhost:7860">]
Now we are ready to test our enviroment.
Step 7- Testing Environment
Open the hello_world.ipynb , verify that you are in the kernel Python 3 (Your Kernell)
and run the first cell
import gradio as gr
def test():
    def greet(name):
      return "Hello " + name + "!"
    iface = gr.Interface(fn=greet, inputs="text", outputs="text")
    iface.launch(server_port=7860)
then
test()
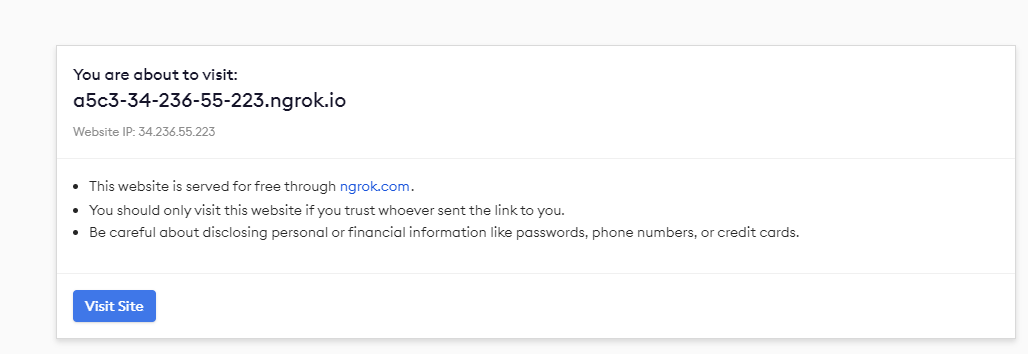
After is running this return back to your reverse_proxy notebook and click the link
Load test: https://e870-34-236-55-223.ngrok.io
then click Visit Site
and type your name for example,
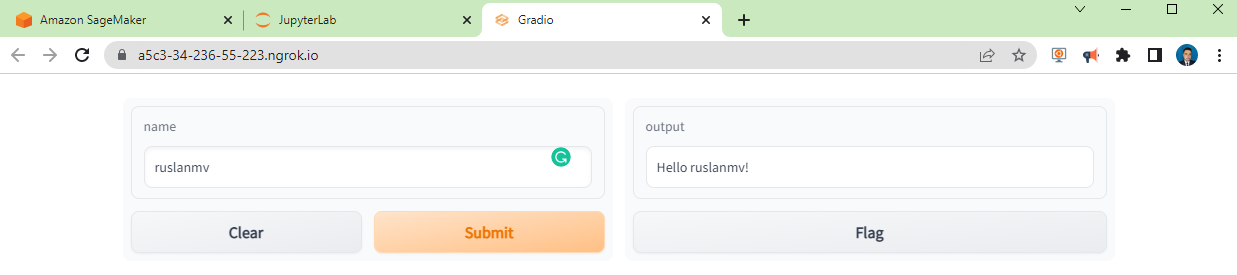 Don’t worry if If Chrome says: Deceptive site ahead Attackers … dont worry. You click visit this site.
Alternative way to avoid this type of issues you can select another method to log into SageMaker, like in previous blog How to connect to Sagemaker via SSH.
If your you pass the test, then you can return to hello_world.ipynb and close Gradio running the following cell
msg = 'Would you like stop gradio server?'
shall = input("%s (y/N) " % msg).lower() == 'y'
if shall == True:
    print(" Shutting down gradio server.")
    gr.close_all()
by pressing y
Would you like stop gradio server? (y/N)  y
 Shutting down gradio server.
Closing server running on port: 7860
For complementary you can use also the terminal to use ngrok, but we wont use for this project (dont run now)
ngrok authtoken YOUR_TOKEN_HERE
and
ngrok http 8089
when you click ctrl+c, the server is stopped.
Step 8 - Environments in SageMaker
In ordering to be familiar in SageMaker Notebook, we need to be familiar with the differents enviroments that there are.
In SageMaker Notebook we have loaded our custom python enviroment
import sys ,os
print(sys.prefix)
and the output
/home/ec2-user/anaconda3/envs/YourKernel
However if we want to install new modules to our environment by using our terminal we have to be careful, because Sagemaker runs on their own container, then in the terminal of Sagemaker we have to load property the environment that we have created
Sagemaker = True
if Sagemaker :
    env='source activate python3 && conda activate VideoMessage &&'
else:
    env=''
then we can create a new hello.py
!echo -e 'import sys , os\nprint(sys.prefix)\nprint("Hello World!")\n'> hello.py
and check it
cat hello.py
with output
import sys , os
print(sys.prefix)
print("Hello World!")
For example if we run the hello world without loading we get
os.system('python hello.py')
you get
/home/ec2-user/anaconda3/envs/JupyterSystemEnv
Hello World!
As you see in Sagemaker the enviroment is different as we wanted
os.system('source activate python3 && python hello.py')
the output is
/home/ec2-user/anaconda3/envs/python3
Hello World!
defining you base enviroment
base='source activate python3 &&'
So we need to call with our custom enviroment
os.system('{}python hello.py'.format(env))
you get
/home/ec2-user/anaconda3/envs/VideoMessage
Hello World!
Moreover avoid mixing environments like
os.system('conda activate VideoMessage && python hello.py')
you get
CommandNotFoundError: Your shell has not been properly configured to use 'conda activate'.
To initialize your shell, run
    $ conda init <SHELL_NAME>
Currently supported shells are:
  - bash
  - fish
  - tcsh
  - xonsh
  - zsh
  - powershell
See 'conda init --help' for more information and options.
IMPORTANT: You may need to close and restart your shell after running 'conda init'.
In conclusion, try to be always in your enviroment and avoid use the base kernell.
Catch os.system exceptions with Python
If you are interested to catch errors from your system you can do this trick. Let us assume you have a simple program in python that has errors
#error.py
print("I am on the Terminal")
# We create intentional error
print(Not_defined)
and you want to know if something went wrong.
import os
is_command_ok = os.system("python error.py")
if is_command_ok >0:
    print("Error")
else:
    print("OK")
Then you can identiffy the errors
I am on the Terminal
Error
Traceback (most recent call last):
  File "error.py", line 3, in <module>
    print(Not_defined)
NameError: name 'Not_defined' is not defined
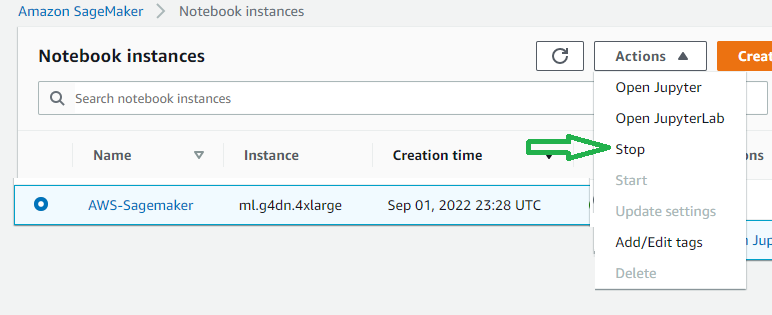
Step 9 - Stop your instance and delete.
and then delete
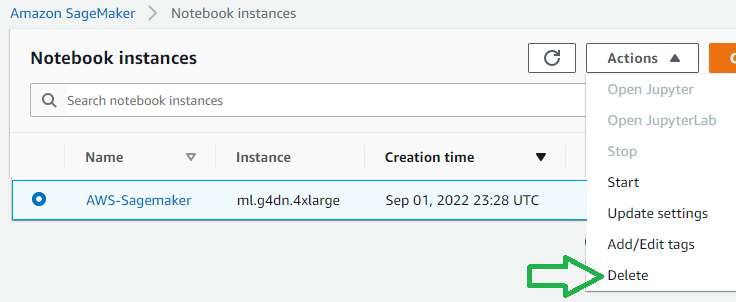
Congratulations! We have built a simple infrastructure in the cloud needed to create our amazing projects with SageMaker.
Leave a comment