
How to setup an Kubernetes cluster on Windows with Docker with Spark
We are going to setup an experimental Kubernetes cluster using Kubernetes in Docker in Windows with Apache Spark. We will create an Apache Spark client POD within that cluster to submit jobs. Then,will use the spark-submit command to create a job running inside this Kubernetes cluster on experimental windows 10 environment.

Kubernetes is a container orchestrator which allows to schedule millions of “docker” containers on huge compute clusters containing thousands of compute nodes. Originally invented and open-sourced by Google, Kubernetes became the de-facto standard for cloud-native application development and deployment.
Install Docker client on Windows Subsystem for Linux
Ubuntu in Windows
The first step is install the bash in windows 10, you can follow previous instructions written here.
https://ruslanmv.com/blog/Python3-in-Windows-with-Ubuntu
Installation of Docker
We should install the docker CE in windows from here
https://hub.docker.com/editions/community/docker-ce-desktop-windows
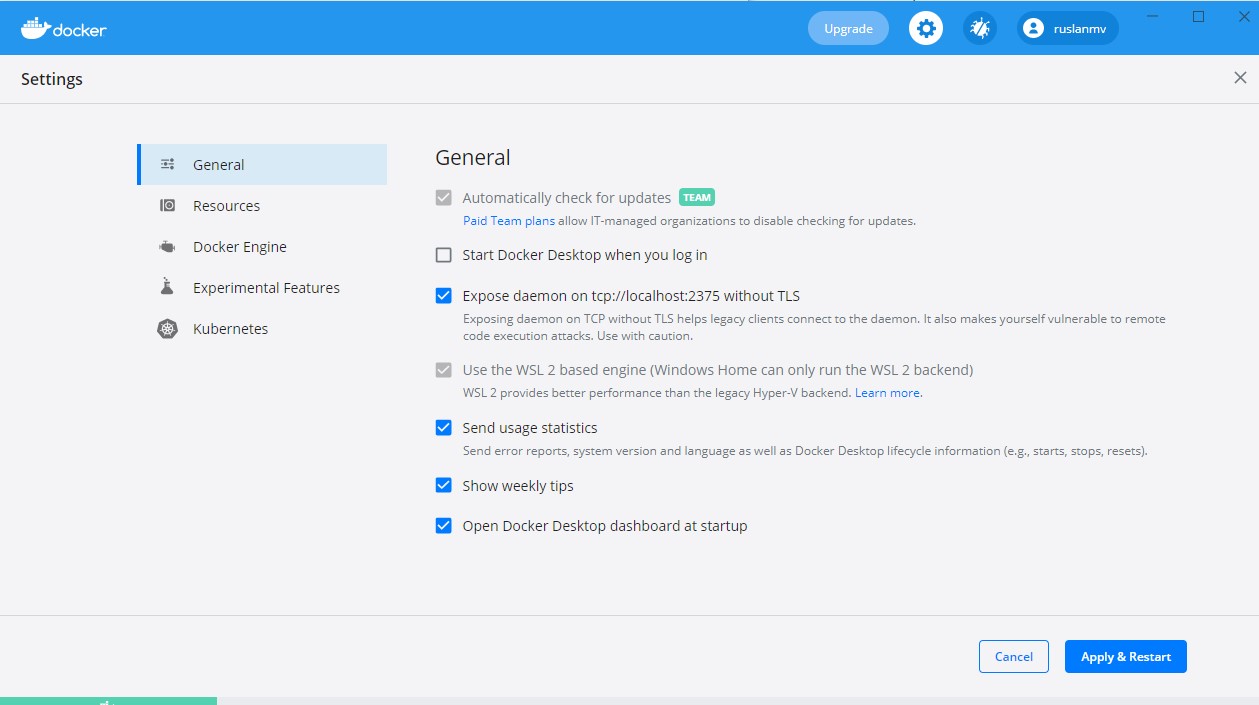
After having installed docker on windows we make sure you expose the daemon on Windows, otherwise it won’t work.
Having Ubuntu and Docker in windows you enter to the bash in your terminal
Bash.exe
Before you install Docker Engine in the Ubuntu for the first time on a new host machine, you need to set up the Docker repository. Afterward, you can install and update Docker from the repository.
Update the apt package index and install packages to allow apt to use a repository over HTTPS:
$ sudo apt-get update

$ sudo apt-get install \
    apt-transport-https \
    ca-certificates \
    curl \
    gnupg \
    lsb-release
Add Docker’s official GPG key:
$ curl -fsSL https://download.docker.com/linux/ubuntu/gpg | sudo gpg --dearmor -o /usr/share/keyrings/docker-archive-keyring.gpg
Use the following command to set up the stable repository. To add the nightly or test repository, add the word nightly or test (or both) after the word stable in the commands below. Learn about nightly and test channels.
$ echo \
  "deb [arch=amd64 signed-by=/usr/share/keyrings/docker-archive-keyring.gpg] https://download.docker.com/linux/ubuntu \
  $(lsb_release -cs) stable" | sudo tee /etc/apt/sources.list.d/docker.list > /dev/null
Install Docker Engine
Update the apt package index, and install the latest version of Docker Engine and containerd, or go to the next step to install a specific version:
sudo apt-get update
Install packages to allow apt to use a repository over HTTPS:
sudo apt-get install apt-transport-https ca-certificates curl software-properties-common
Add Docker’s official GPG key:
curl -fsSL https://download.docker.com/linux/ubuntu/gpg | sudo apt-key add -
Verify that you now have the key with the fingerprint 9DC8 5822 9FC7 DD38 854A E2D8 8D81 803C 0EBF CD88, by searching for the last 8 characters of the fingerprint.
sudo apt-key fingerprint 0EBFCD88
Use the following command to set up the stable repository. You always need the stable repository, even if you want to install builds from the edge or test repositories as well. To add the edge or test repository, add the word edge or test (or both) after the word stable in the commands below.
sudo add-apt-repository "deb [arch=amd64] https://download.docker.com/linux/ubuntu $(lsb_release -cs) stable"
Now we’re ready to install Docker Community Edition
Update the apt package index again
$ sudo apt-get update
And install Docker CE
sudo apt-get install docker-ce
When that finishes, you’ll end up having everything installed in Linux, but as I mentioned before, the Docker Engine does not run in WSL so if you write any command like docker images, you’ll see a message like this one:
Cannot connect to the Docker daemon at unix:///var/run/docker.sock. Is the docker daemon running?
No, it is not running and it’ll never be, at least for now.
You need to tell the Docker client where the Docker host is, and you can do that by using the -H option as follows:
docker -H localhost:2375 images
If you don’t want to type the host every time, you can set up and environment variable called DOCKER_HOST to localhost:2375
export DOCKER_HOST=localhost:2375
Now just running docker images will show the images in your host environment.
Restart the bash console and the DOCKER_HOST variable should be there, just type docker images to check everything is there.
First, check if the Docker engine is running:
sudo service docker status
If the Docker engine isn’t working, start it with the following command:
sudo service docker start
Verify that Docker Engine is installed correctly by running the hello-world image.
$ sudo docker run hello-world
This command downloads a test image and runs it in a container. When the container runs, it prints a message and exits.
Docker Engine is installed and running. The docker group is created but no users are added to it. You need to use sudo to run Docker commands.
Install KIND - Kubernetes in Docker
An easy way to install and run a Kubernetes cluster inside a single docker container
Please enter the following commands in the terminal:
Get the latest code:
git clone https://github.com/ruslanmv/Spark-with-Kubernetes.git
Change the directory to the downloaded code:
cd Spark-with-Kubernetes
Change into the “Kubernetes in Docker” installation folder:
cd kind
Install the “Kubernetes in Docker” install tool (kind):
./install_kind.sh
We can install the KIND Kubernetes Cluster running on top of Docker:
./create_kind_cluster.sh
or Install the Kubernet
Download the latest Kubernetes release with the command:
curl -LO "https://storage.googleapis.com/kubernetes-release/release/$(curl -s https://storage.googleapis.com/kubernetes-release/release/stable.txt)/bin/linux/amd64/kubectl"
Make the kubectl binary executable:
chmod +x ./kubectl
Move the binary in to your PATH:
sudo mv ./kubectl /usr/local/bin/kubectl
Test to ensure the version you installed is up-to-date:
kubectl cluster-info
kubectl version
Deploy the Apache Spark Kubernetes Pod
Create a Kubernetes Pod - a set of containers running inside Kubernetes. Here, containing Apache Spark which we use to submit jobs against Kubernetes
Entering the following commands in the terminal:
Install the Apache Spark POD:
kubectl apply -f ../spark/pod_spark.yaml
Make sure that we can interact the the Kubernetes Cluster form inside a POD:
kubectl apply -f rbac.yaml
Now it is time to check the status of the Pod. Just enter the following command:
kubectl get po
If you see the following output it means that the Pod is not yet available and you need to wait a bit.
NAME   READY   STATUS              RESTARTS   AGE
spark  0/2     ContainerCreating   0          29s
Just issue the command again after some time:
kubectl get po
After a while you should see an output like this:
NAME  READY   STATUS    RESTARTS   AGE
spark 2/2     Running   0          10m
In case you see the following status you need to delete the pod and start over again later as this usually happens when the image registry is unreliable or offline.
NAME   READY   STATUS              RESTARTS   AGE
spark  0/2     ImagePullBackOff    0          29s
Just in this case please delete the pod:
kubectl delete po spark
Then start over:
kubectl apply -f ../spark/pod_spark.yaml
Again, regularly check status:
kubectl get po
Note that this Pod is called spark and contains two containers (2/2) of which are both in status Running. Please also note that Kubernetes automatically RESTARTS failed pods - this hasn’t happened here so far. Most probably because the AGE of this pod is only 10 minutes.
Submit Apache Spark jobs to Kubernetes
Now it is time to enter the spark container of this Pod. The command exec is told to provide interactive access (-it) to the container called spark (-c). With – we execute a shell (/bin/bash).
kubectl exec -it spark -c spark -- /bin/bash
You’ve now entered container spark in Pod spark inside Kubernetes. This container we will use to submit Spark applications to the Kubernetes cluster. This container is based on an image with the Apache Spark distribution and the kubectl command pre-installed.
If you are interested you can have a look at the Dockerfile to understand what’s really inside.
You can also check out the pod.yaml. You’ll notice that it contains two containers. One is Apache Spark, another one is providing a Kubernetes Proxy - a so called side car container - allowing to interact with the Kubernetes cluster from inside a Pod.
Inside the container you can use the spark-submit command which makes use of the new native Kubernetes scheduler that has been added to Spark recently.
The following command submits the SparkPi sample application to the cluster. SparkPi computes Pi and the more iterations you run, the more precise it gets:
./bin/spark-submit \
--master k8s://http://127.0.0.1:8001 \
--deploy-mode cluster \
--name spark-pi \
--class org.apache.spark.examples.SparkPi \
--conf spark.executor.instances=1 \
--conf spark.kubernetes.container.image=romeokienzler/spark-py:3.1.2 \
--conf spark.kubernetes.executor.limit.cores=1 \
local:///opt/spark/examples/jars/spark-examples_2.12-3.1.2.jar \
10
You should see output like below, please ignore the WARNINGS. Unless you don’t see ERRORS all is fine:
Understanding the spark-submit command
So let’s have a look what’s going on here:
- ./bin/spark-submit is the command to submit applications to a Apache Spark cluster
- –master k8s://http://127.0.0.1:8001 is the address of the Kubernetes API server - the way kubectl but also the Apache Spark native Kubernetes scheduler interacts with the Kubernetes cluster
- –name spark-pi provides a name for the job and the subsequent Pods created by the Apache Spark native Kubernetes scheduler are prefixed with that name
- –class org.apache.spark.examples.SparkPi provides the canonical name for the Spark application to run (Java package and class name)
- –conf spark.executor.instances=1 tells the Apache Spark native Kubernetes scheduler how many Pods it has to create to parallelize the application. Note that on this single node development Kubernetes cluster increasing this number doesn’t make any sense (besides adding overhead for parallelization)
- –conf spark.kubernetes.container.image=romeokienzler/spark-py:3.1.2 tells the Apache Spark native Kubernetes scheduler which container image it should use for creating the driver and executor Pods. This image can be custom build using the provided Dockerfiles in kubernetes/dockerfiles/spark/ and bin/docker-image-tool.sh in the Apache Spark distribution
- –conf spark.kubernetes.executor.limit.cores=1 tells the Apache Spark native Kubernetes scheduler to set the CPU core limit to only use one core per executor Pod
- local:///opt/spark/examples/jars/spark-examples_2.12-3.1.2.jar indicates the jar file the application is contained in. Note that the local:// prefix addresses a path within the container images provided by the spark.kubernetes.container.image option. Since we’re using a jar provided by the Apache Spark distribution this is not a problem, otherwise the spark.kubernetes.file.upload.path option has to be set and an appropriate storage subsystem has to be configured, as described in the documentation
- 10 tells the application to run for 10 iterations, then output the computed value of Pi
Please see the documentation for a full list of available parameters.
Monitor the Spark application in a parallel terminal
Once this command runs you can open a second terminal window within Theia and issue the following command:
kubectl get po
This will show you the additional Pods being created by the Apache Spark native Kubernetes scheduler - one driver and at least one executor (with an exception if there is only one executor, it runs within the driver Pod).
To check the job’s elapsed time just execute (you need to replace the Pod name of course with the one on your system):
Please make sure you run the following code in the newly created terminal window which allows you to execute commands within the Spark driver running in a POD.
kubectl logs spark-pi-b2969b7bf8c34bb7-driver |grep "Job 0 finished:"
You should get something like:
Job 0 finished: reduce at SparkPi.scala:38, took 8.446024 s
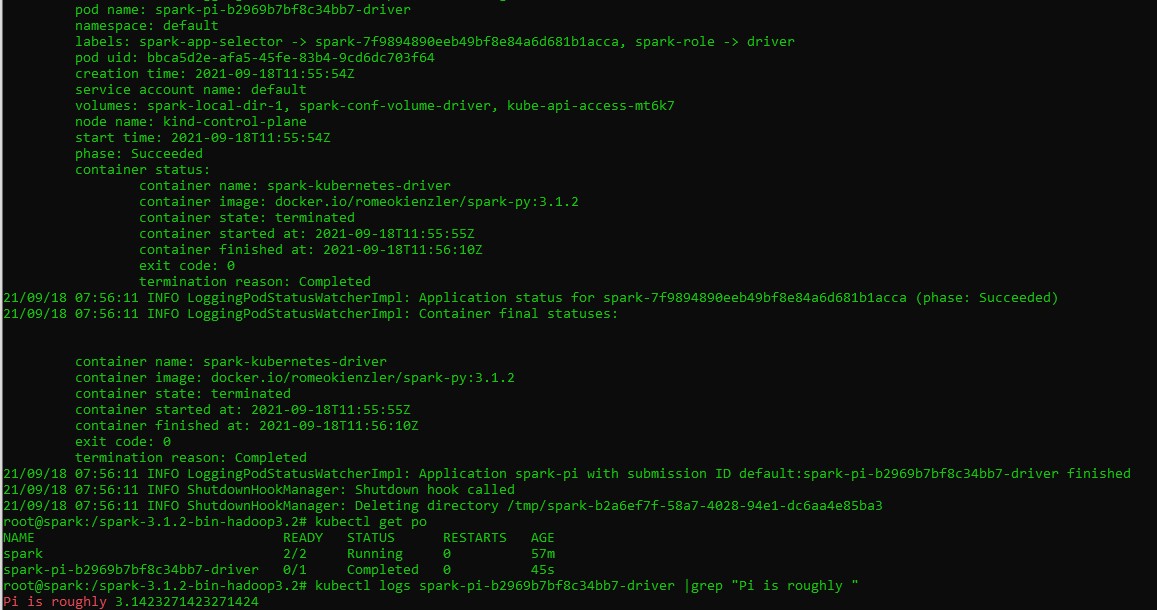
If you are interested in knowing what value for Pi the application came up with just issue:
kubectl logs spark-pi-b2969b7bf8c34bb7-driver |grep "Pi is roughly "
And you’ll see something like:
Pi is roughly 3.1416551416551415
Now you can play around with values for spark.executor.instances, spark.kubernetes.executor.limit.cores=1 (0.1 is also a valid number) and number of iterations and see how it affects runtime and precision of the outcome.
Congratulations!. You are now able to scale your Apache Spark jobs on any Kubernetes cluster running in the cloud or in your data center to thousands of nodes, CPUs and GB of main memory.
Leave a comment